Product
A specific piece of software: nginx, openssl, postgresql, wordpress… This is the usual case. A product can carry a version: only CVEs affecting that version raise alerts.
The stack is the list of vendors and products TechWatchAlert monitors for a project. It decides which CVEs become alerts: a CVE that touches nothing in the stack produces nothing. The more accurate the stack (right names, exact versions), the more accurate the alerts.
The screen is under Monitoring › Stack. It shows the stack of the active project, the one chosen under Active project at the top of the menu; the project name is shown next to the title. With no active project, the page only says “Select a project to see its stack”.
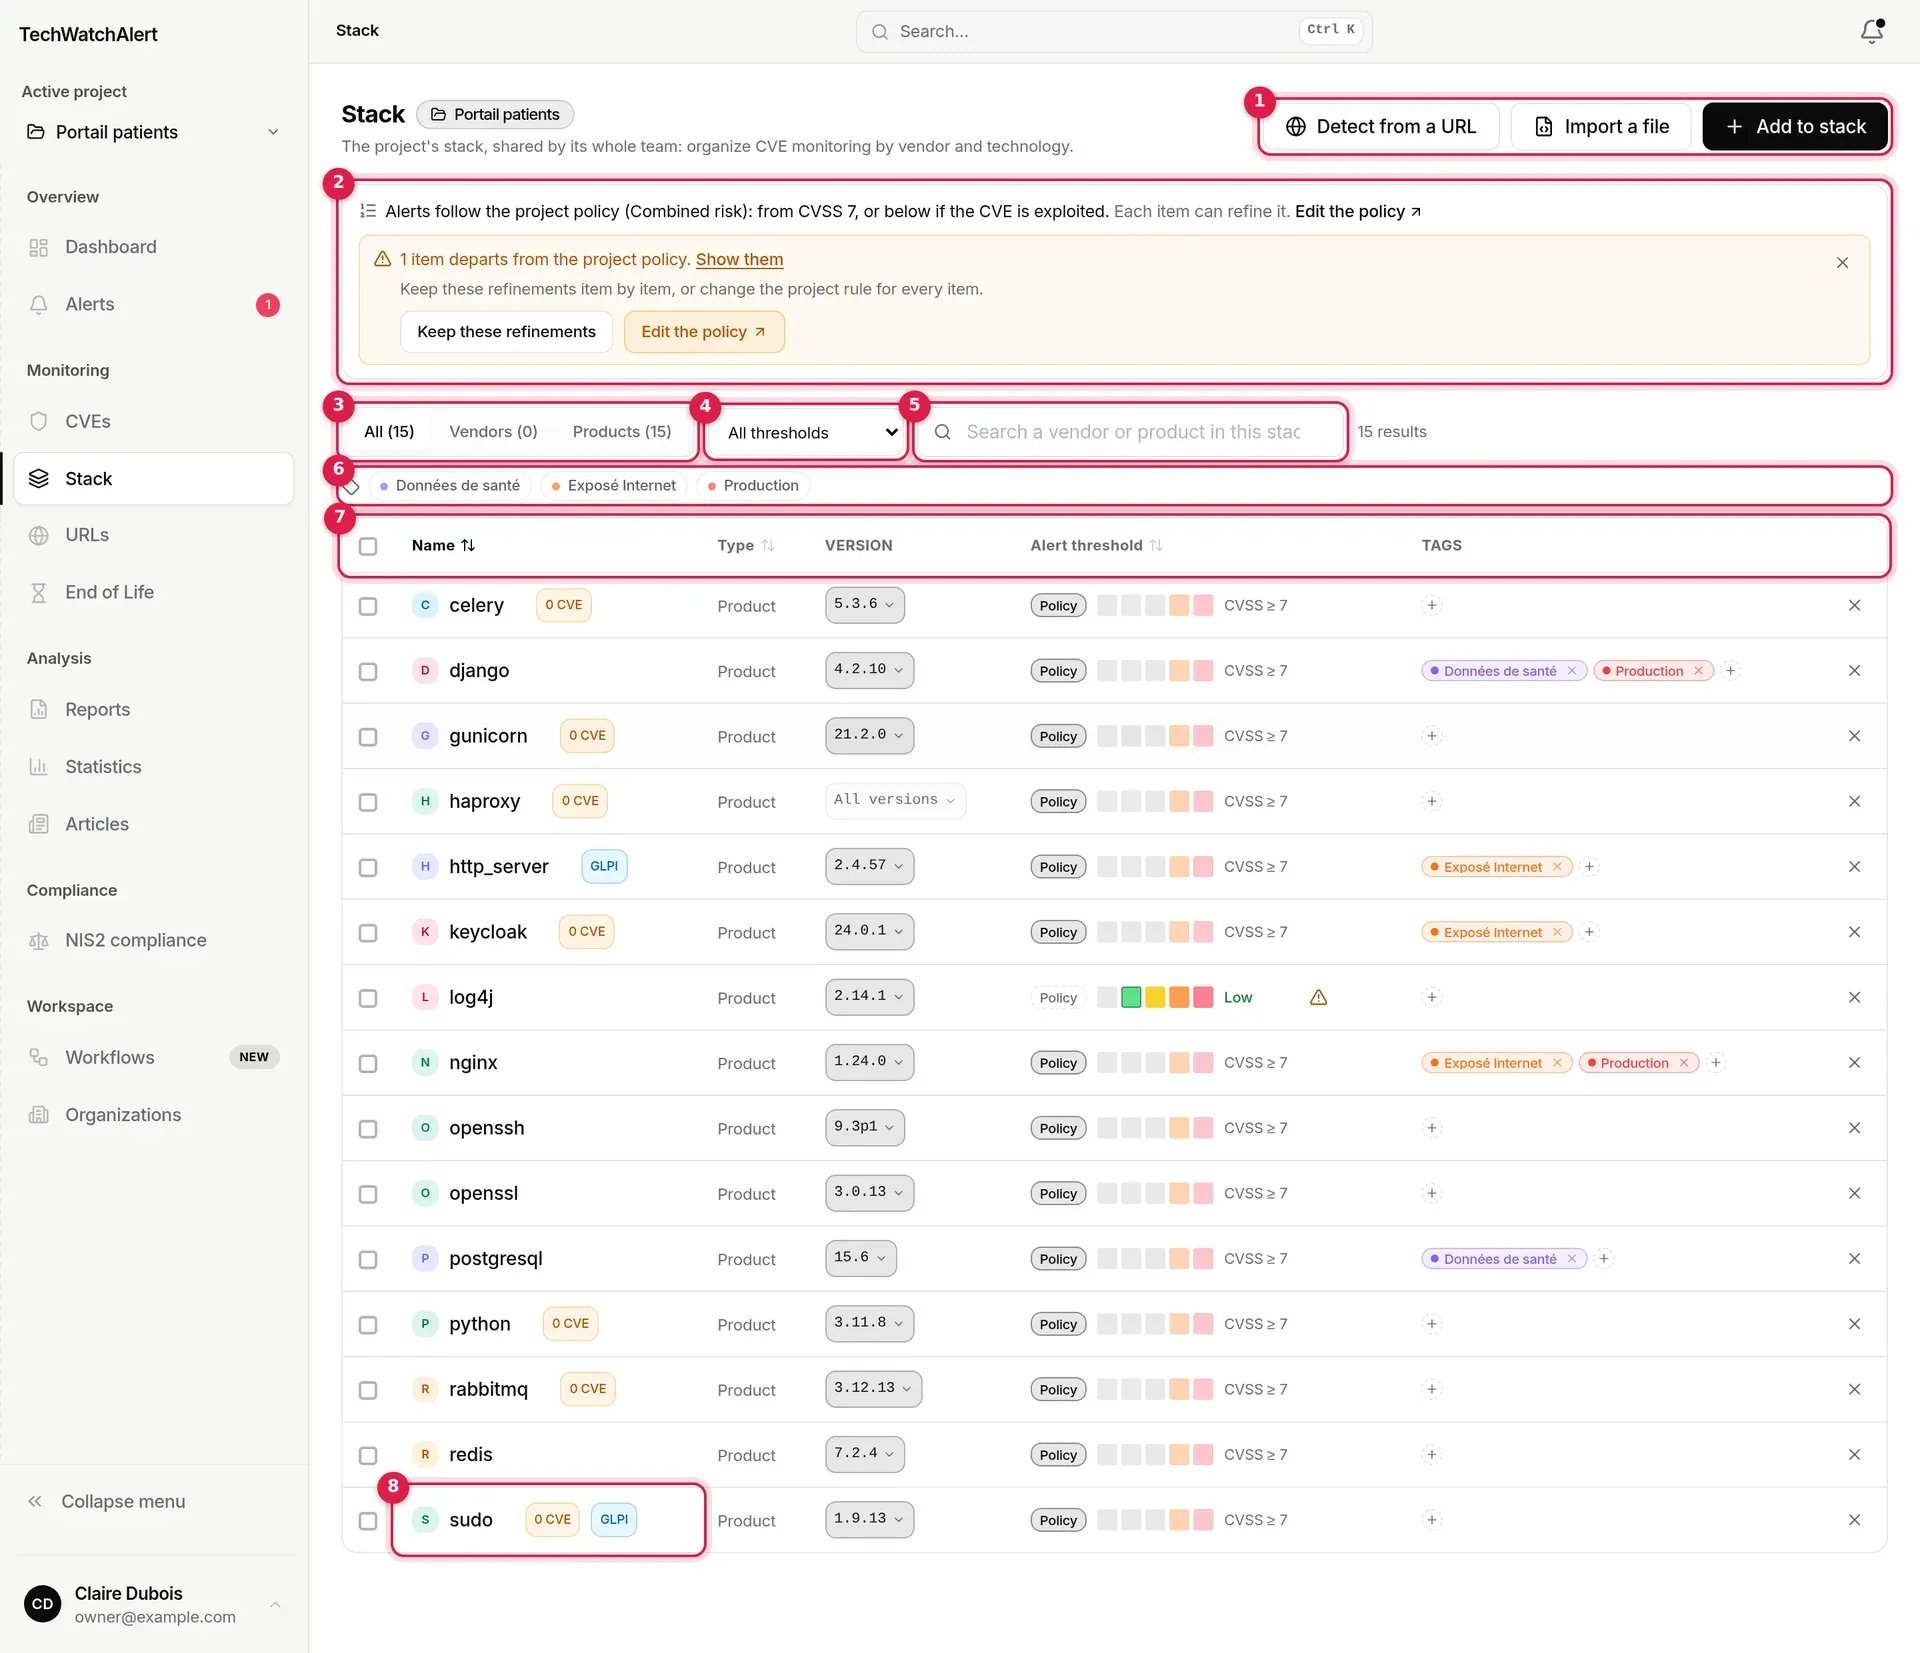
A stack item is one of two types:
Product
A specific piece of software: nginx, openssl, postgresql, wordpress… This is the usual case. A product can carry a version: only CVEs affecting that version raise alerts.
Vendor
A whole vendor: microsoft, apache… Any CVE in one of that vendor’s products may alert. A vendor never carries a version (the column shows “—”). Keep it for vendors whose products you use widely.
Names are those used in CVEs (the NVD CPE vocabulary): http_server for Apache HTTP Server, node.js, linux_kernel… The add search suggests them, so you don’t need to know them by heart.
For a CVE to become an alert, the engine checks, in order:
When several items match the same CVE (say the vendor microsoft and a Microsoft product), only one alert is created for the project, attached to the broadest item (the vendor).
Each row describes one stack item. By default the list is sorted by name, A to Z.
| Column | What it shows |
|---|---|
| Checkbox | Selection for bulk actions (only if you may remove items). The header box Select all ticks the visible items. |
| Name | Logo (or initial), item name and badges. The name links to the CVE database filtered on that product or vendor. |
| Type | Product or Vendor. |
| Version | The monitored version, or All versions. Click it to change it. |
| Alert threshold | The project policy or the item’s own threshold. |
| Criticality | Only when NIS2 is turned on for the project (see Criticality). |
| Tags | The item’s tags, and + to add one. |
| × | Removes the item from the stack. |
The stack shows neither CPEs nor linked alerts: the CPE and vendor brought by an import or URL detection are kept and used for matching, without being displayed; alerts are read in Alerts, where each one says which item raised it.



Filters combine. When nothing matches, the page shows “No results” and a Clear filters button.
Sort by clicking Name, Type or Alert threshold; a second click reverses the order. Sorting by threshold orders items by their effective threshold (their own, otherwise the policy’s), from broadest to strictest; at equal threshold, an inheriting item comes before a refining one.
Add to stack opens a search window. It can add several items at once: you first put them in a To add queue, tune them, then confirm.
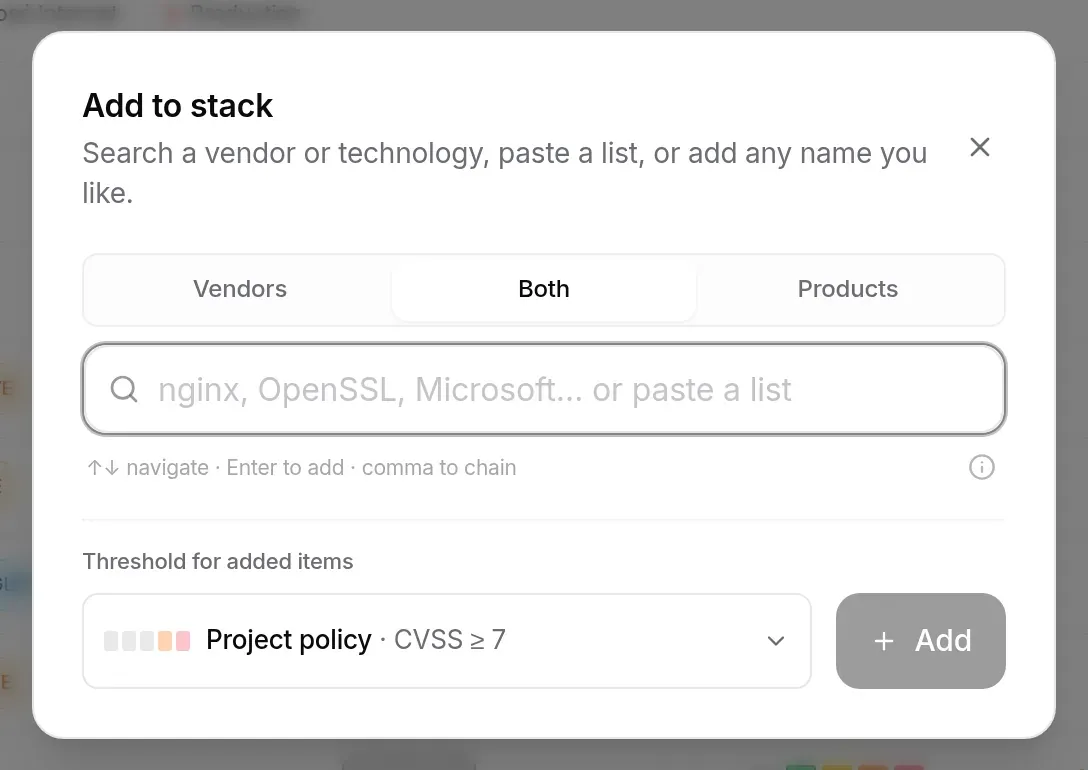
Click Add to stack.
If needed, choose the search scope: Vendors, Both (default) or Products. Narrowing the scope helps when the result list is too long.
Type a name in the field (at least one character). Suggestions appear, grouped into products and vendors; each result shows the vendors that publish it and how many CVEs are already on record (“12 CVEs”, or “0 CVE”). A result already in the stack or already queued is greyed out and marked already added.
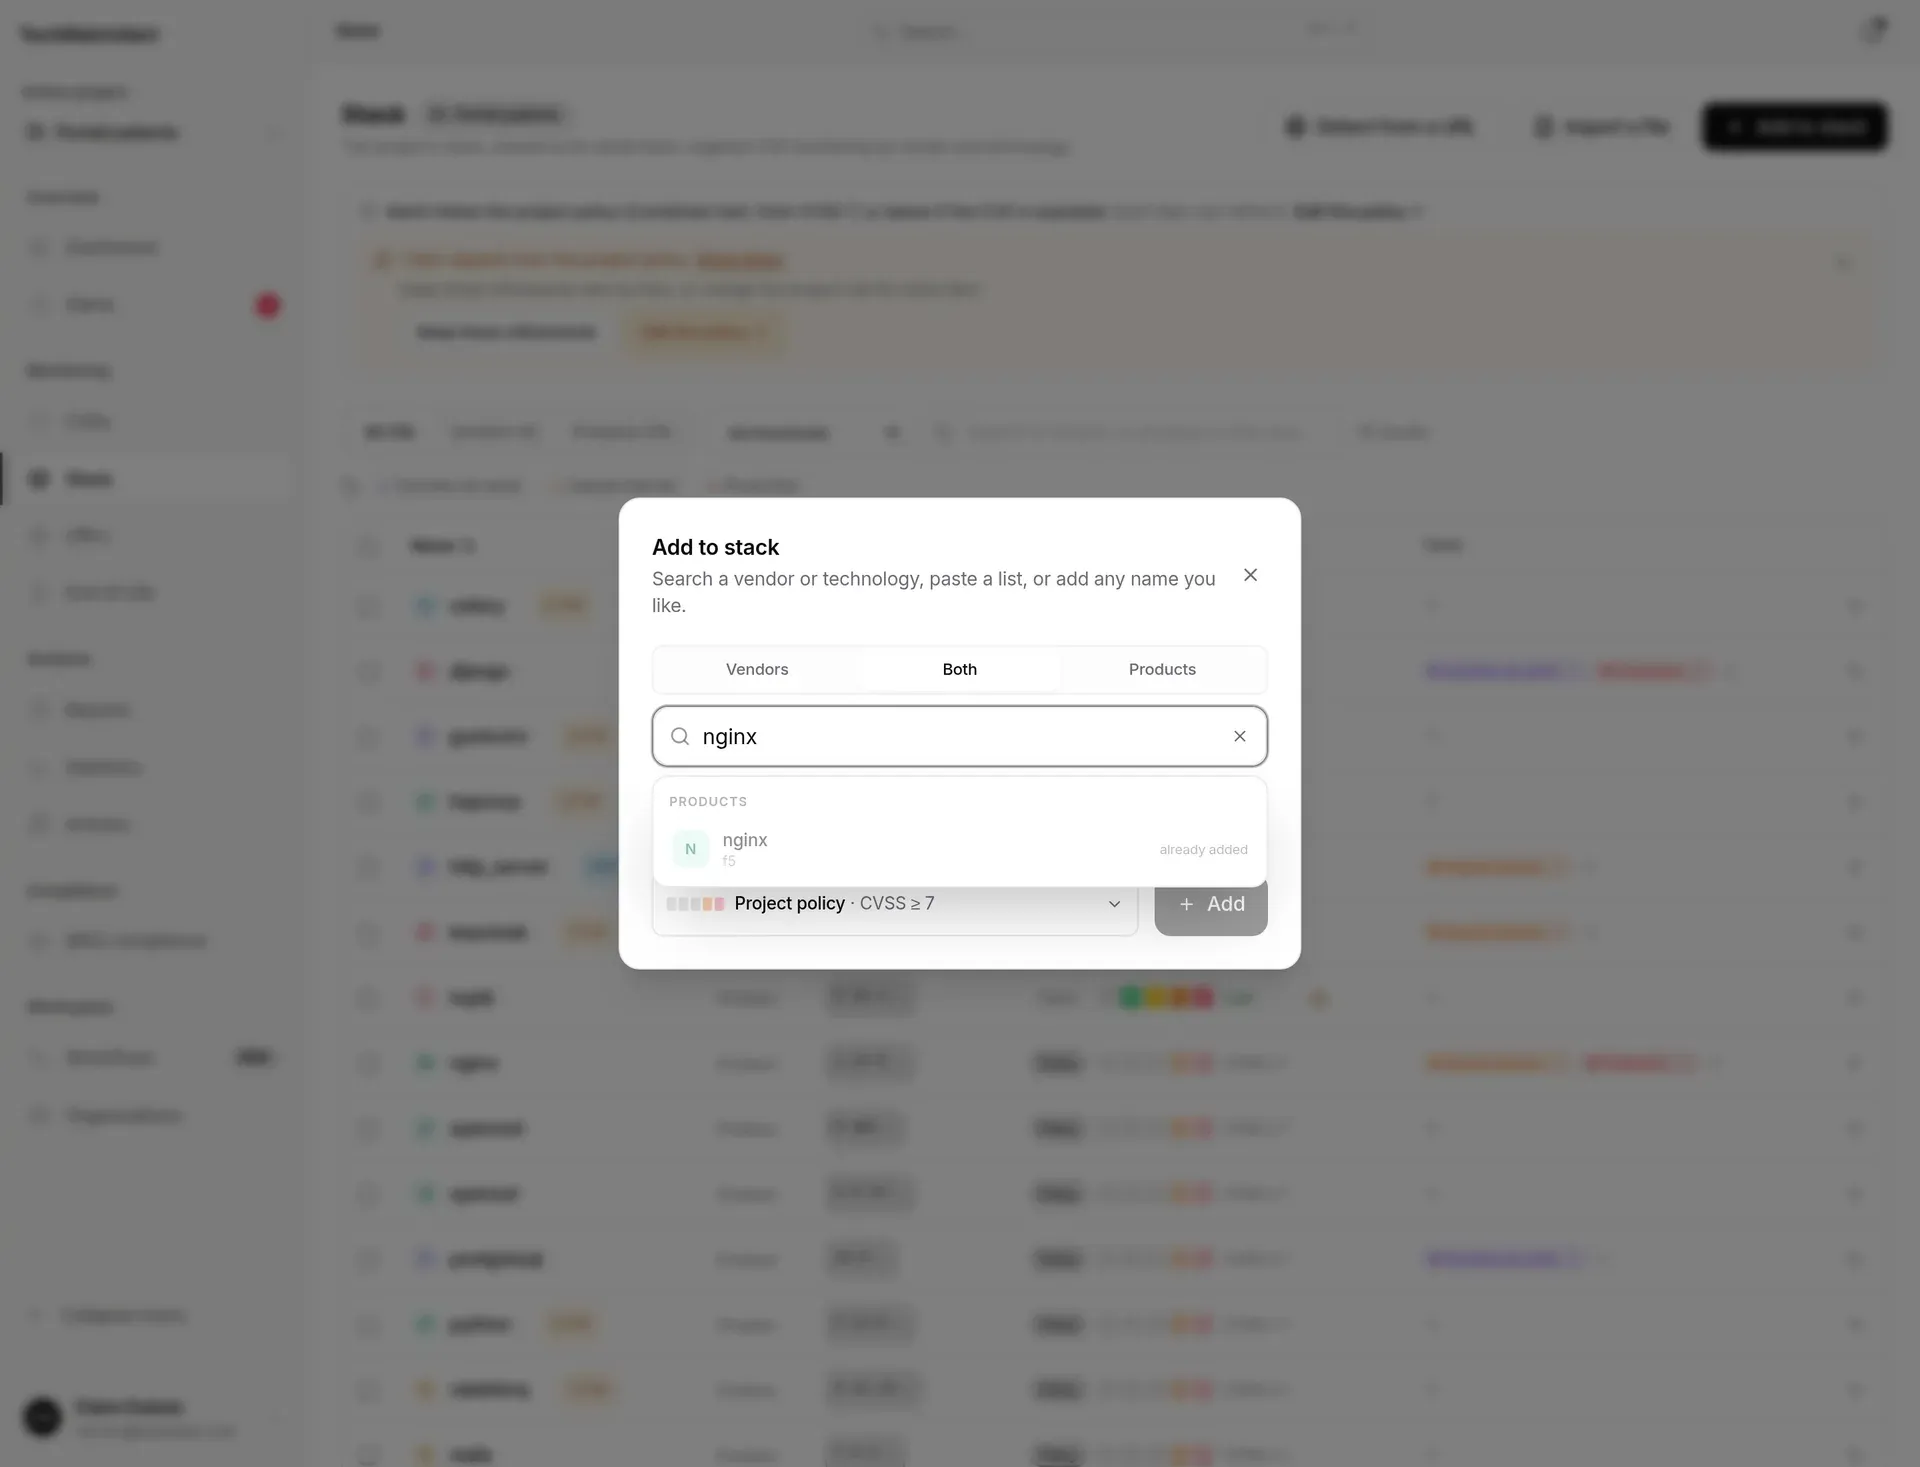
Click a result, or pick it with the arrow keys and Enter. It joins the To add queue and the field clears for the next one.
If the name you are looking for appears in no CVE, the last row offers Add “…” (free text): the only way to monitor a product before its very first CVE.
Tune each queued item: its alert threshold (gauge) and, for a product, its version (see below). The cross removes an item from the queue.
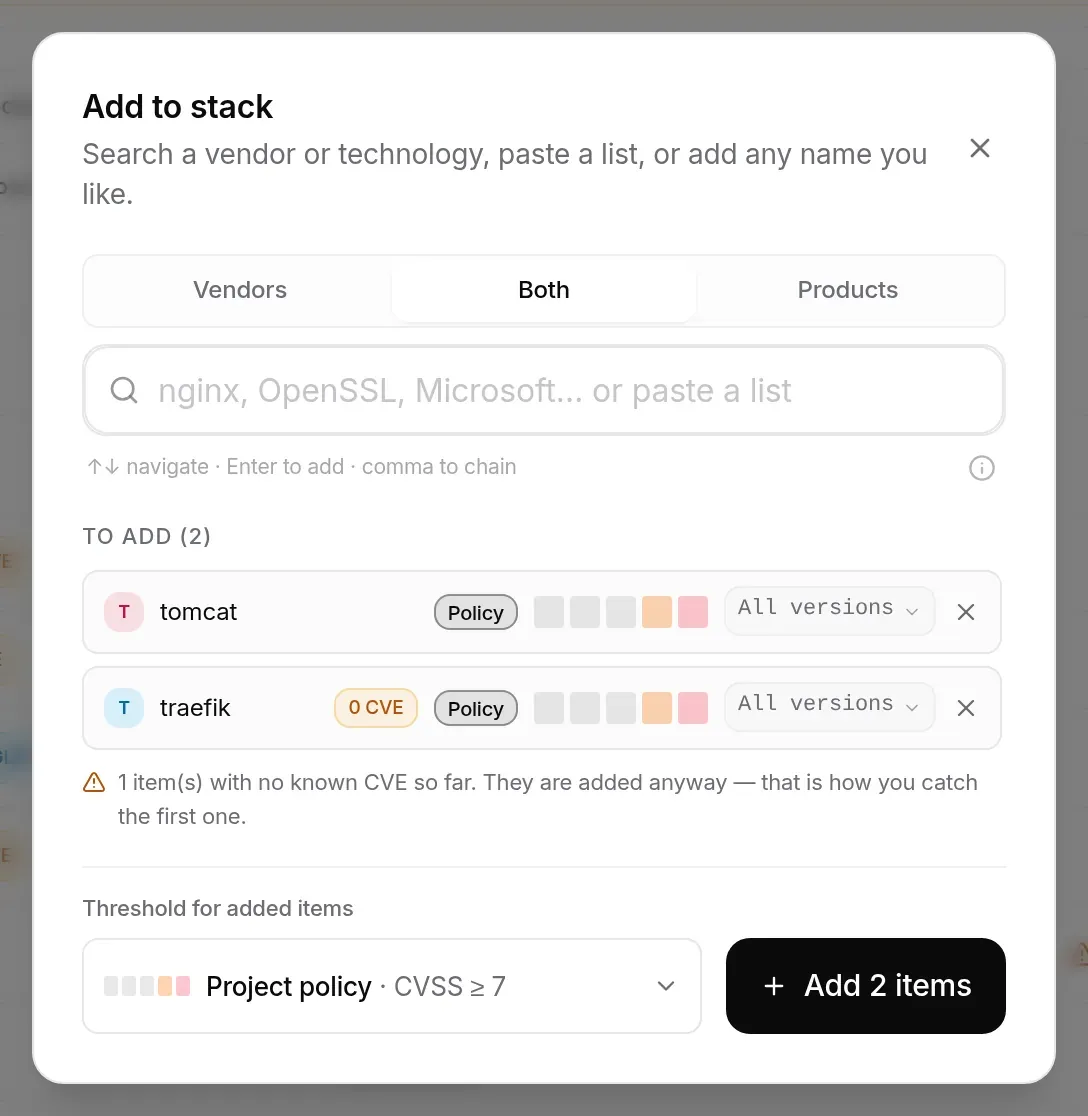
If needed, choose the Threshold for added items: it applies to the whole queue at once (the project policy by default).
Click Add N item(s).
A few shortcuts, recalled by the i to the right of the field (“How it works”):
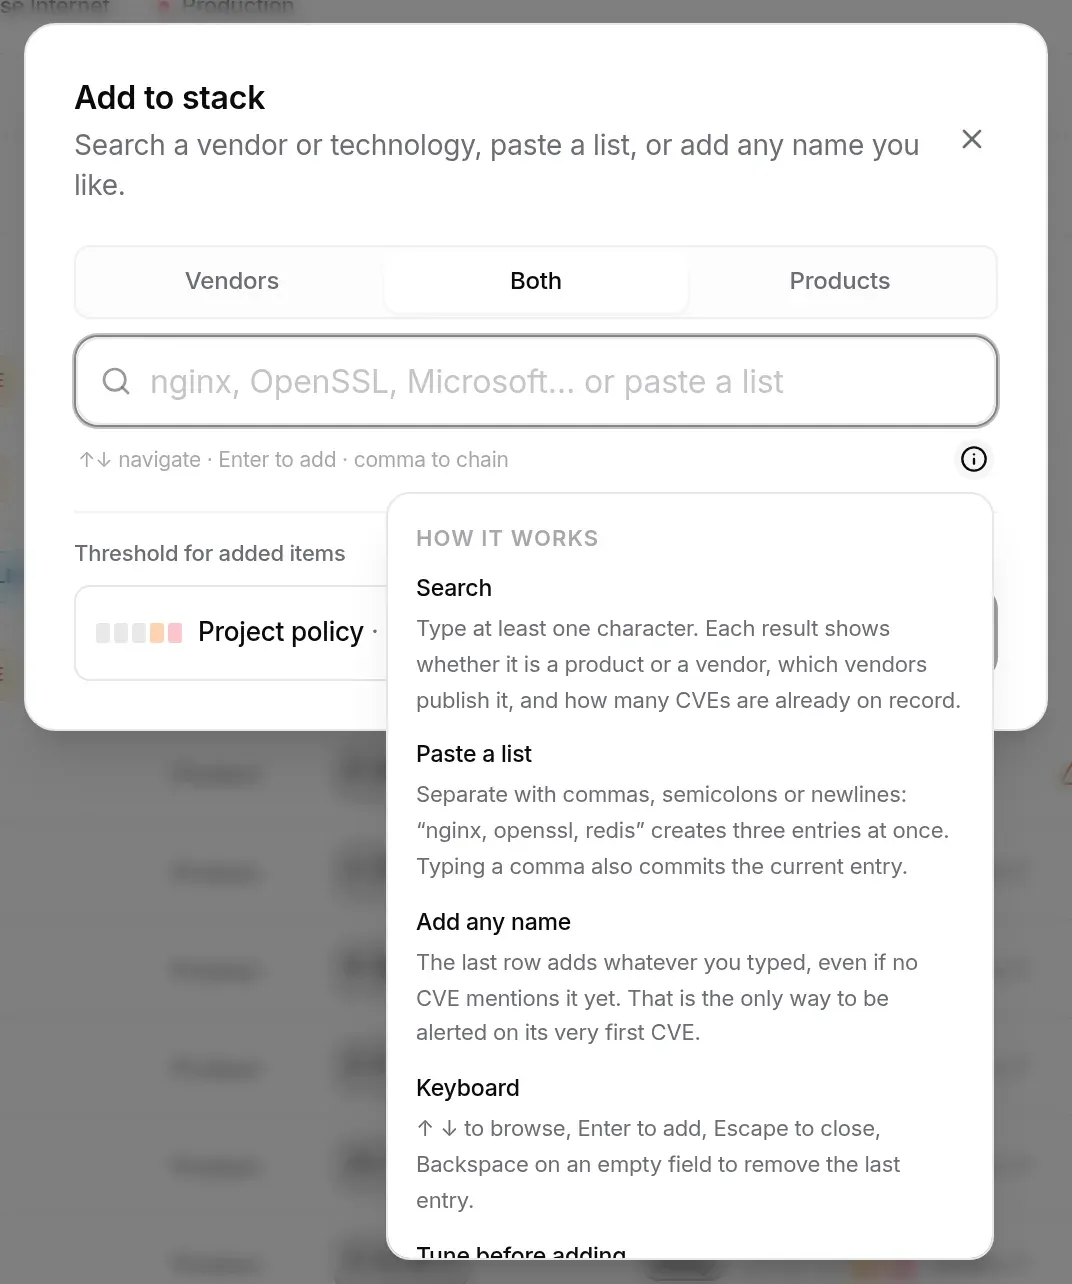
After sending:
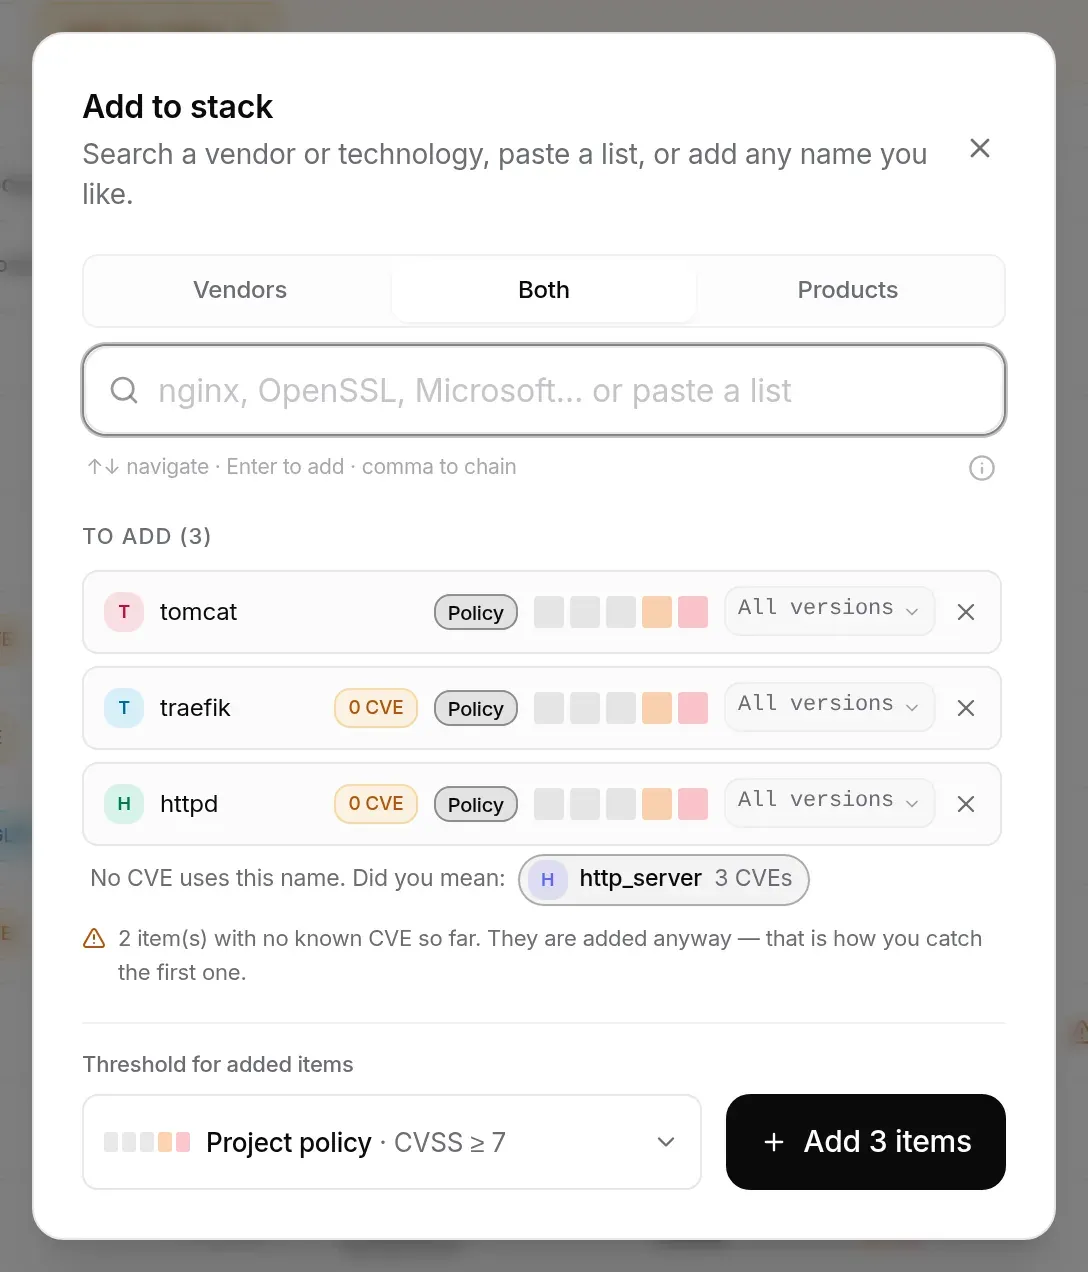
An item with no known CVE is added anyway; the window says so under the queue (“1 item(s) with no known CVE so far. They are added anyway”).
Alerts compare names exactly: “httpd” or “http” in the stack never trigger anything, while Apache’s CVEs use http_server. So when a name appears in no CVE, the queue suggests close names that do, under the item: “No CVE uses this name. Did you mean: http_server (3 CVEs)”. One click replaces the item. Suggestions come from common short names (httpd, sshd, postgres…), close spelling (one missing letter) and CVE names that contain what you typed.
When you add, by hand, products that are in the end-of-life catalogue (PHP, PostgreSQL, HAProxy…), a Track end of life? window opens right after the addition.
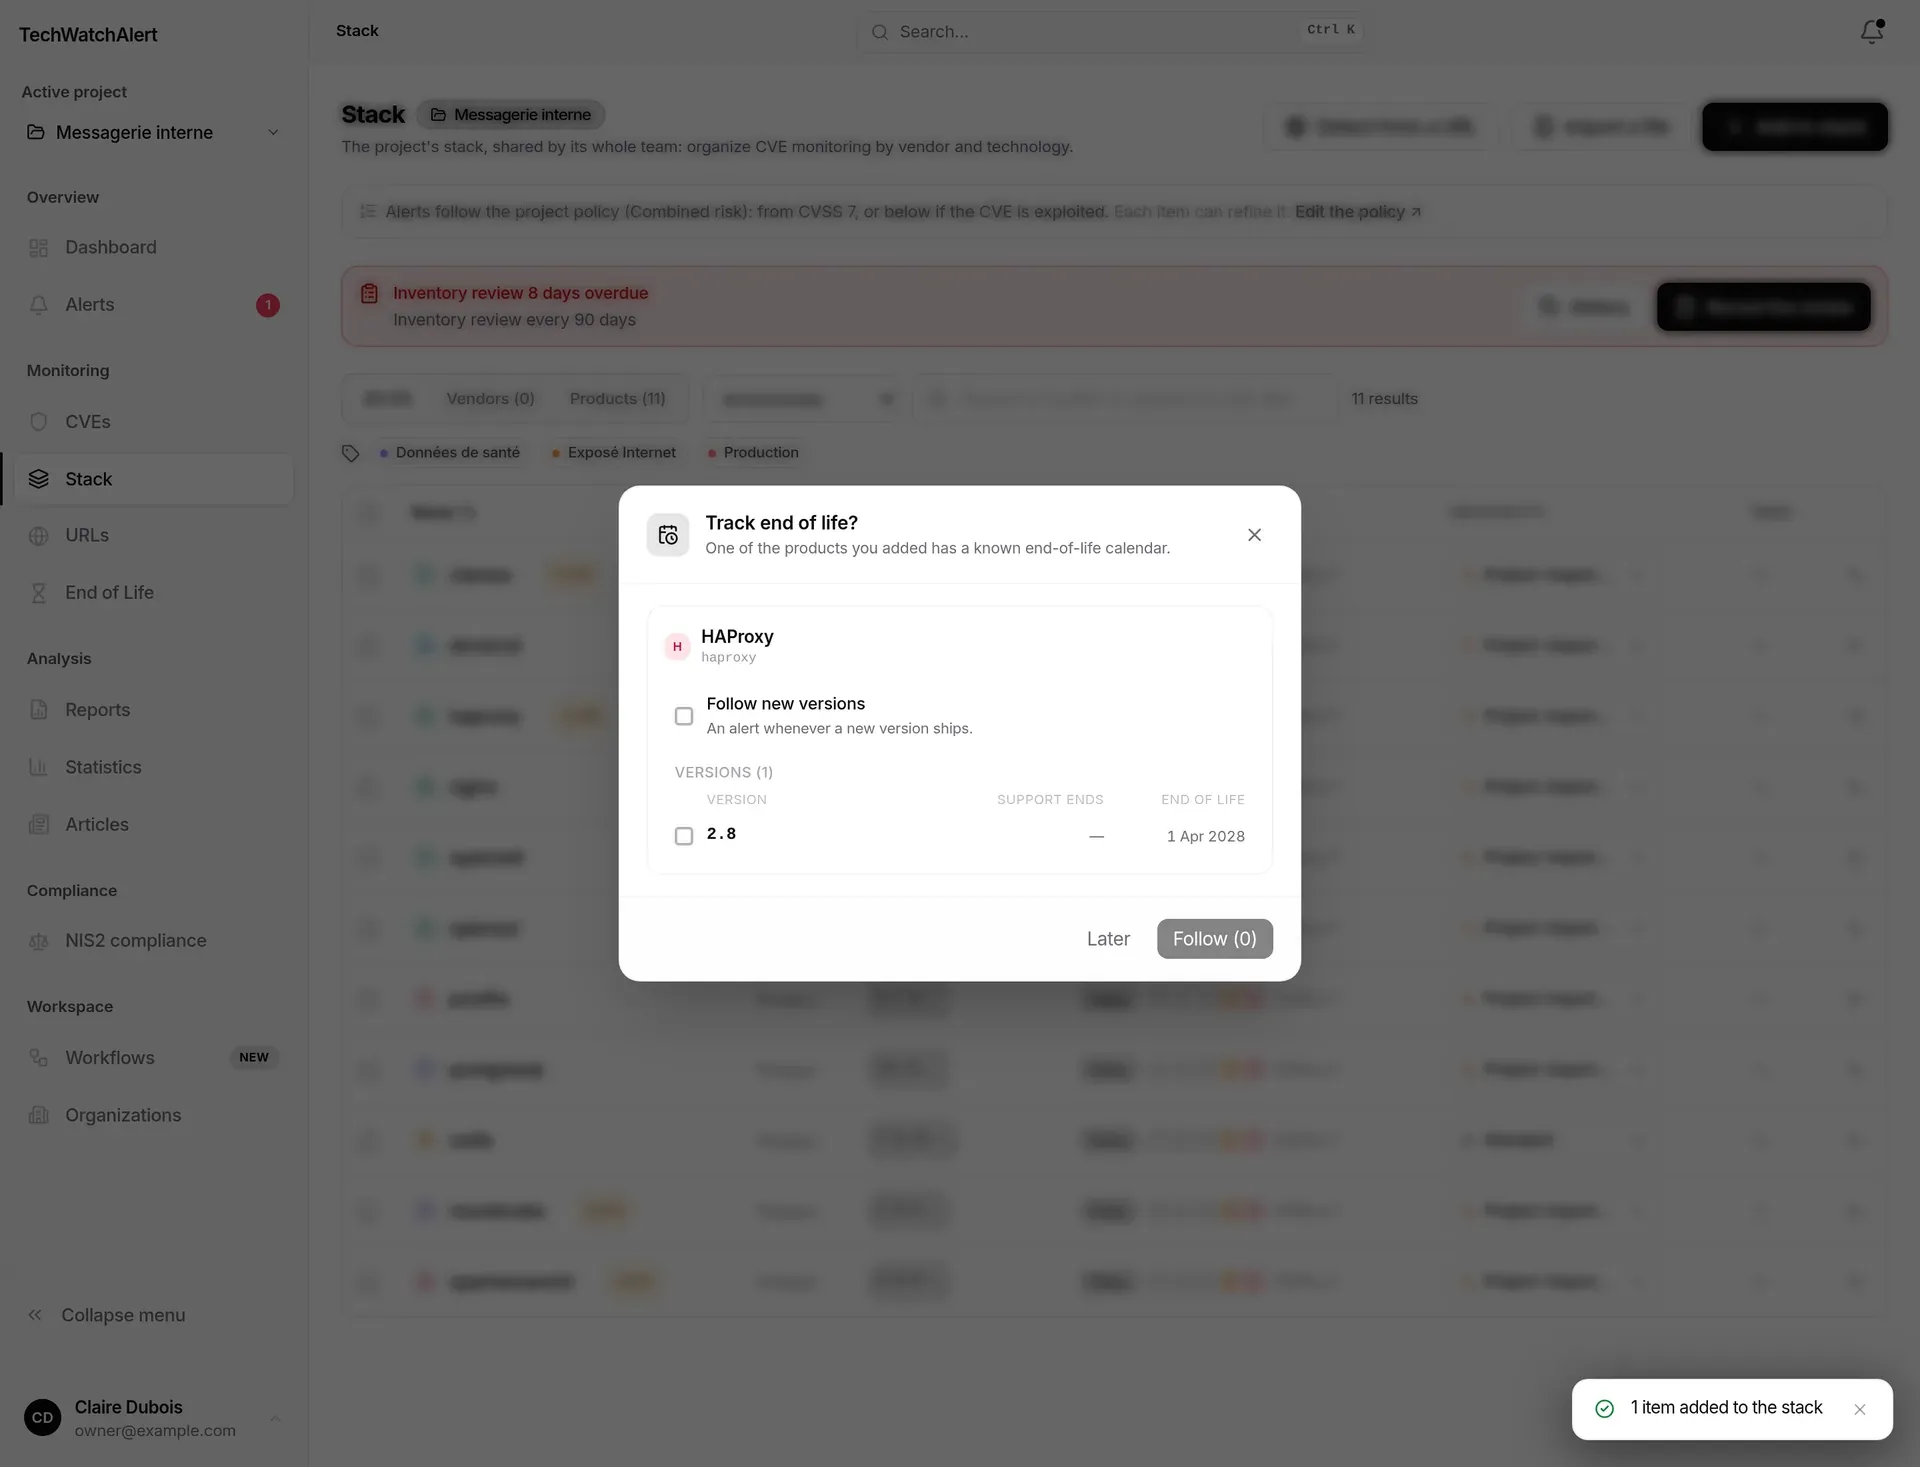
This prompt does not appear for file imports or URL detection. Subscriptions are explained in End of life.
A product with no version monitors every version: any CVE for the product may alert, including ones fixed long ago on your side. With the exact version, only CVEs that really affect it alert. It is the setting that removes the most noise.
To choose or change a version, click the pill in the Version column (or in the add queue):
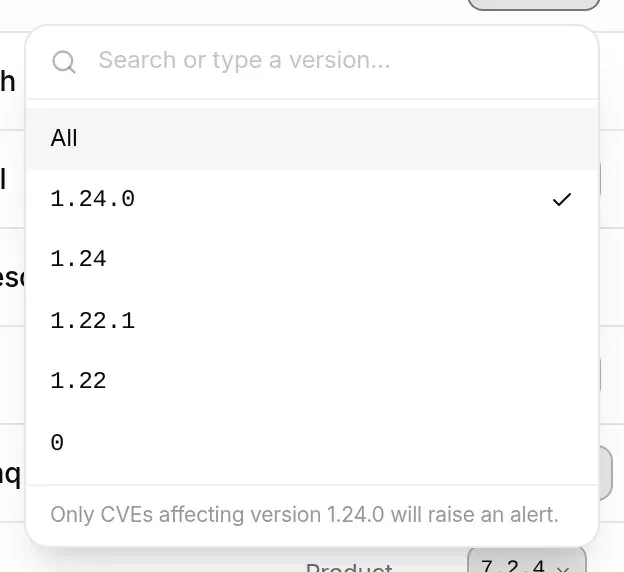
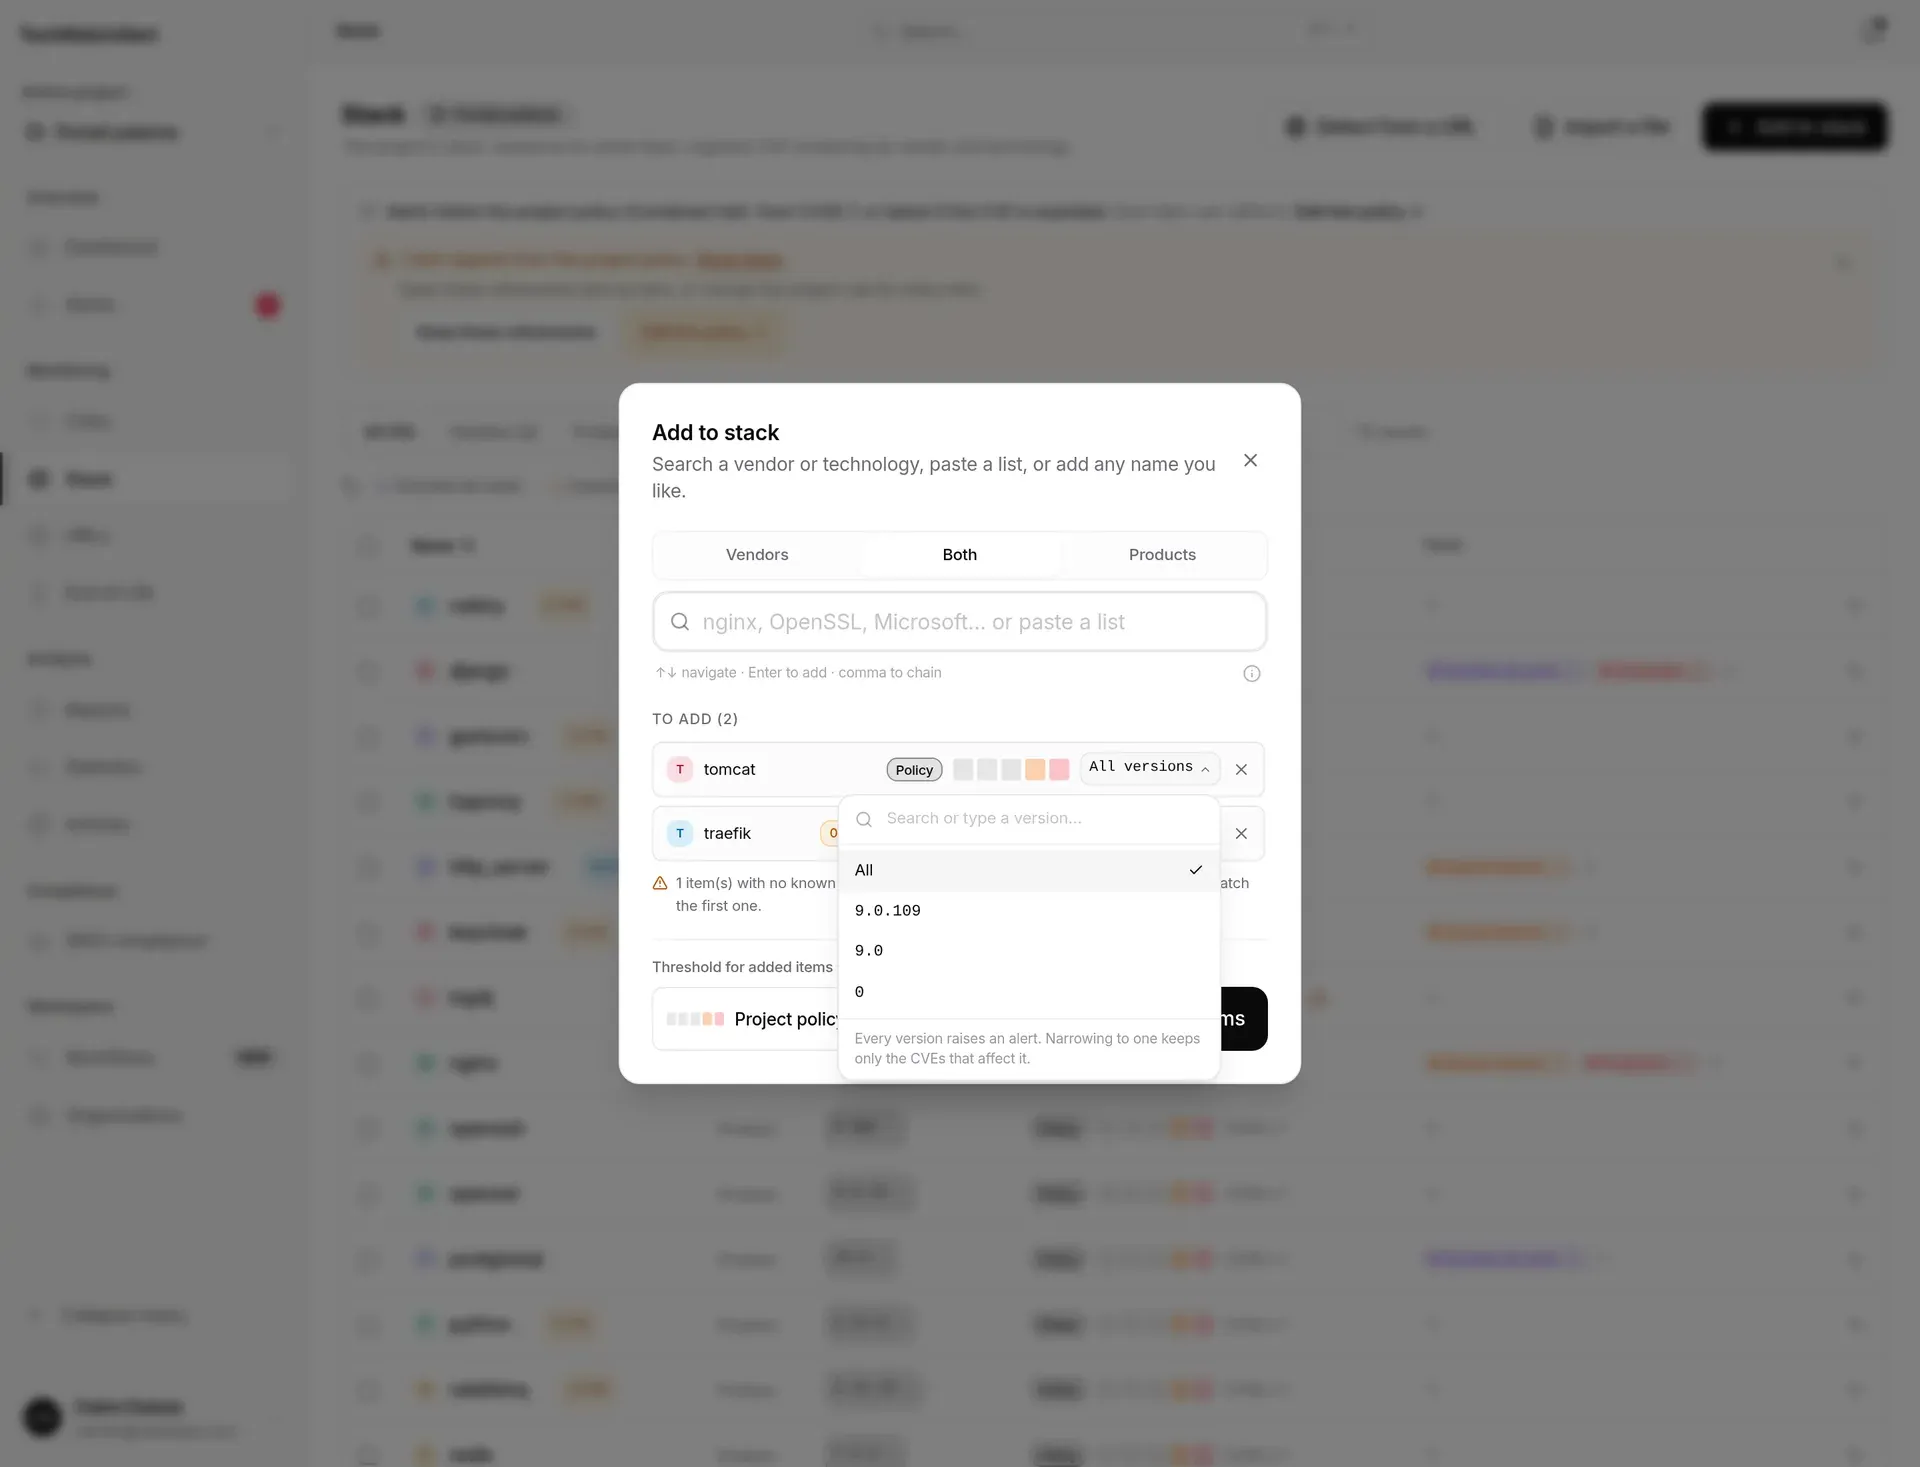
The version also drives end-of-life tracking: it links a product to its cycle (“3.0.13” belongs to cycle “3.0”). A product with no version cannot be assessed.
What raises an alert is decided first by the project’s prioritisation policy (project settings, Alerts page; see Projects). The banner at the top of the page sums it up, for example: “Alerts follow the project policy (Combined risk): from CVSS 7, or below if the CVE is exploited.” The Edit the policy link opens that setting; without the right to configure the project, it reads View the policy and opens it read-only.

Each item can refine the threshold in the Alert threshold column:
The item’s threshold only replaces the policy’s minimum CVSS; the rest of the policy still applies (for instance alerting below the threshold for an exploited CVE, if the policy does so).

An item that departs from the policy shows an amber triangle, whose tooltip quantifies the gap; the same sentence appears for a few seconds under the gauge when you choose:
Nothing is blocked. While at least one item refines its threshold, the banner says so (“1 item departs from the project policy.”) with:
To bring an item back to the policy, click its Policy pill.
When NIS2 is turned on for the project and the due-dates module is part of the plan, a Criticality column appears. It states what each item means for the business; it scales the remediation deadlines of its vulnerabilities (see NIS2 registers).
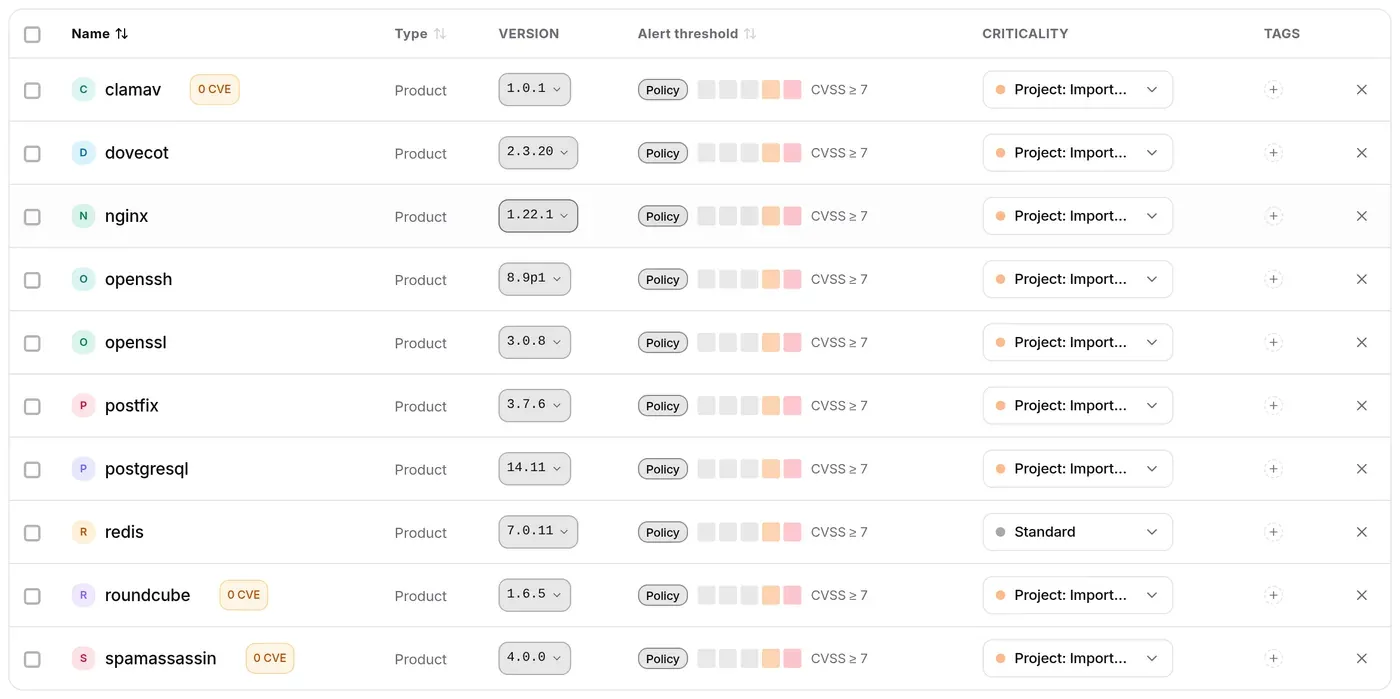
By default an item inherits the project’s criticality (“Project: Important”). The list lets you choose Vital, Important, Standard or Low for the item, or go back to the project’s criticality. Every change is logged.
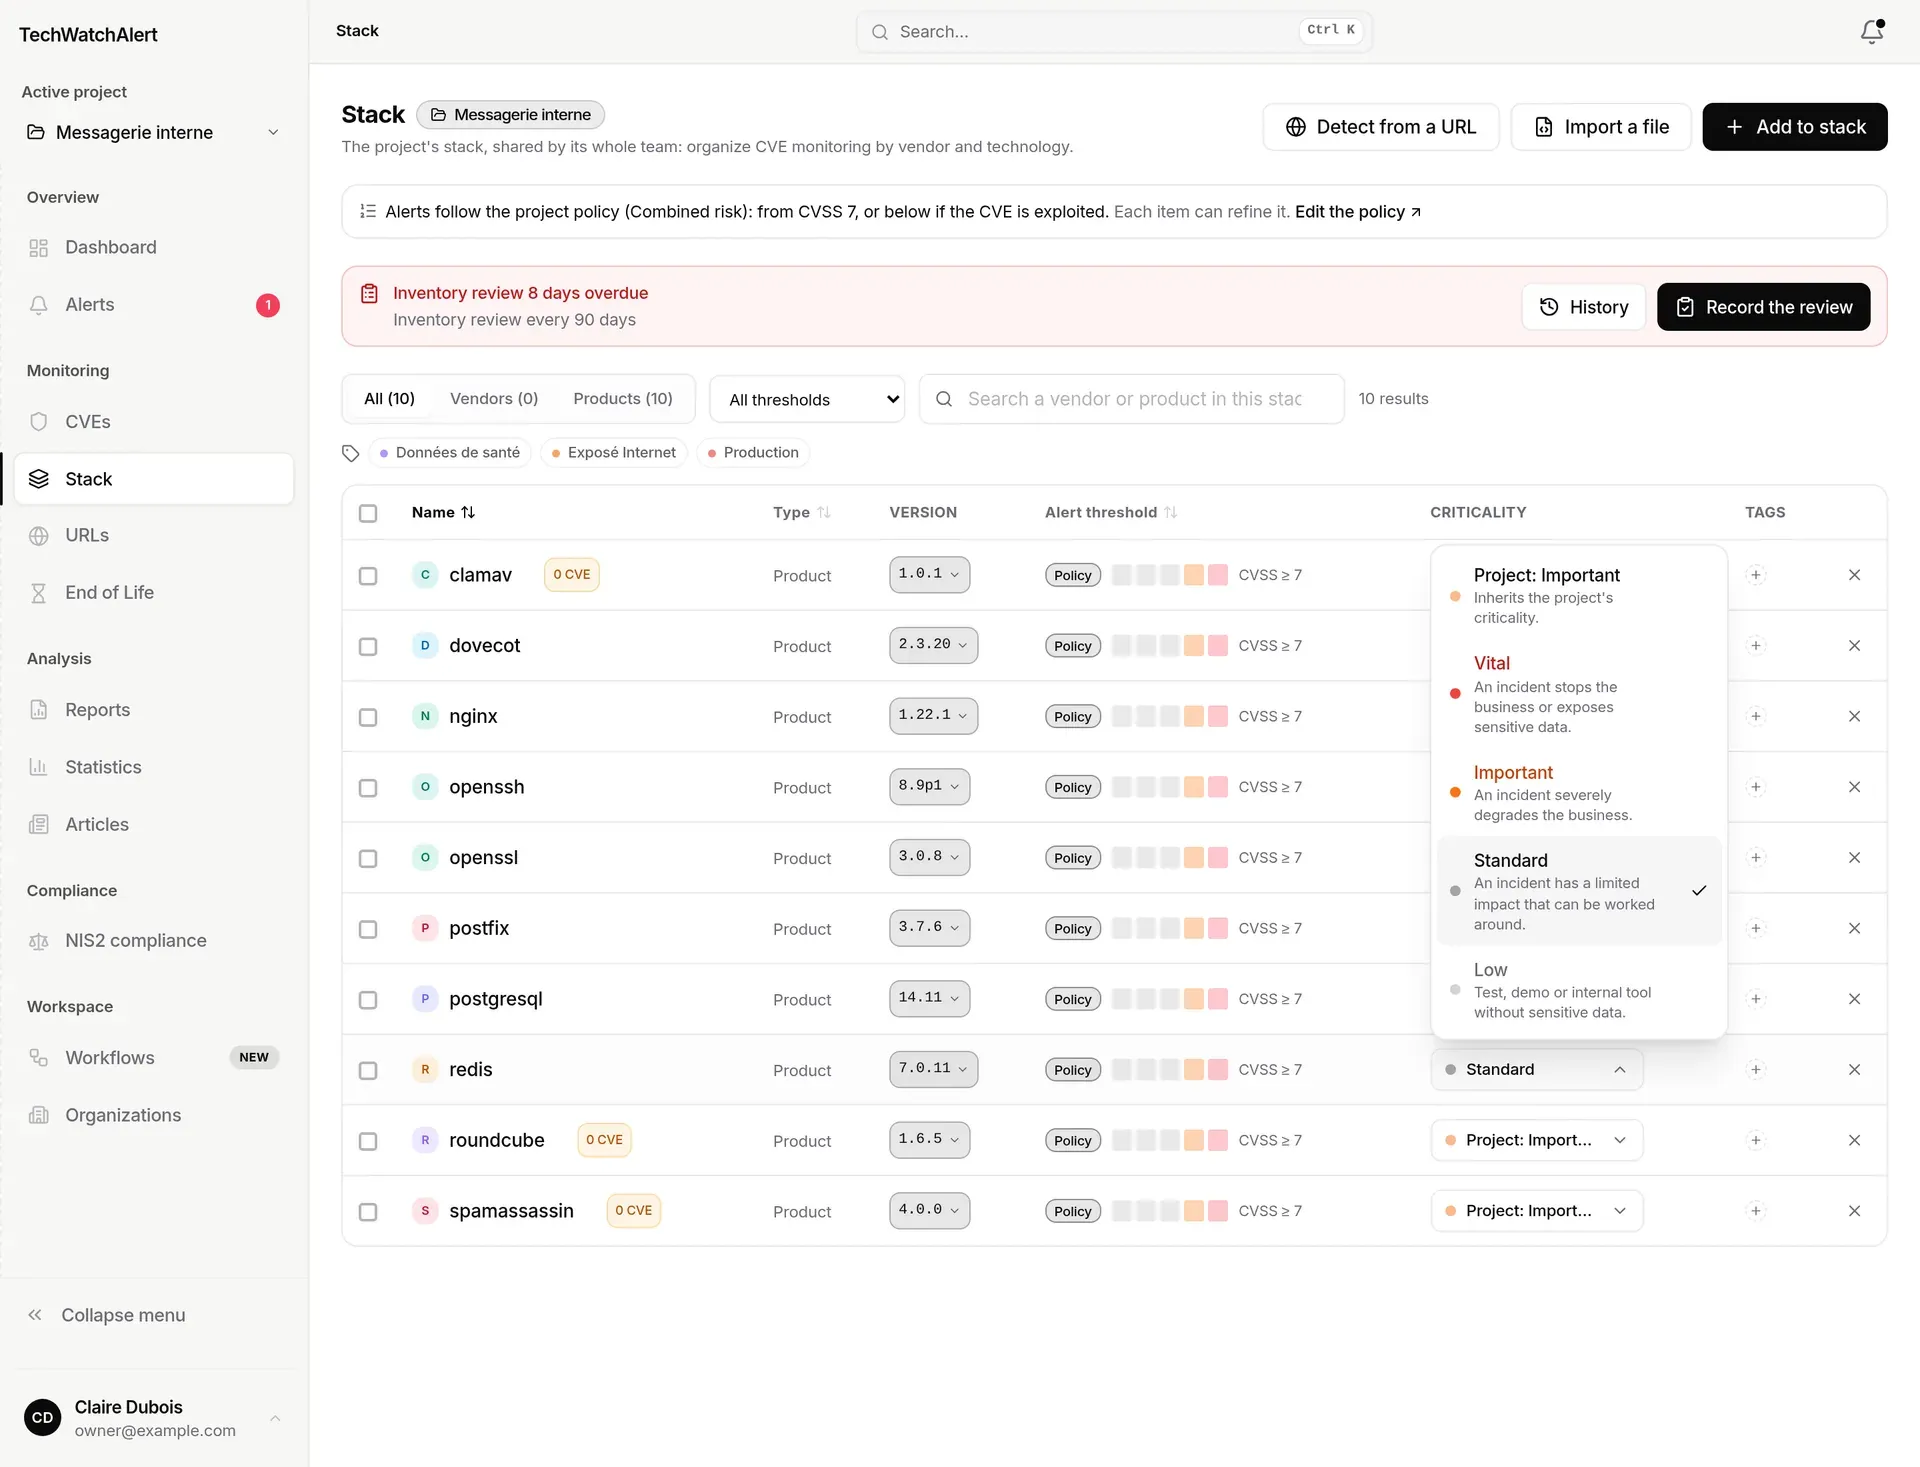
On these projects a banner appears at the top of the page: the inventory review, only when it is near (7 days before it is due), due or overdue (due date, History, Record the review; the rest of the time the history is in the Inventory reviews tab of the compliance space; see NIS2 registers). Vulnerability scans are managed in the project settings, Scans tab (see Imports, connectors and scans).
Where inventory review runs (NIS2 projects), it happens on the Stack page, where the inventory lives. Each project’s inventory must be reviewed and the review recorded at a fixed interval; the history keeps the evidence.
/stack#revue (notice links and the former Inventory reviews page) brings you to the banner and opens the history; ?projet= picks the project.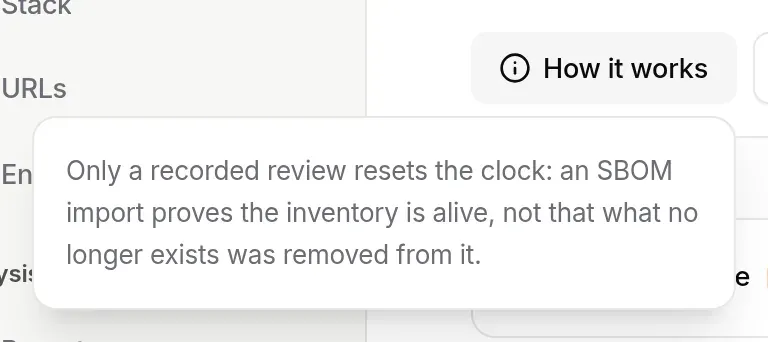
The rules:
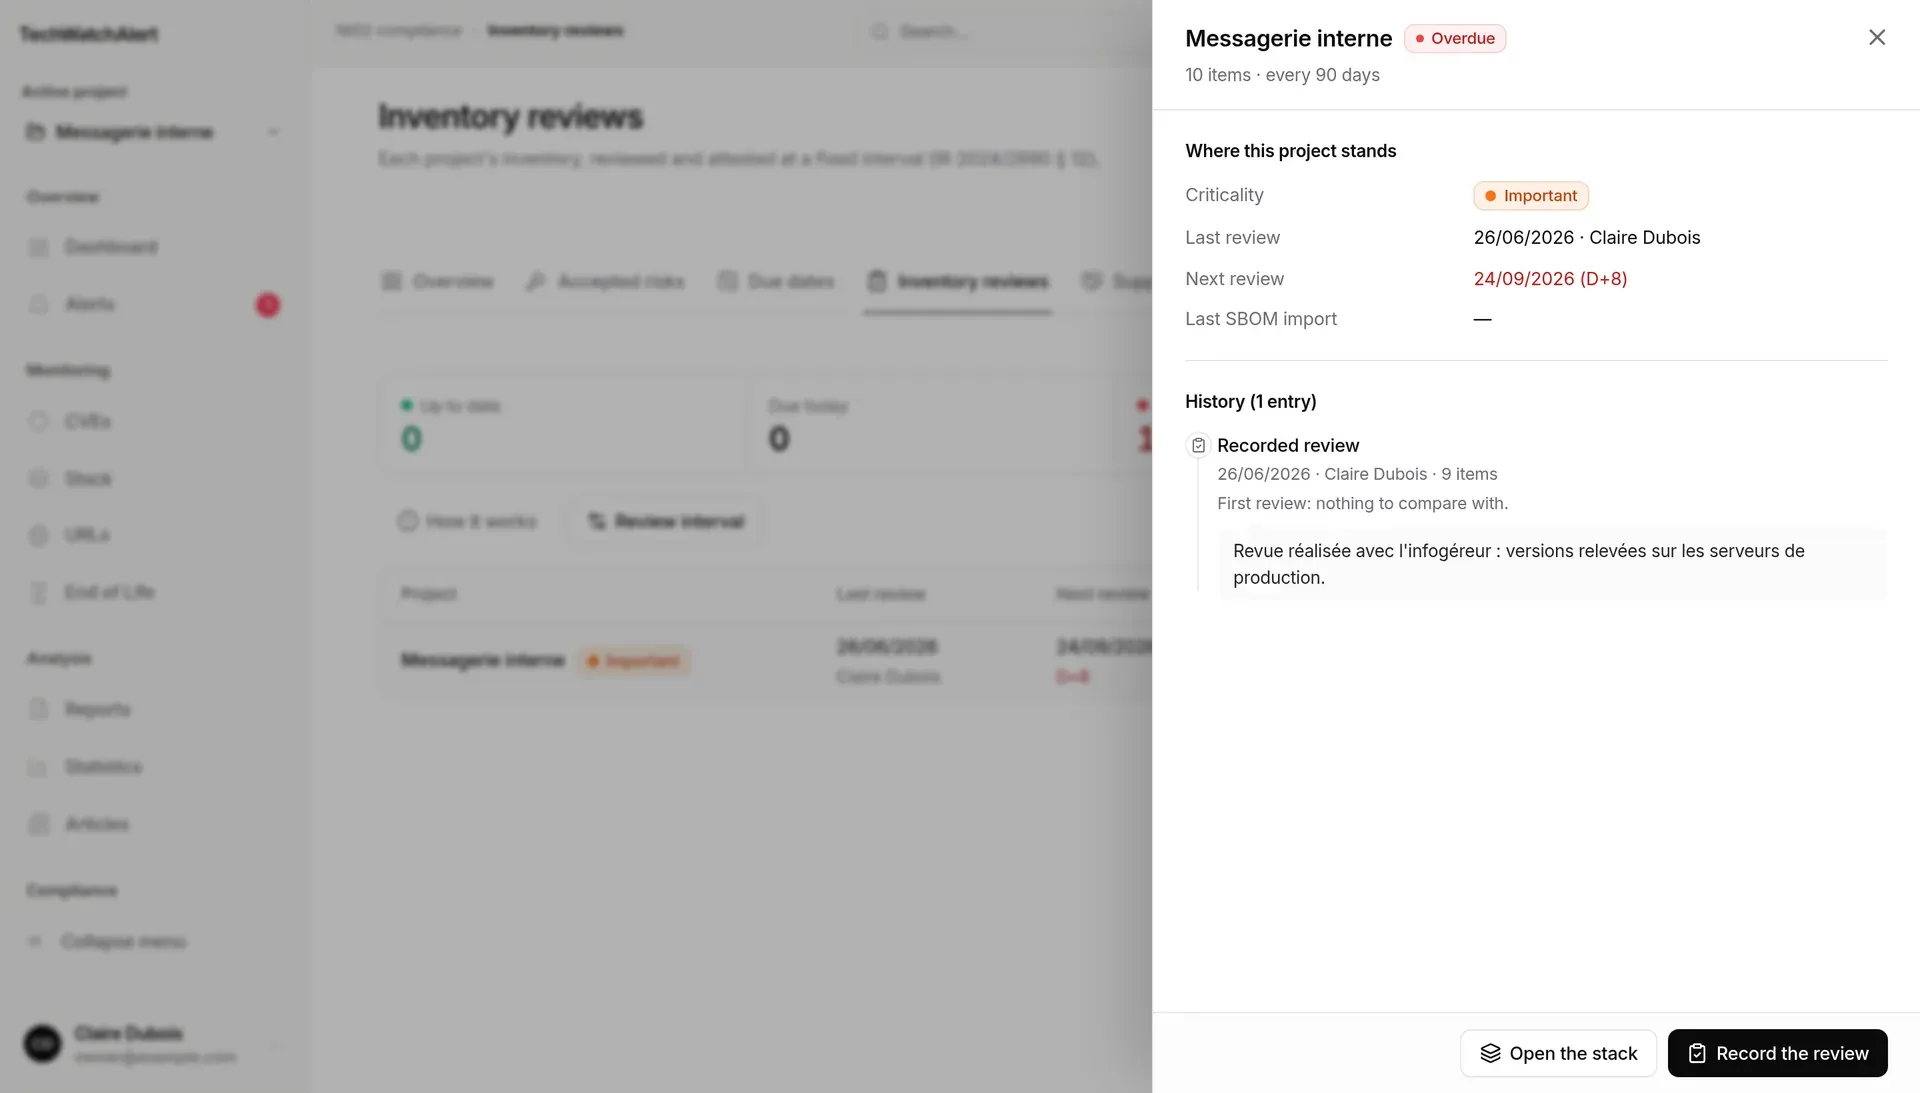
The History panel gives the project’s criticality, its dates, the last SBOM import, then the history: each recorded review and each import, with what changed since the previous one (items added, removed, versions changed) and the comment. In the footer: Record the review.
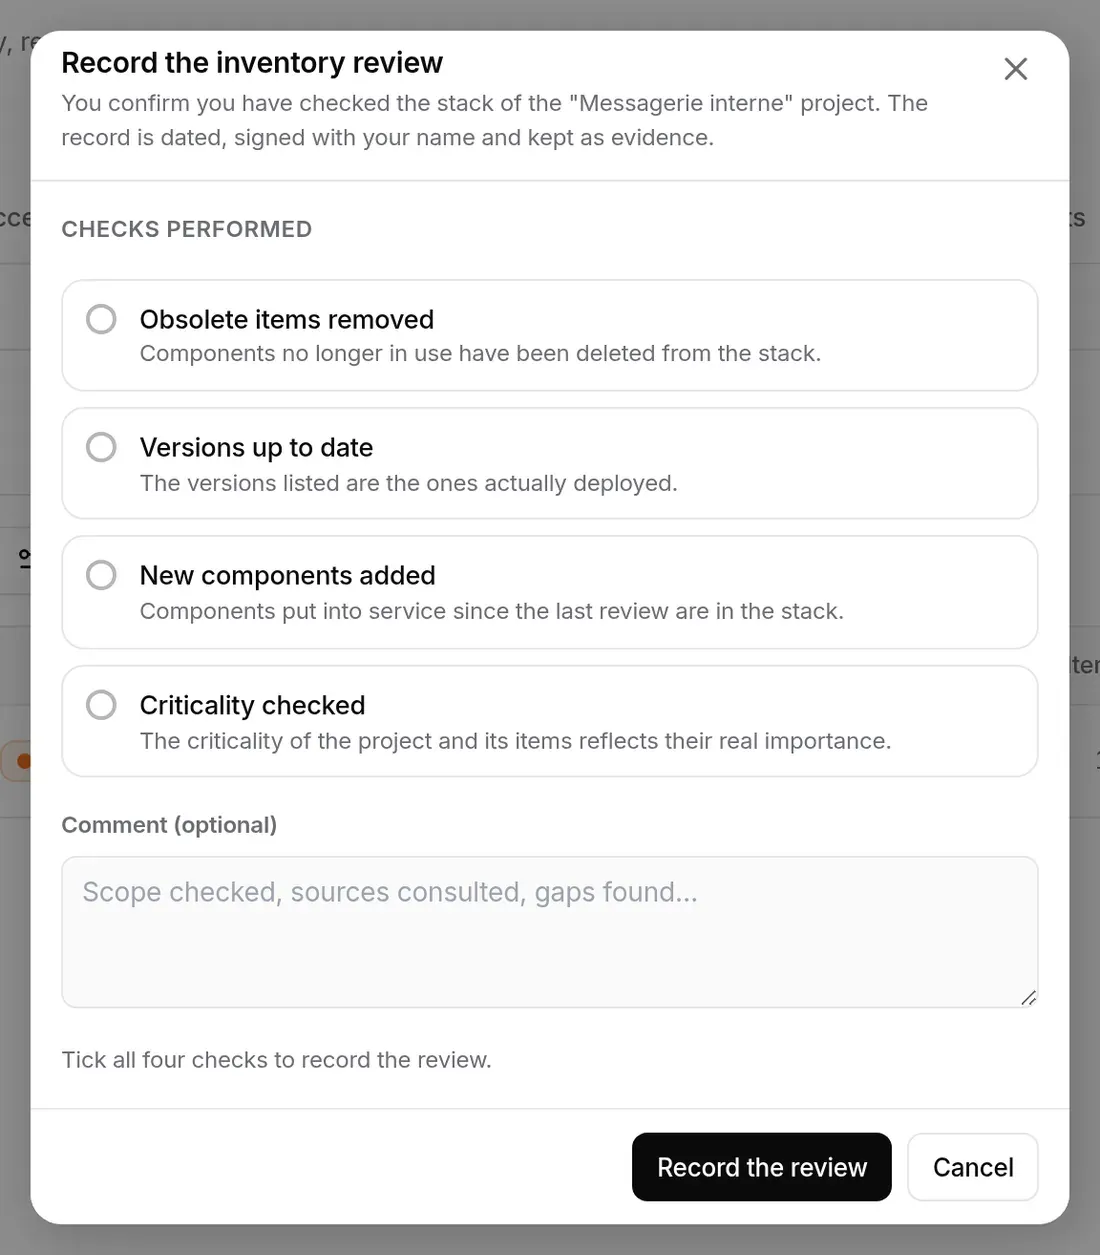
The record is dated, signed with your name and kept. Recording a review requires the “Record an inventory review” project permission (analyst and above by default).
Reminders: when the review becomes due, the project’s administrators and owner and the security lead are notified, once per due date (NIS2 · Inventory reviews workflow).
The organisation’s tags (created in the organisation settings, Tags page) classify items: internet-facing, health data, production…
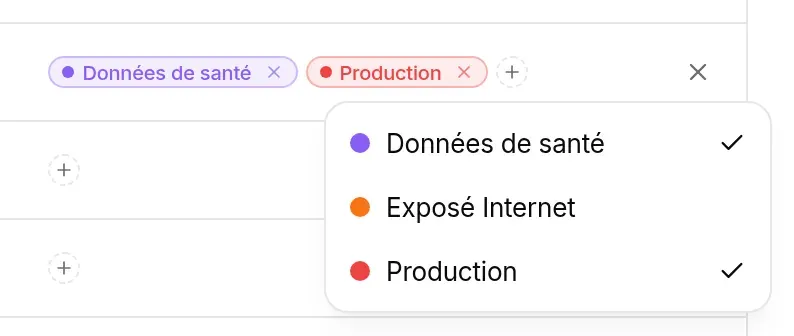
Tick items (or Select all, which ticks the items visible with the current filters): a bar appears above the list.

Alert threshold… and Add tag… are only offered with the right to edit the stack; Criticality… follows the right to set criticality; Remove follows the right to remove from the stack.
When the project’s stack is empty, the page offers to Start from a preset: six presets that each add five or six common products, to adjust afterwards.
| Preset | Products added |
|---|---|
| PHP web / LAMP | http_server, php, mysql, openssl, wordpress, linux_kernel |
| Node & front-end | node.js, next.js, express, nginx, openssl, postgresql |
| Python | django, flask, requests, urllib3, postgresql, redis |
| Java / JVM | tomcat, spring_framework, log4j, openjdk, jenkins |
| Containers & K8s | kubernetes, docker, containerd, traefik, grafana, prometheus |
| Workstation | windows_11, office, edge, acrobat_reader, firefox, 7-zip |
The Add to stack, Detect from a URL and Import a file buttons remain available under the presets. Presets add products without versions: remember to set versions afterwards.
The list becomes a series of cards (name, type, version, large threshold gauge, criticality, tags). Adding goes through the floating + button; the … button in the header groups URL detection, file import and Select mode; filters live in a sheet opened from the settings icon to the right of the search.
Rights follow each person’s role in the project (see Team, roles and groups) and can be fine-tuned by administrators.
| Action | User | Analyst | Admin | Owner |
|---|---|---|---|---|
| View the stack | ✓ | ✓ | ✓ | ✓ |
| Add (by hand, preset, URL) | ✓ | ✓ | ✓ | |
| Import a file (SBOM, manifest) | ✓ | ✓ | ✓ | |
| Change version and threshold, manage tags | ✓ | ✓ | ✓ | |
| Remove items, bulk actions | ✓ | ✓ | ✓ | |
| Change criticality (NIS2 projects) | ✓ | ✓ | ✓ | |
| Dismiss the refined-threshold warning | ✓ | ✓ | ✓ |
Each action follows a specific right, the same in the interface and on the server:
Does a colleague see the items I add? Yes: the stack is the project’s (see the note at the top of the page). An item added by one member is monitored for the whole team, and the alerts it raises appear in every member’s list.
A member leaves the project: do their items disappear? No. Items belong to the project, not to the person who added them: they stay in the stack, as do the connectors and followed URLs.
I added a product, but it shows “0 CVE”.
No CVE names it yet. If the product is well known, search for it again in the add window: the expected name (the one used in CVEs) often differs from the brand name (http_server for Apache).
Can I monitor two versions of the same product? Not from the add window, which refuses a name already present whatever its version. Inventory connectors and a URL’s auto-follow, however, can add one row per product-version pair.
Does removing an item delete its alerts? No. Alerts stay; simply, no new alert will come from that item.