Organisations
An organisation is a team’s workspace. It carries the subscription, the members and their groups, the projects, the tags, the default prioritisation policy and remediation deadlines, the frameworks it follows, the API keys, SSO and the audit log. Every project belongs to an organisation.
- Who it is for: every member can see the organisation; most settings are reserved for Admins and the Owner (see Who can do what).
- Where: Workspace › Organizations in the sidebar, then click the organisation. The command palette (Ctrl K) also goes straight to every settings page of the active project’s organisation: type “Settings”, “Members”, “SSO”, “Deadlines”…
The interface uses American spelling (“Organization”); this guide quotes its labels as they appear.
The organisation list
Section titled “The organisation list”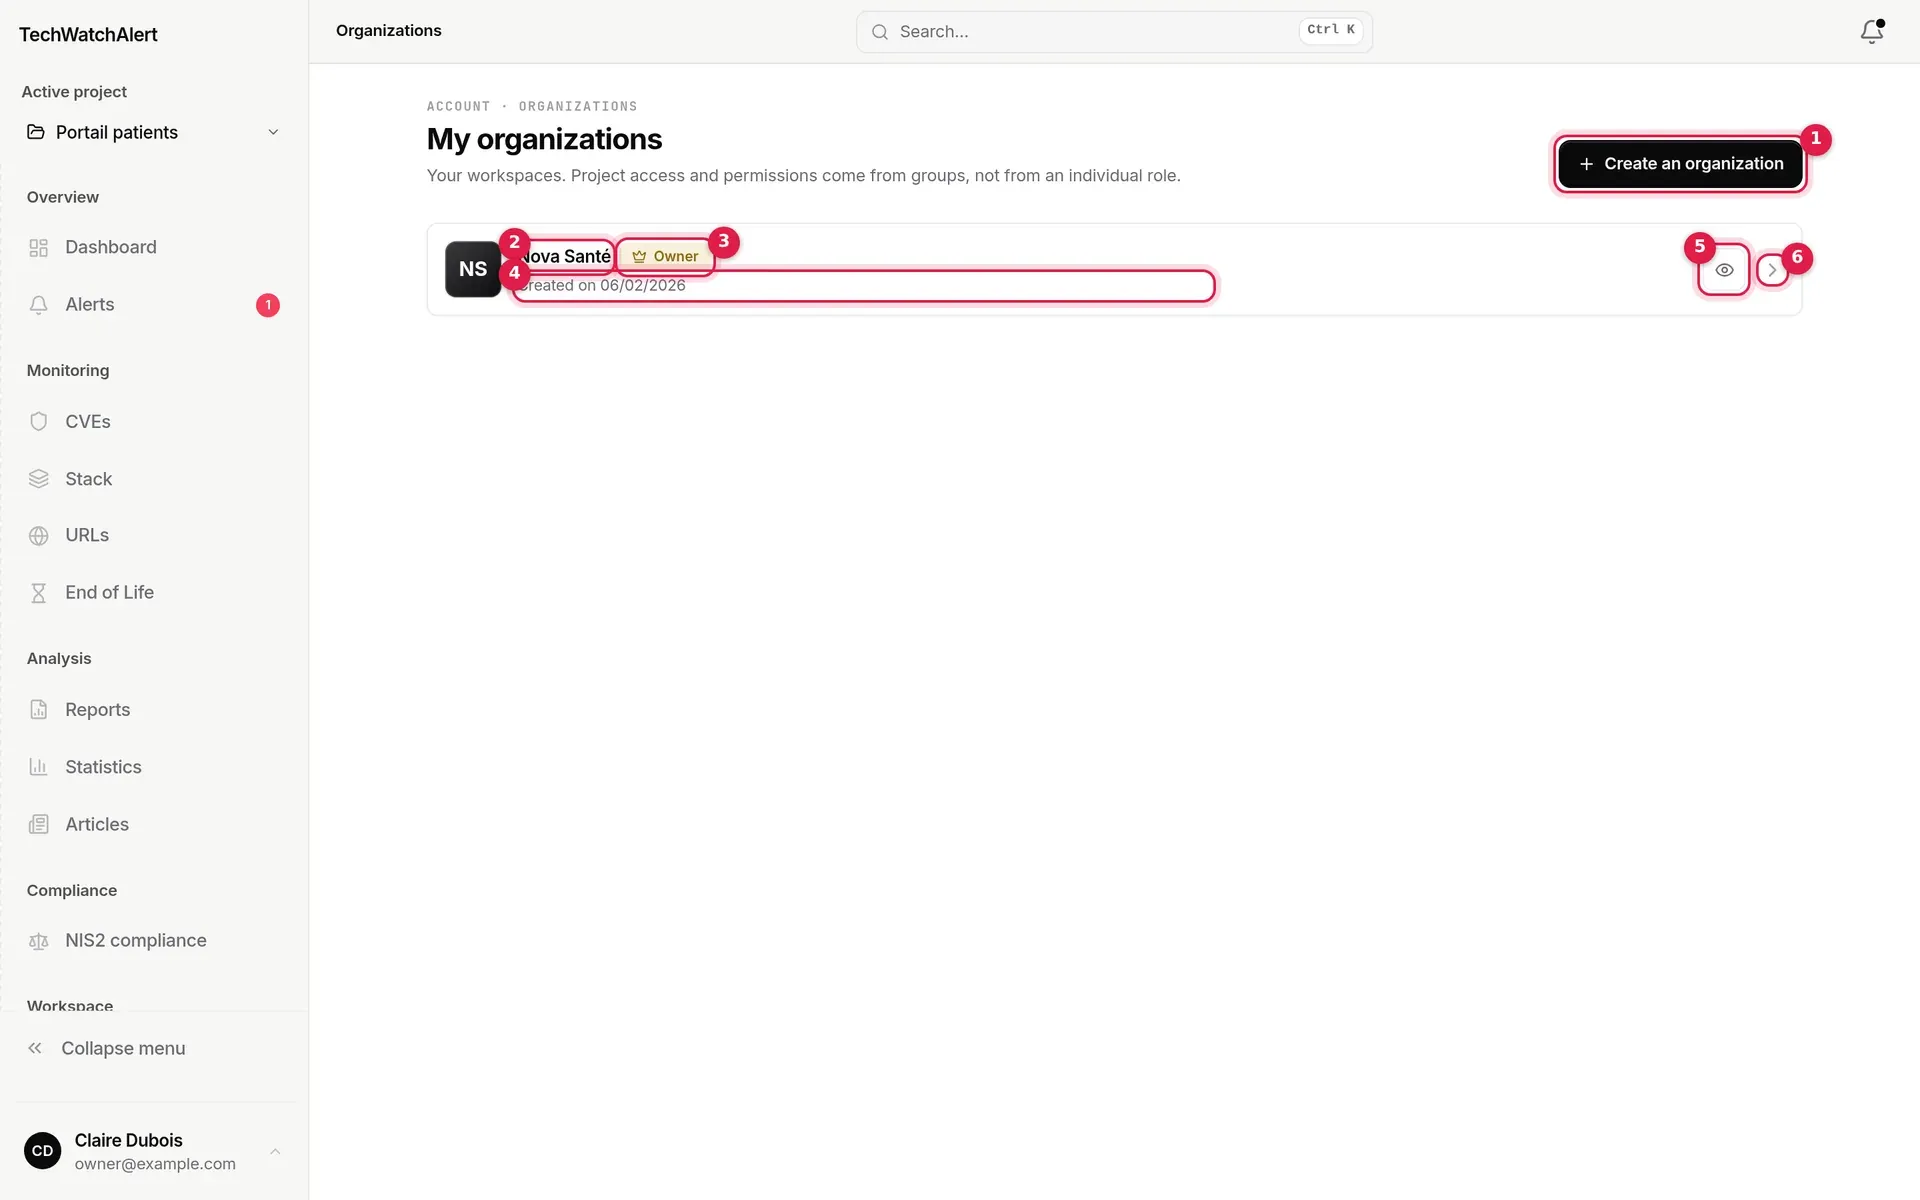
- Create an organization, to the right of the title: opens the creation window (a name, then Create); the new organisation opens on its overview.
- Organisation: its name, plus a Personal badge for a personal space. Clicking the row opens its overview.
- Your role: Owner, Admin or Member.
- Plan of the organisation (the one that applies, trial or partner programme included).
- Members and projects: how many (a partner’s team does not count as members).
- The ⋯ menu: Open settings, Hide from navigation (or Show in navigation). Right-clicking the row also offers Open in a new tab and Copy link.
When the page is narrow (discussion panel open, phone), the role and plan move under the name; on a phone each organisation is a card, and a long press opens the menu.
Hiding an organisation removes its projects from the sidebar’s project selector; it stays in this list, dimmed, with the Hidden badge. The choice is stored in your browser only.
The team of a partner organisation also sees a Partner space button (see Partner space).
If someone has invited you by name to an organisation or a project, the Invitations received box appears at the top of the page: Accept or Decline without digging out the email (see Team › Invitations received).
Creating an organisation
Section titled “Creating an organisation”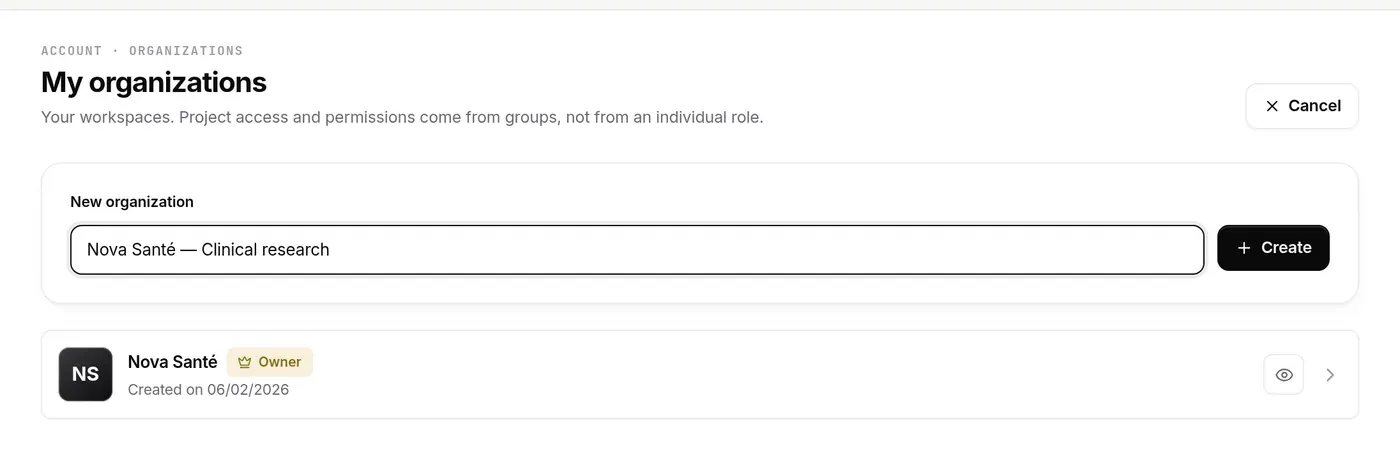
- Click Create an organization.
- Enter the name (at least 2 characters).
- Click Create or press Enter.
You become the Owner of the new organisation and a member of its Administrateurs system group; its overview opens straight away. The organisation starts on the Free plan, with no trial. Creating one requires your current organisation’s plan to include Organizations (Team and above); otherwise it is refused.
The /organizations/new address only redirects to this list.
An organisation’s settings
Section titled “An organisation’s settings”Settings are no longer a row of tabs: one page per topic, each with its own address (/organizations/{id}/settings/members…) that you can share or bookmark; the browser’s Back button returns to the previous page.
Inside the settings, the application sidebar becomes their navigation:
- The space header, in indigo: “Settings”, the organisation’s name, its plan, and Back to the app, which returns to the last page of the app you had open (see Spaces). The list of organisations stays reachable from Organisations and the breadcrumb.
- Search settings: filters the pages by name or keyword, in English or French (“tags”, “SAML”, “logs”, “quotas”…). Escape clears it.
- Overview, then the pages, sorted into groups: Organisation (General, Projects), People (Members, Groups and permissions), Monitoring and remediation (Prioritisation, Remediation deadlines, Tags), Compliance (Frameworks, Owners, Management report), Security (Authentication (SSO), Audit log), Developers (API keys, Connected applications), Billing (Plan and billing, Usage).
- Projects: every project of the organisation; the one you are configuring is expanded on its pages (General, Members, Alerts, Integrations, Compliance). Beyond six projects, Choose a project opens a searchable list.
A page your role cannot read does not appear; a page your role can read but not change shows a Read-only banner. A page outside the plan stays visible with a padlock: it says what it would bring and which plan opens it; only the Owner gets the button to change plans (see Plan and billing).
The breadcrumb says where you are: Organizations › Nova Santé › Members, and, for a project, Nova Santé › Portail patients › Alerts. On a phone, the sidebar is in the menu; the overview also lists every page, and each page links back to it.
The pages you see depend on your role:
| Page | Member | Admin | Owner |
|---|---|---|---|
| Overview, General, Projects, Groups and permissions, Prioritisation, Remediation deadlines, Frameworks, Owners | read | ✓ | ✓ |
| Members, Tags, Management report, Authentication (SSO), Audit log, API keys, Connected applications | — | ✓ | ✓ |
| Usage | — | read | read |
| Plan and billing, transfer ownership, delete the organisation | — | — | ✓ |
A personal space has neither People nor Security: it is single-user, cannot be deleted and does not accept invitations.
Overview
Section titled “Overview”The organisation’s landing page tells you in one screen what is left to do.
- To do (Admins and Owner): a sign-in domain to verify for SSO, invitations pending for more than 7 days, NIS2 owners to appoint, projects without a stack, API keys expiring within 30 days, a trial ending within 14 days. Each line leads to the page where it is set. Nothing to do: the page says so (“All in order”).
- At a glance: members (and pending invitations), projects (against the plan’s maximum), groups, API keys, plan. Each figure leads to its page.
- Settings: the index of pages, group by group.
- Projects: each with its NIS2 status, a “No stack” signal, its member count and a link to its settings; New project for Admins.
The Invite button in the header opens the invitation window (see Team › Inviting a member). For a personal space, a card suggests creating a team organisation to invite colleagues.
General
Section titled “General”- Identity: the organisation’s name (a field, saved with Save; Cancel brings back the previous name), its identifier (with a Copy button) and its creation date. Leaving the page with a changed name first asks whether to save it. Renaming is recorded in the audit log. A personal space keeps its name.
- Brand: for the organisation of a partner’s client, the Report white label card to upload the logo that replaces the platform’s on PDF reports; for a partner organisation, a link to the partner space’s Brand page (see Team, billing and brand).
- Transfer ownership (Owner): choose a member, then Transfer and confirm. They become Owner, you become Admin.
- Delete the organisation (Owner), at the very bottom: see Deleting the organisation.
Projects
Section titled “Projects”The table of the organisation’s projects you can access: name and description, tags, NIS2 status, member count and your role. Filter by tag or search by name; clicking a row opens the project’s settings. Tags are read here; you add them from the project’s General page. Everything is described in Projects.
Members
Section titled “Members”One list for members and pending invitations.
- All / Members / Invited: the segment chooses what is shown, with the count of each. A link to the former Invitations tab opens Invited directly.
- Group and the Name or email search filter the list.
- Groups column: groups grant the permissions. Under the name, the Owner, Admin, you or Partner · … mentions.
- Last sign-in (or Member since).
- A row’s ⋯ menu: Open profile, Remove member (with confirmation); for an invitation: Copy invitation link, Revoke.
Clicking a member opens their profile (its own address): groups, accessible projects, access expiry, profile, activity, and removal from the organisation at the bottom. An Admin removes neither another Admin nor the Owner; a partner’s team is not removed from here. Profile, removal and invitations are detailed in Team, roles and groups.
The organisation’s only Invite button is in this page’s header (and on the overview).
Groups and permissions
Section titled “Groups and permissions”Groups grant access to projects and the rights that come with it. Clicking a group opens its page: its members (Add members offers the organisation’s members), then its access and permissions — the covered projects when its scope is “selected projects”, and the permission matrix —, saved together by a single Save. At the bottom, Delete the group. See Team › Groups.
Prioritisation
Section titled “Prioritisation”The organisation’s prioritisation policy orders alerts, the “Priority CVEs” widget, the CVE list, reports and the email digest, and decides which CVEs trigger an alert. Every project in the organisation inherits it, unless it sets its own (the project’s Alerts page, see Projects).
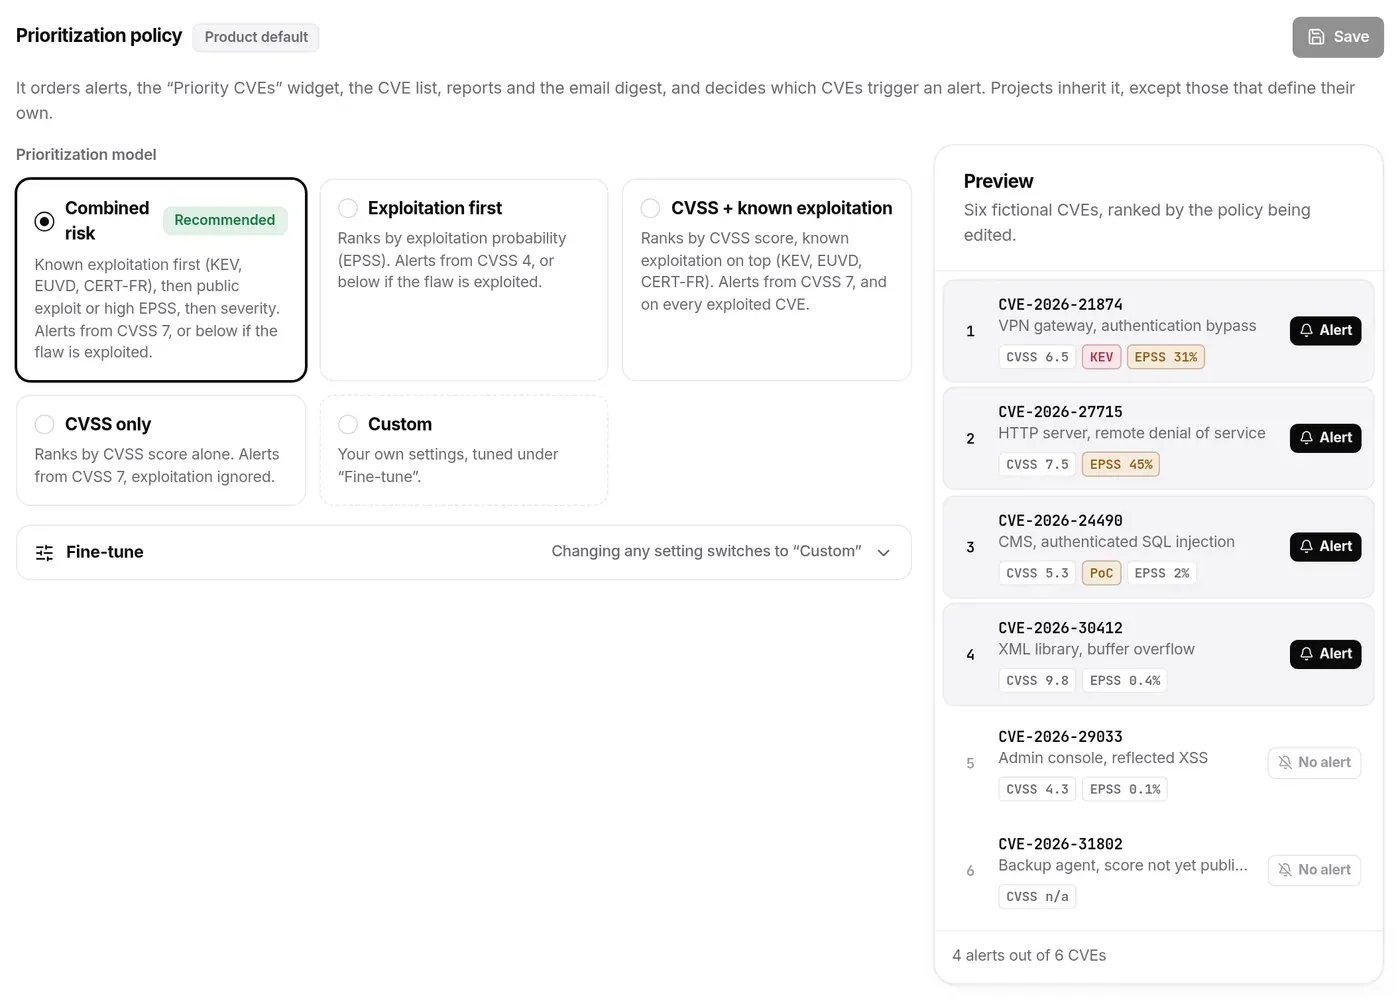
Choose a model:
| Model | Ranking | Alert |
|---|---|---|
| Combined risk (recommended, default) | Known exploitation first (KEV, EUVD, CERT-FR), then public exploit or high EPSS, then severity | From CVSS 7, or below if the flaw is exploited |
| Exploitation first | By exploitation probability (EPSS) | From CVSS 4, or below if the flaw is exploited |
| CVSS + known exploitation | By CVSS score, known exploitation on top | From CVSS 7, and on every exploited CVE |
| CVSS only | By CVSS score alone | From CVSS 7, exploitation ignored |
| Custom | Your own settings | According to your settings |
The Fine-tune panel gives access to detailed settings; changing any of them switches the policy to Custom:
- Main criterion: CVSS score, EPSS or Severity, to separate CVEs with the same exploitation level.
- Known exploitation on top (KEV, EUVD, CERT-FR): an exploited CVE goes ahead of all others.
- EPSS as an exploitation signal, with its threshold; Public exploit as a signal.
- Alert threshold: the minimum CVSS score for a stack CVE to trigger an alert, or All CVEs.
- Exploitation exception: alert below the threshold when an exploitation signal is present.
The Preview ranks six fictitious CVEs with the policy being edited and shows which would alert. The badge next to the title says where the policy comes from: Product default or Set for the organization. Save is only active after a change; Revert to the default policy clears the organisation’s policy. Every member can read it; only Admins and the Owner can change it.
Remediation deadlines
Section titled “Remediation deadlines”How long to fix a vulnerability: model, deadlines by severity, criticality, reminders and escalation. Projects inherit them (a project’s Compliance page shows what it inherits). Placed next to Prioritisation: one says what alerts, the other how fast it gets fixed. Details in Settings and board report.
Tags are shared by the team to classify CVEs (alongside their status) and projects. They are used to filter alerts, in reports and in workflows. This page holds the catalogue; you add a tag to a project from its General page.
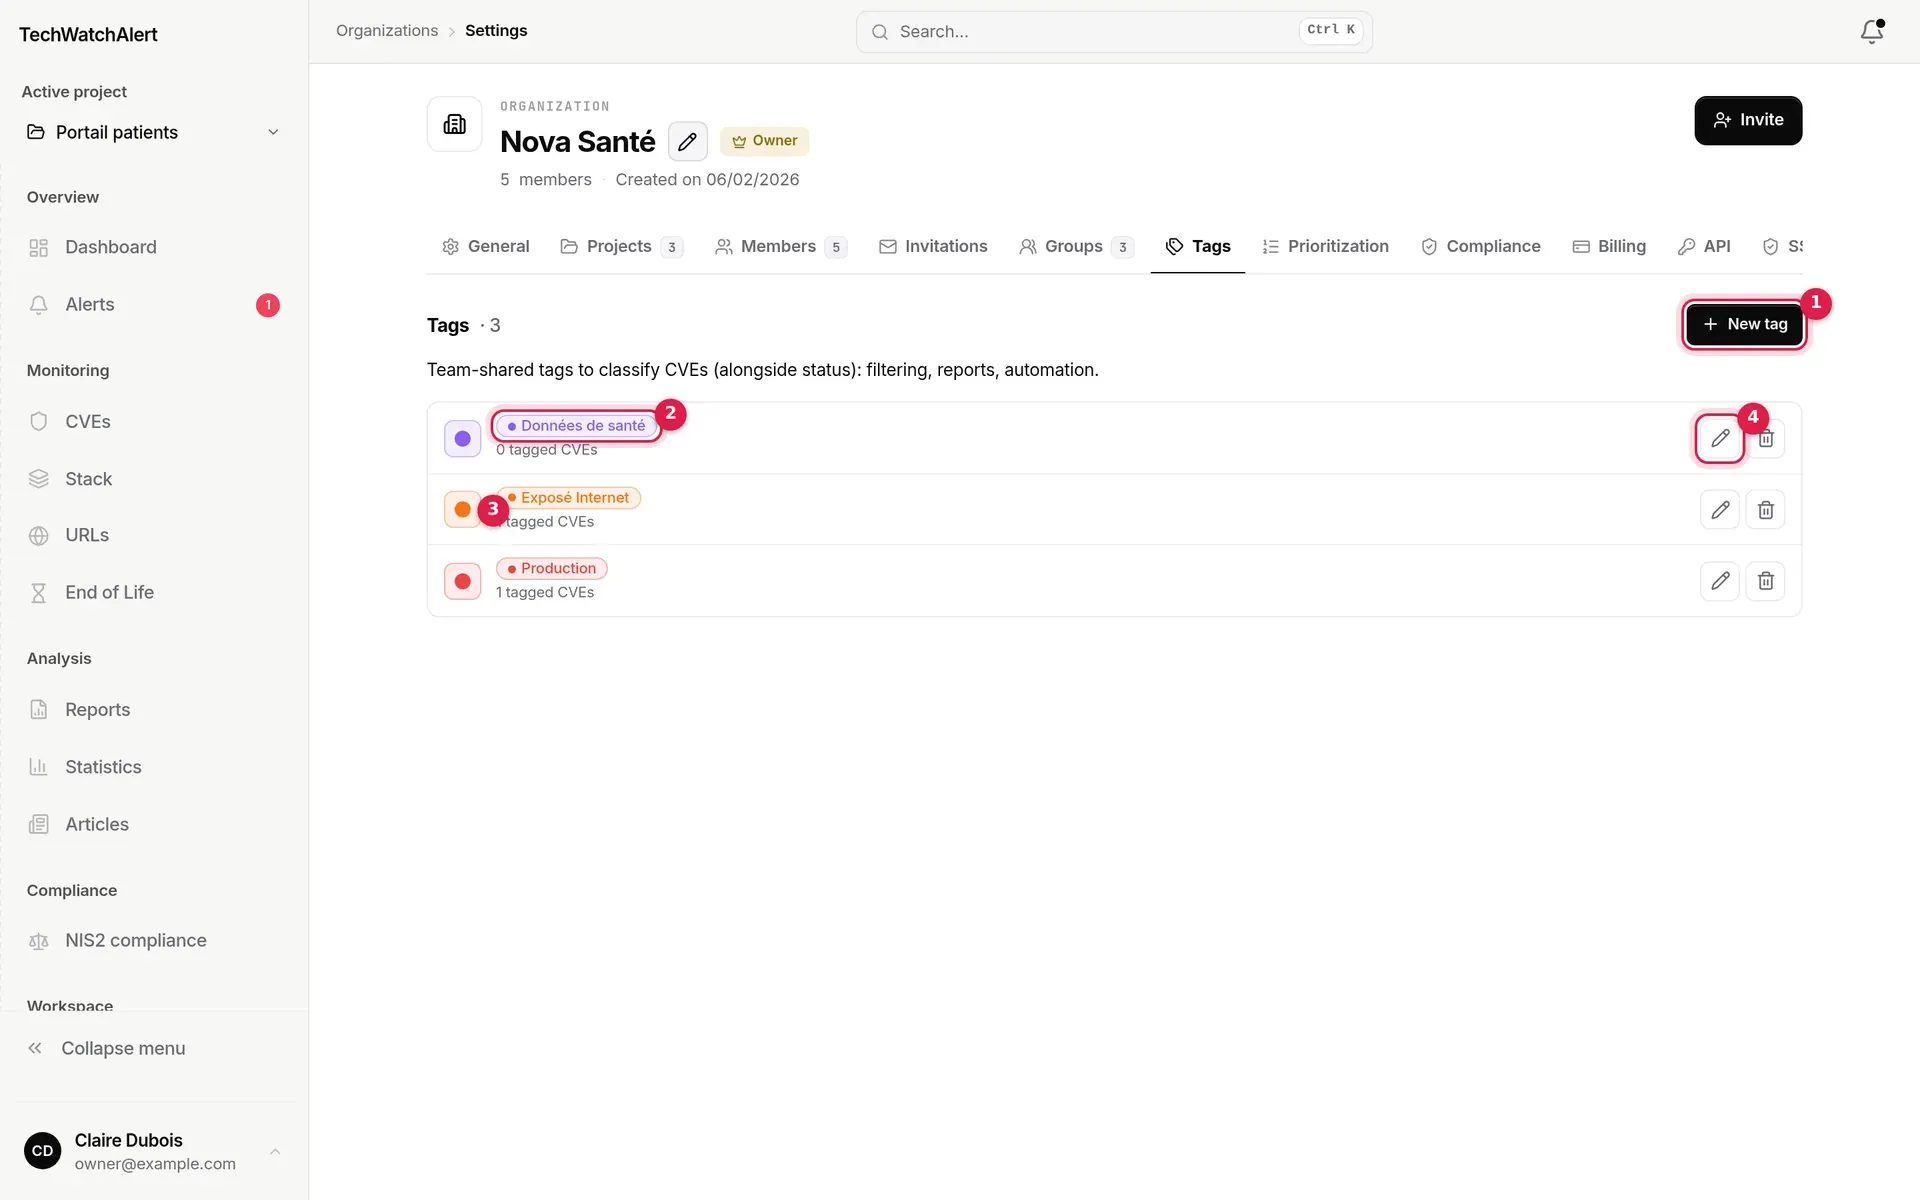
- New tag.
- The tag, in its colour.
- The number of CVEs carrying it (tags on projects are not counted).
- The ⋯ menu (or a right-click on the row): Edit and Delete.
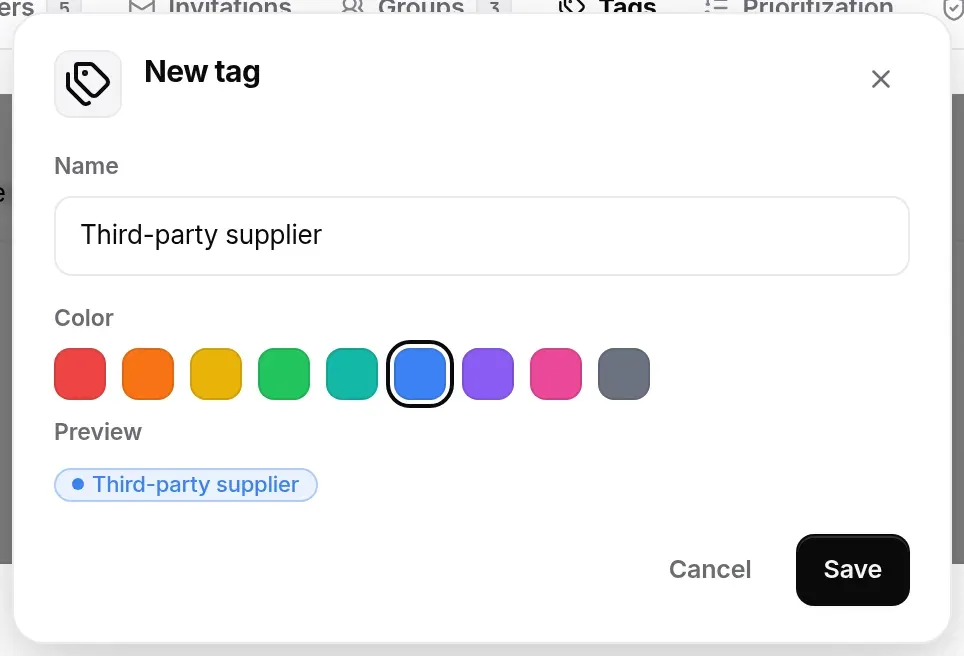
- The name is required (40 characters at most); the colour is picked from a palette of nine.
- Deleting a tag asks for confirmation and removes it from every CVE carrying it. It cannot be undone.
- Tags are listed alphabetically.
Frameworks, owners and management report
Section titled “Frameworks, owners and management report”Three pages of the Compliance group, which used to share a single tab:
- Frameworks: those the organisation follows (NIS2, ISO 27001, CIS, ANSSI) and its NIS2 status. View coverage leads to the Coverage page.
- Owners: management, the security officer and the incident contact, appointed by the Owner.
- Management report: frequency, language and recipients of the report sent to management.
Activating NIS2 project by project is no longer an organisation setting: the Coverage page (/referentiels) lists every project with its Activate button, and each project’s Compliance page does it for that project. All covered in Settings and board report.
Plan and billing, usage
Section titled “Plan and billing, usage”Plan and billing (Owner): plan, subscription status, invoices, plan changes and cancellation. Usage (Admins and Owner, read-only): consumption gauges against the plan’s limits (members, projects, tracked components, URLs, end-of-life tracking, Vigie tokens…) and the included features. Admins manage what consumes it: they read it, without seeing invoices or changing plans. See Plan and billing. For a partner organisation, billing lives in the partner space.
API keys
Section titled “API keys”API keys give your tools (monitoring, CI, dashboards) access to the organisation’s API. They are read-only, except for scan report uploads by CI. The API reference starts at Authentication.
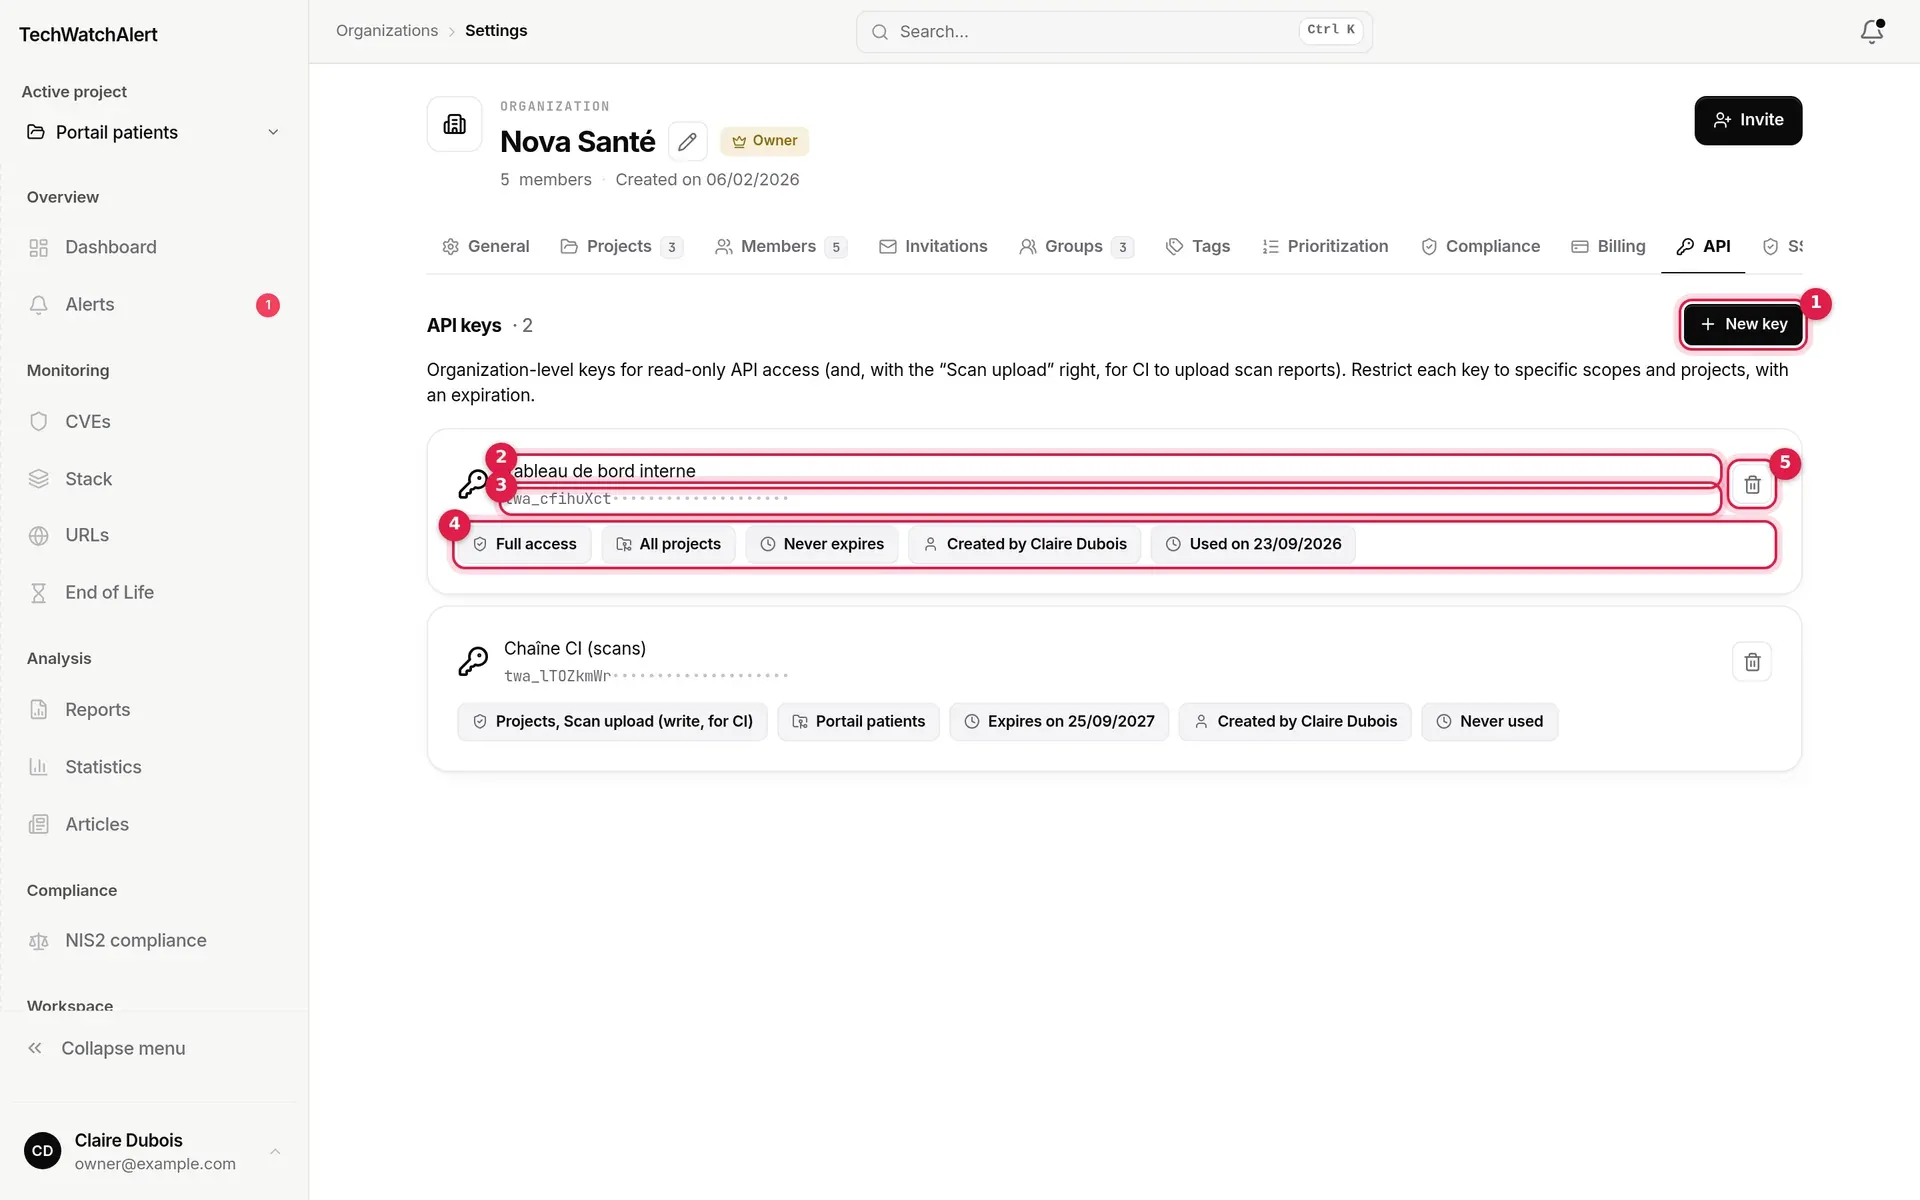
- New key, to the right of the page title.
- Key: its name, the prefix (only its beginning is ever displayed), its creator (“Created by…”) and the Expired badge where relevant.
- Permissions, projects, expiry and last use, in columns; when the page is narrow (discussion panel open, phone) the secondary columns step aside, and on a phone each key is a card.
- The ⋯ menu (or a right-click on the row): Copy prefix, Revoke.
Creating a key
Section titled “Creating a key”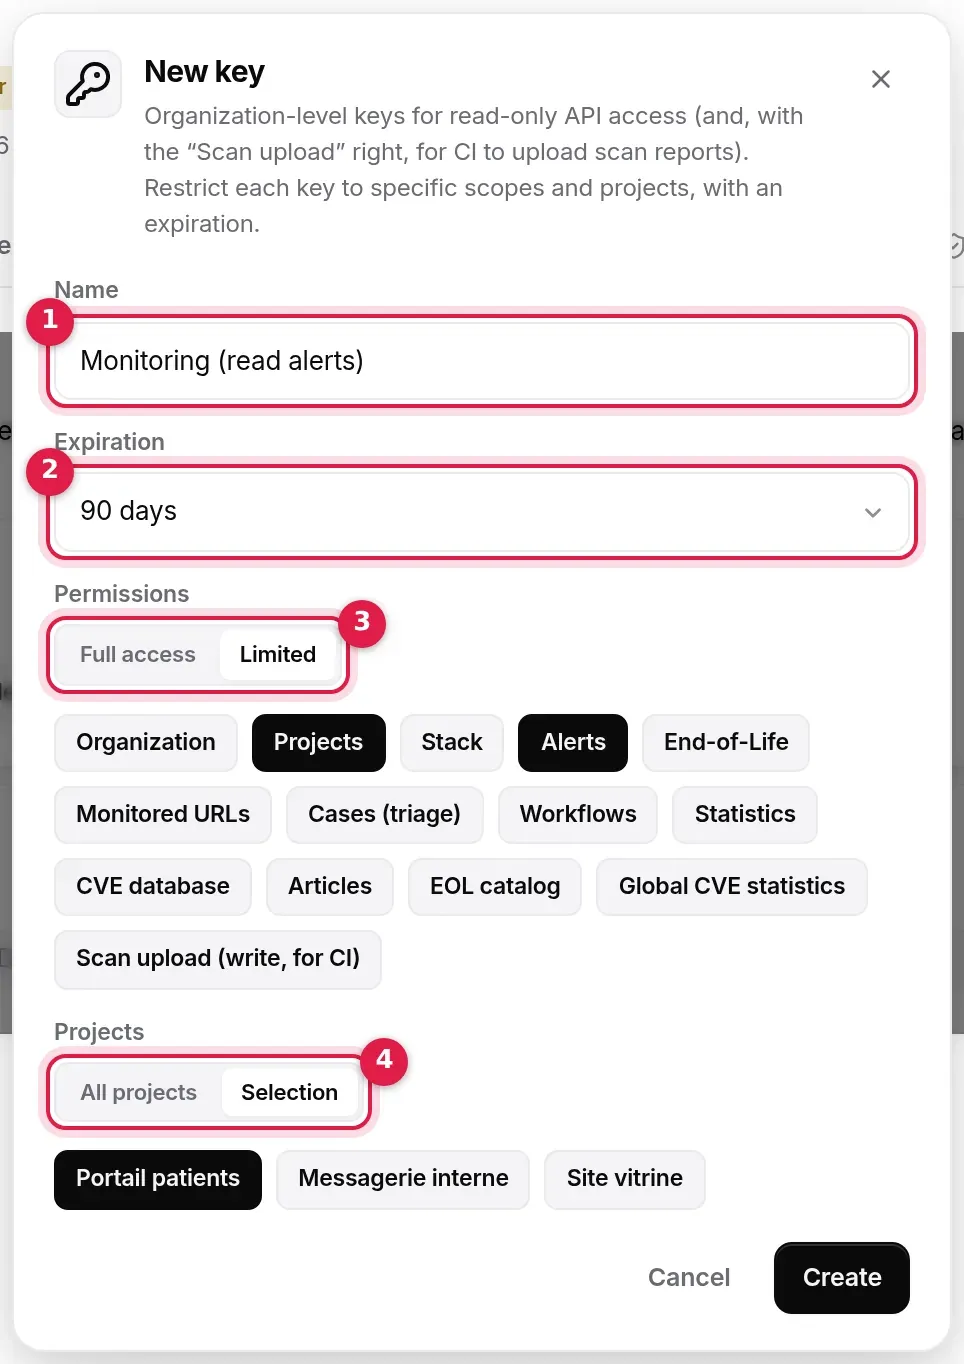
- Click New key.
- Name (required, 100 characters at most): the name of the tool that will use it.
- Expiration: Never expires, 30 days, 90 days, 1 year or 2 years.
- Permissions: Full access (read access to every resource) or Limited, then tick the resource families you need: Organization, Projects, Stack, Alerts, End-of-Life, Monitored URLs, Cases (triage), Workflows, Statistics, CVE database, Articles, EOL catalog, Global CVE statistics, Scan upload (write, for CI).
- Projects: All projects or Selection, then tick the projects.
- Click Create.
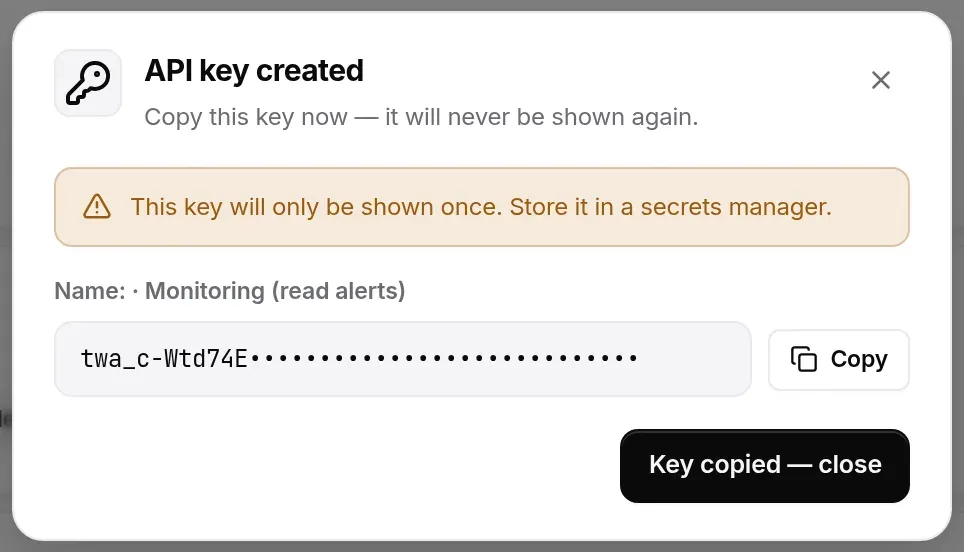
The API key created window then shows the full key once only: copy it straight into a secrets manager. It will never be shown again.
Rules applied:
- A Full access key reads everything but writes nothing: scan upload must be ticked explicitly, in Limited mode.
- A key limited to scopes is refused on any resource outside them; a key limited to projects is refused on other projects.
- At most 10 active keys per organisation.
- Using the API requires a plan that includes API access (Pro and Business): on another plan keys can be created but their calls are refused. The hourly call allowance is the plan’s (5,000 on Pro, unlimited on Business), counted for the whole organisation, all keys together.
- Each key’s creator is shown: when an administrator leaves, their keys can be spotted at a glance, and the removal window offers to revoke them in the same step (see Team › Removing a member).
- An expired key is refused; it stays listed with the Expired badge until revoked.
Revoking a key
Section titled “Revoking a key”Choose Revoke in the key’s ⋯ menu (or with a right-click on its row), then confirm in the window that opens. The key stops working at once and disappears from the list.
Connected applications
Section titled “Connected applications”The Connected applications page lists every access that members have granted to the organisation through the MCP connector (Claude…), revocable by an Admin; every revocation is recorded in the audit log. The personal Settings window only shows your own accesses (see MCP connector).
SSO (single sign-on)
Section titled “SSO (single sign-on)”SSO connects TechWatchAlert to your OIDC identity provider (Okta, Entra ID, Google Workspace…): colleagues sign in with their company account. It is included in the Business plan; on another plan the tab shows SSO unavailable on your plan (see Plan and billing). Signing in itself is described in Account and sign-in › Signing in with SSO.
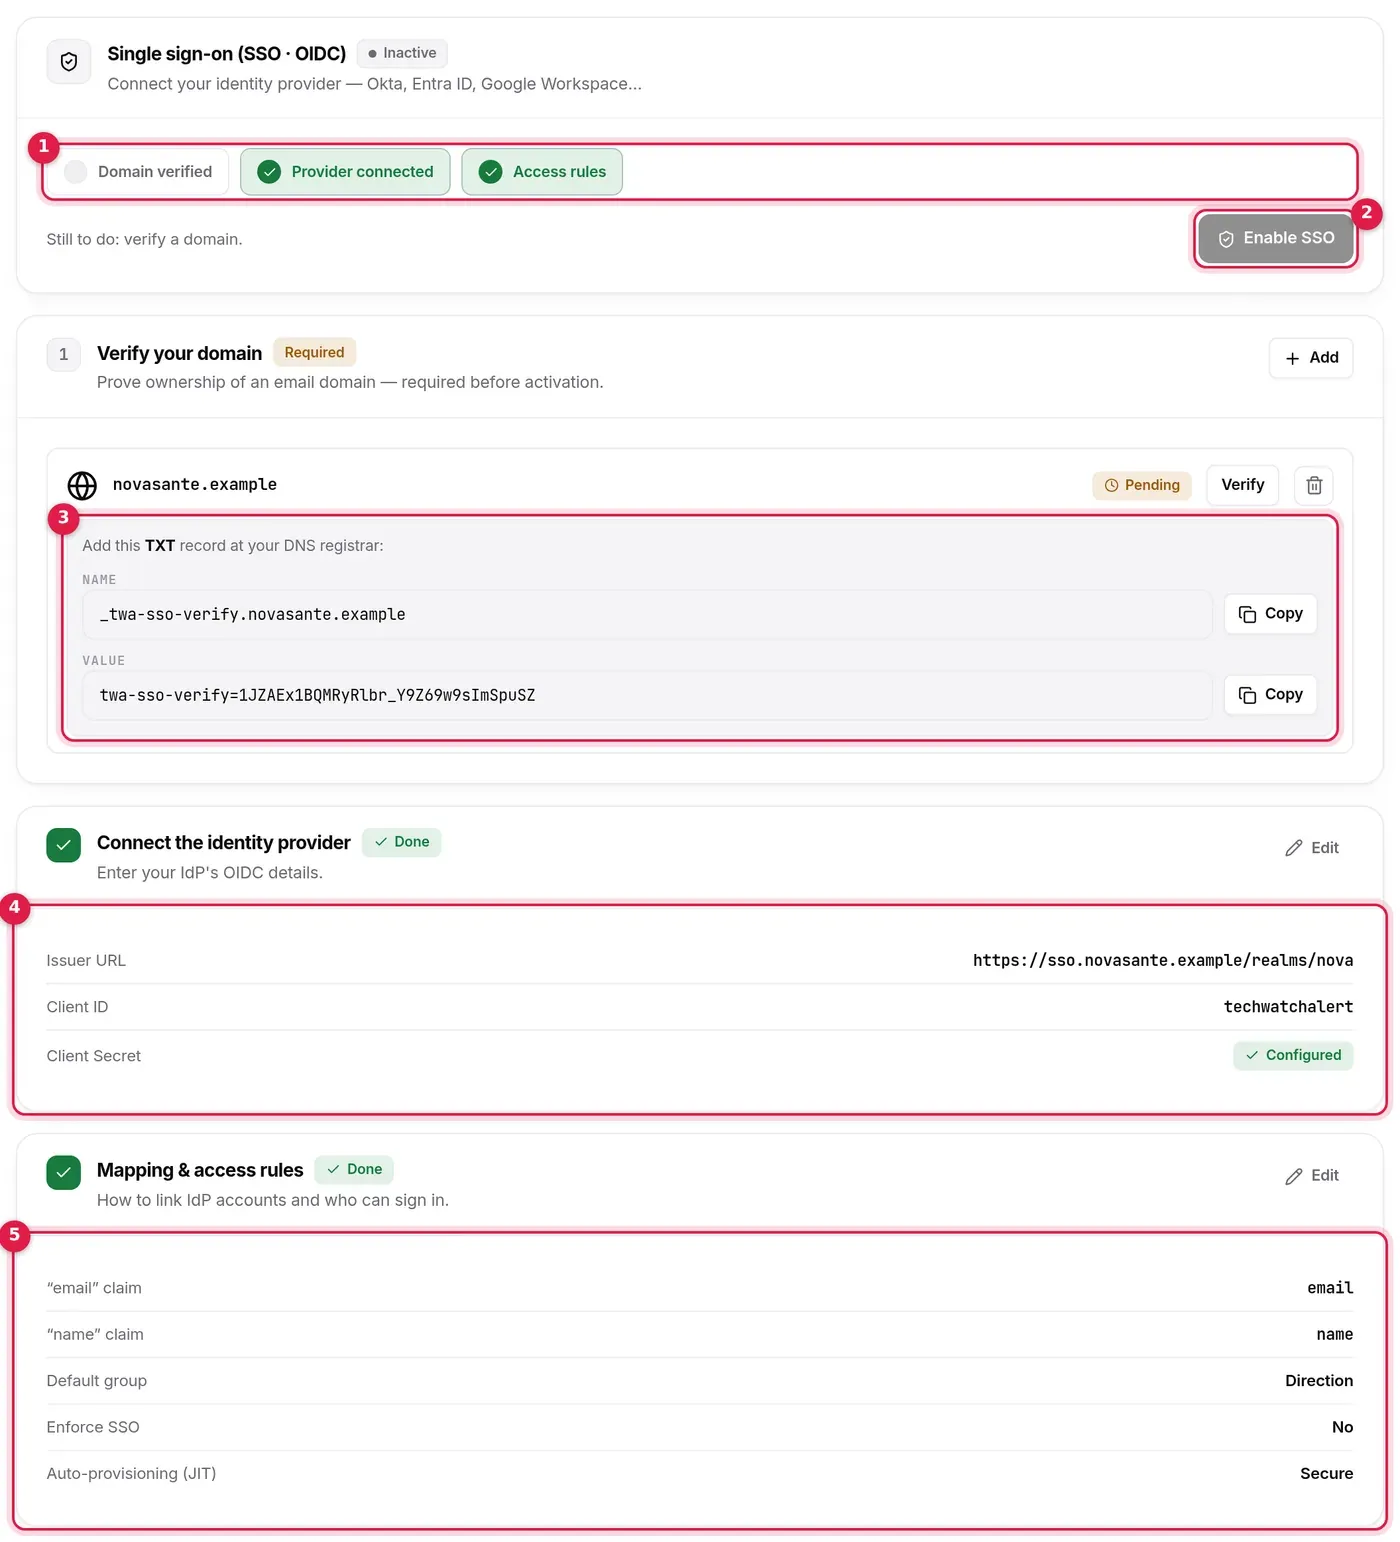
- Readiness: the status (Enabled or Inactive) and the three steps, ticked once complete: Domain verified, Provider connected, Access rules. The sentence below says what is left to do.
- Enable SSO, to the right of the readiness: greyed out until all three steps are complete and a client secret is stored. Once active, the button becomes Disable SSO.
- Step 1 — Verify your domain: the declared domains, and for a pending domain the TXT record to publish at your DNS registrar (name and value, each with a Copy button). A domain’s ⋯ menu (or a right-click) offers Delete, with confirmation.
- Step 2 — Connect the identity provider: Issuer URL, Client ID, Client Secret.
- Step 3 — Mapping & access rules: claims, default group, enforced SSO, auto-provisioning.
Steps 2 and 3 are always-open forms: each saves through its own Cancel · Save footer, active only once it has changed, without carrying a draft of the other. Leaving the page with a modified step first asks whether to save it.
- Verify a domain. Click Add a domain, enter your email domain, then publish the TXT record shown (
_twa-sso-verify.<domain>). Once it is live, click Verify: the domain becomes Verified. Several organisations may declare the same domain as long as none has proved it: DNS verification assigns it, and the other organisations’ claims are then dropped. - Connect the provider. On step 2, copy the redirect URL shown into your IdP’s configuration, then fill in the Issuer URL, Client ID and Client Secret. Save.
- Define the rules. Fill in step 3 (see below), then Save.
- Enable. Click Enable SSO. The server then checks that the issuer answers (OIDC discovery) and that at least one domain is verified.
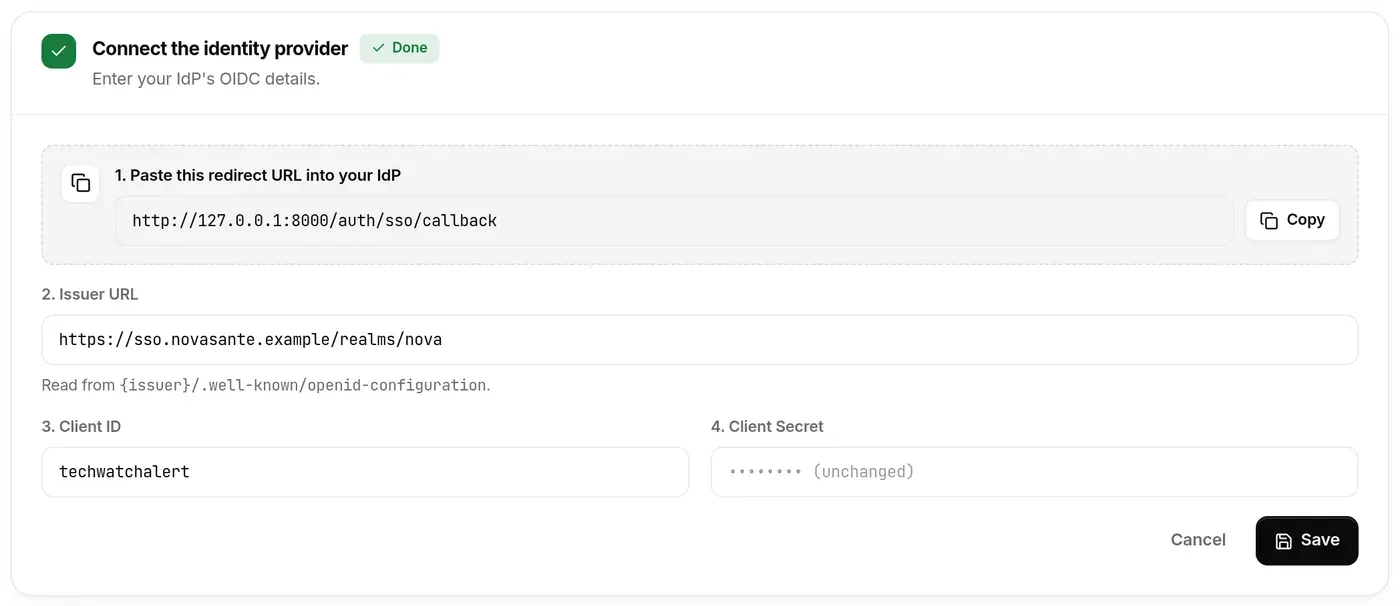
The client secret is never shown again: the field says (unchanged), and leaving it empty keeps the stored one. If you change the Issuer URL or the Client ID, the secret must be entered again: the server refuses to send the old secret to a new provider.
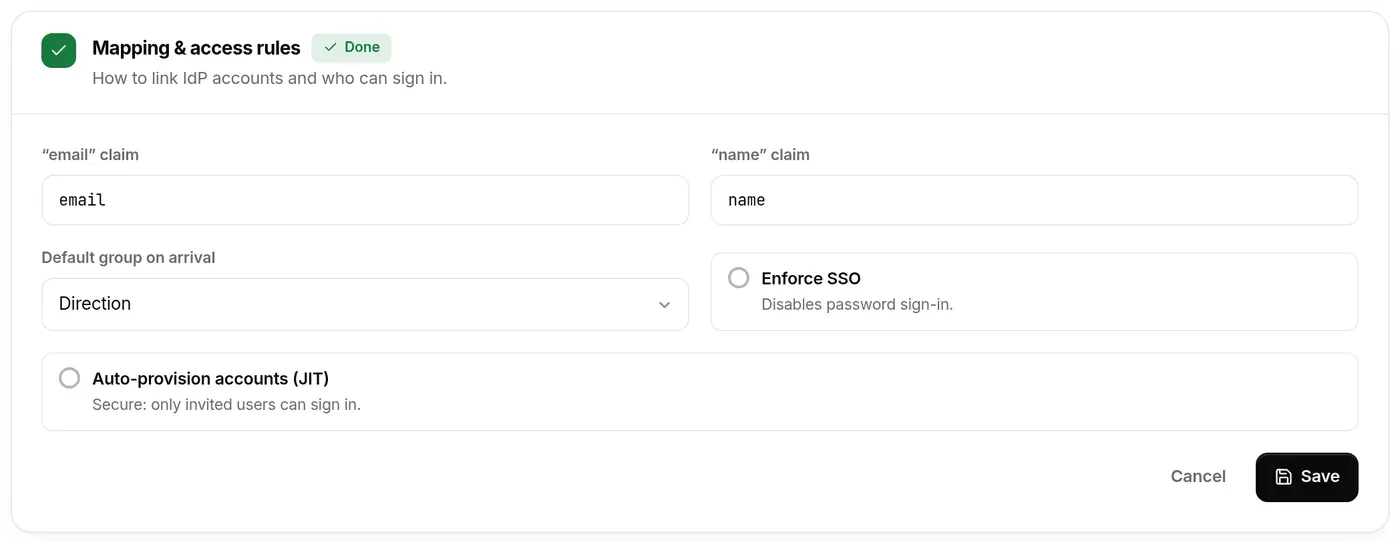
- “email” claim and “name” claim: the identity-token attributes to read (
emailandnameby default). The IdP must vouch for the email address (email_verified), and that address must belong to one of the organisation’s verified domains: otherwise sign-in is refused (“This address is not in a verified domain of your organization”), and the refusal is recorded in the audit log. - Default group on arrival: the group an account arriving through SSO is placed in; it decides their projects and rights. Required for the step to count as complete.
- Enforce SSO: disables password sign-in for addresses in the verified domains.
- Auto-provision accounts (JIT): Open, anyone from a verified domain authenticated by the IdP gets an account and joins the organisation; Secure (box unticked), only existing members and invited people can sign in.
SSO settings are reserved for Admins and the Owner; every save and every domain verification is recorded in the audit log. A domain not yet verified appears in the overview’s To do.
Audit log
Section titled “Audit log”The Audit log traces what happens in the organisation: members, groups, invitations, SSO, subscription, stack, URLs, end of life, CVE statuses, workflows, reports, NIS2 registers, incidents… It is included in the Pro and Business plans and reserved for Admins and the Owner.
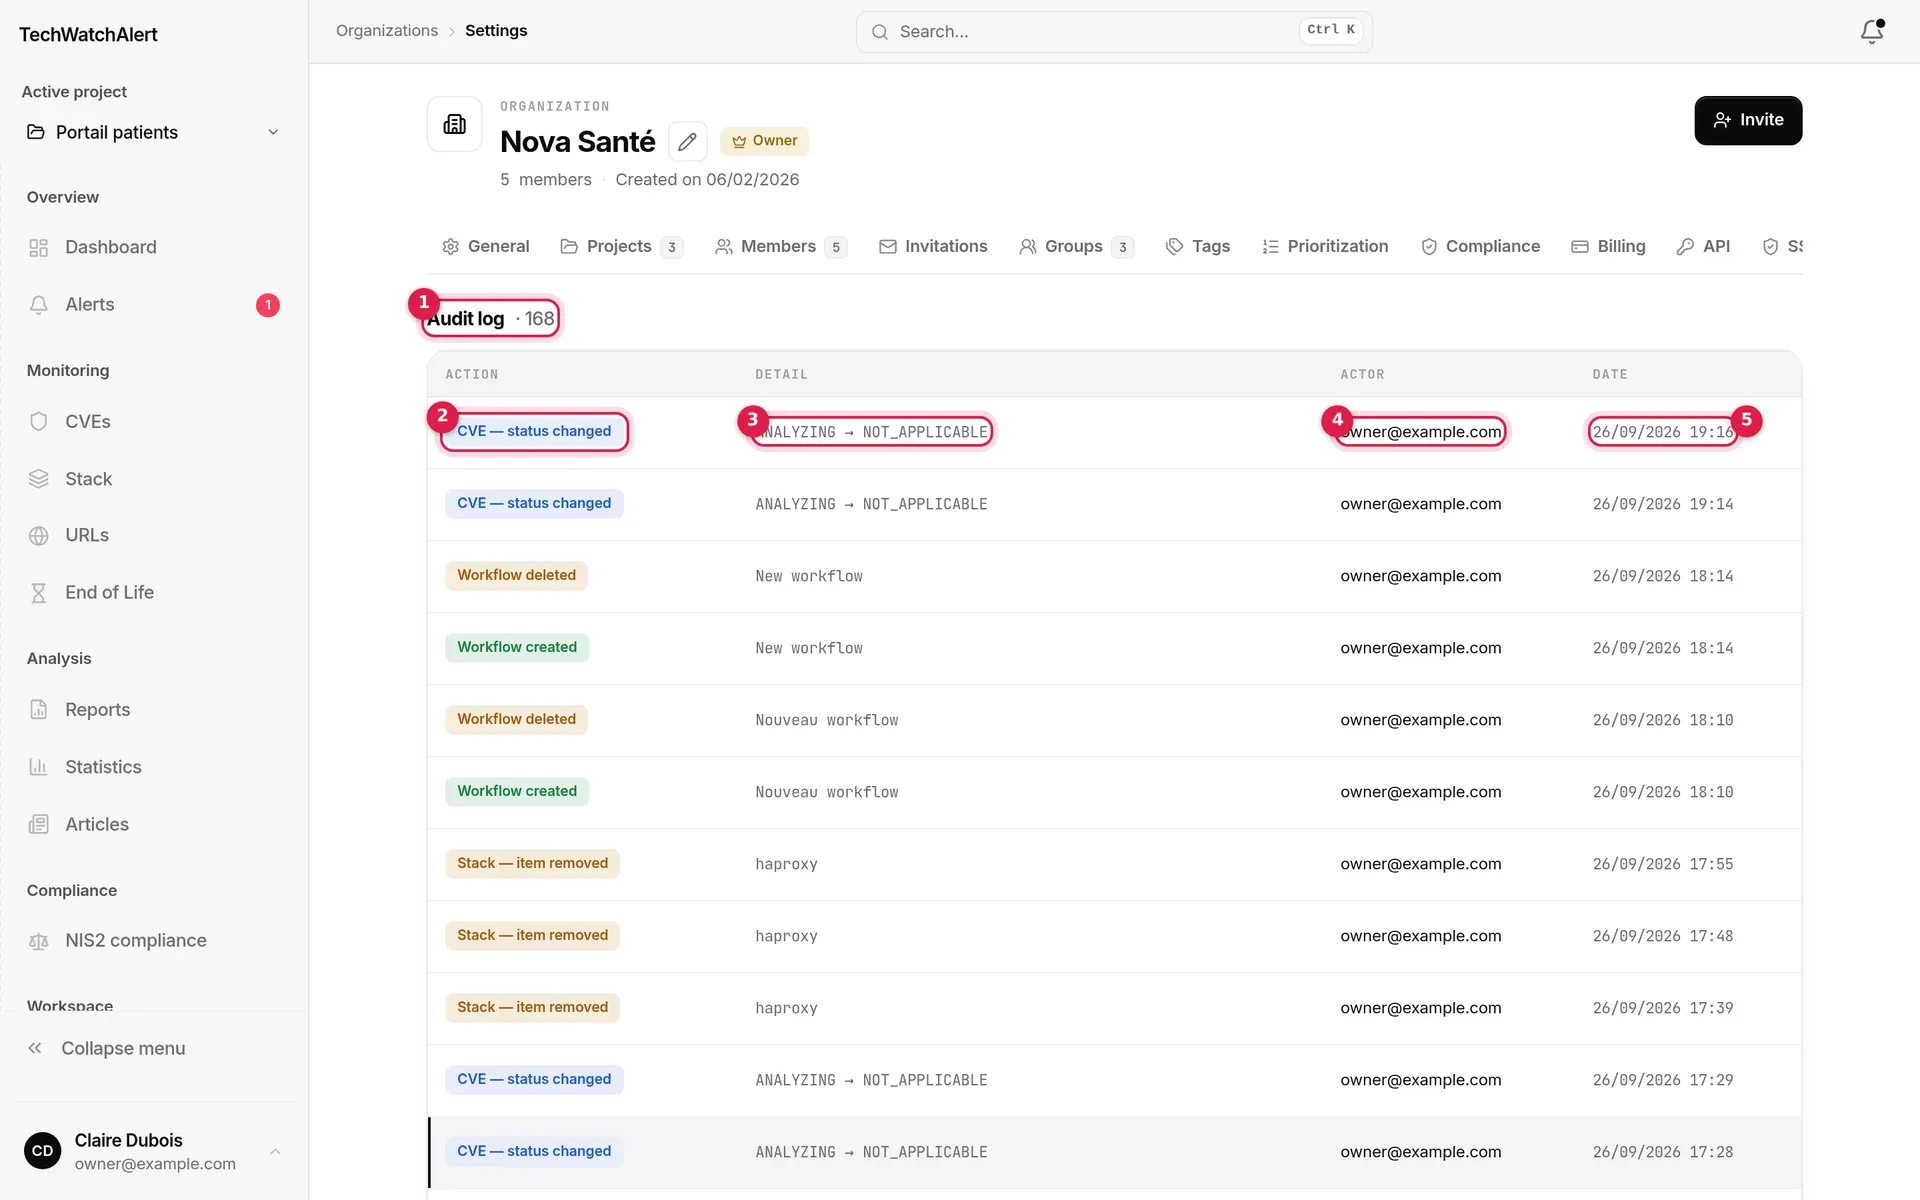
- At the top, the log’s retention under your plan, in one line.
- Two filters: All actions (pick an action) and Actor (part of the email address).
- Action, in a coloured badge: green for a creation, orange for a removal, red for sensitive actions (subscription cancellation, incident created…).
- Detail: the item concerned (name, address, CVE, or “old → new” for a change).
- Actor: the person’s address, or “system” for an automatic action.
- Date and time.
Entries are listed from most recent to oldest, 30 per page; the arrows at the bottom change page.

Entries are kept for 1 year on the Pro plan and 5 years on the Business plan (30 days on Free and 90 days on Team, where the log cannot be viewed). Some action types and details are displayed in French, and dates use the day/month/year format whatever the language.
Deleting the organisation
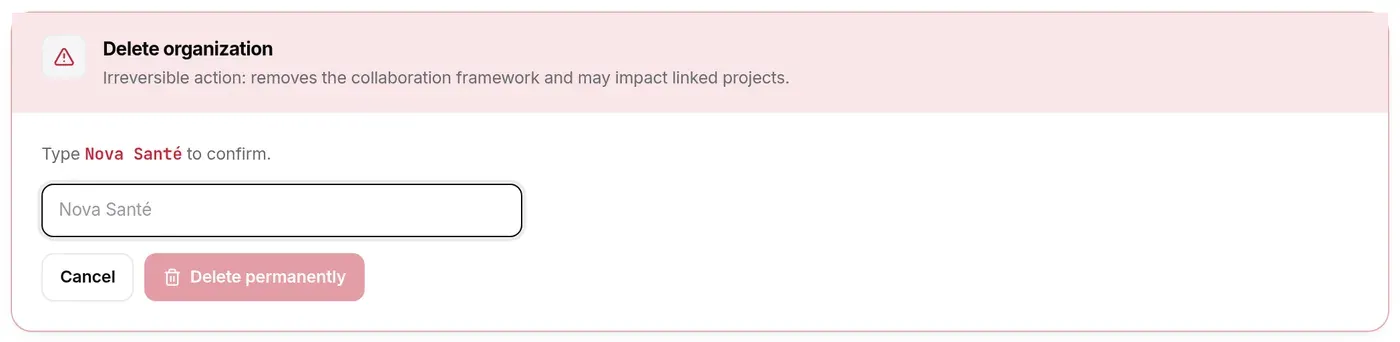
Section titled “Deleting the organisation”The bottom section of the General page, reserved for the Owner (the former “Danger” tab). Deletion happens in three steps, so that a click in a stolen session is not enough and a mistake can still be undone:
- The request, from this section. Nothing is deleted.
- The confirmation, through the link sent to your account’s address (valid for 24 hours, usable once). The organisation disappears at once.
- The permanent erasure, 30 days after the confirmation. Until then, support can restore everything.
Conditions
Section titled “Conditions”The section checks them before the click and says what blocks. Deletion is only possible:
- if you are the organisation’s Owner;
- if no other member remains: remove them (Members page) or transfer ownership to one of them (same General page). Members brought in by a partner count: detach the organisation from the partner first. Exception: the owner of a partner deleting the organisation of one of its clients, of which they act as owner; their team then loses access with them;
- while it manages no clients (Partner plan);
- while it keeps no NIS2 incident register: those incidents are evidence to be kept. Export the register as a PDF (Incidents page, Export › PDF register), then contact support to delete the organisation.
A personal space is not deleted on its own: it goes with the account (see Settings › Delete my account).
Requesting the deletion
Section titled “Requesting the deletion”- Click Delete organization (inactive while a condition is not met).
- Type the organisation’s exact name.
- Click Get the confirmation link. The message “Email sent to …” recalls the address and the link’s expiry. A new request cancels the previous one; 5 requests per hour at most.
- In the email, click Confirm the deletion. The page that opens (signed in or not) recalls what will be deleted: click Confirm the deletion. Opening the link is not enough, this second click is required.
What the confirmation changes
Section titled “What the confirmation changes”- The organisation is no longer listed nor accessible: projects, stack, alerts, cases, groups, tags and settings disappear for everyone.
- Nothing goes in or out any more: no new alert, workflows suspended, webhooks off, API keys deactivated, URL monitoring and inventory connectors stopped, SSO disabled, pending invitations revoked.
- A running Paddle subscription is cancelled immediately. If Paddle does not answer, the confirmation fails without changing anything: the same link will work again.
- An email confirms the date of the permanent erasure, 30 days later. Until then, write to support to cancel: the organisation comes back as it was, except the subscription, to be taken again from billing.
- If you no longer belong to any organisation, the application takes you back to the first-run setup to create one, right away and at every sign-in.
Who can do what
Section titled “Who can do what”| Action | Member | Admin | Owner |
|---|---|---|---|
| See the overview, projects (those you belong to), groups, prioritisation, remediation deadlines, frameworks and owners | ✓ | ✓ | ✓ |
| Rename, create projects, manage members (except Admins and the Owner), groups, invitations and tags | — | ✓ | ✓ |
| See “To do” and the plan’s usage | — | ✓ | ✓ |
| Delete a project of the organisation | — | ✓ | ✓ |
| Change the prioritisation policy and remediation deadlines | — | ✓ | ✓ |
| API keys, connected applications, SSO (Business plan), audit log (Pro and Business plans), management report | — | ✓ | ✓ |
| Billing, plan changes, cancellation | — | — | ✓ |
| Appoint NIS2 owners | — | — | ✓ |
| Transfer ownership, delete the organisation | — | — | ✓ |
The Admin role comes from the Administrateurs system group (see Team, roles and groups).
Frequently asked questions
Section titled “Frequently asked questions”I can see neither the Audit log page nor Plan and billing. Your role does not open them: the log is for Admins and the Owner, billing for the Owner only (see the table above). A page with a padlock, on the other hand, is outside the plan.
Where did the Invitations tab go? To the Members page, Invited segment.
Where did the Danger tab go? To the bottom of the General page: Transfer ownership, then Delete the organisation.
We are on Pro: can we prepare SSO? No: without the Business plan the SSO page carries the plan’s padlock and the server refuses any configuration.
An API key has leaked. Revoke it at once on the API keys page; it is refused from the next call. Create a new one limited to the scopes and projects you actually need.
How do I transfer ownership of the organisation? General page, Transfer ownership section (or the member’s profile): they become Owner, you become Admin.
Deleting the organisation is refused. It still has other members, clients (Partner plan) or a NIS2 incident register, or Paddle could not cancel the running subscription: the message says which.
I did not receive the confirmation email. It goes to your account’s address (Settings › Profile); check your spam folder. The link expires after 24 hours: make the request again.
I deleted the organisation by mistake. Write to support within 30 days of the confirmation: it can be restored.