Account settings
The Settings window gathers what concerns you only: your profile, your account’s security, how often you get alert emails, the theme and the language. Anything that concerns a team (members, subscription, API keys) is set in the organisation.
- Who it is for: every signed-in user, for their own account.
- Where: the user menu at the bottom of the sidebar › Settings. Also through the command palette (Ctrl K): “My profile”, “Security”, “Preferences”. The “Manage notifications” link in emails opens the Notifications tab directly (address
/settings?tab=…, which brings you back to the dashboard with the window open).
The user menu
Section titled “The user menu”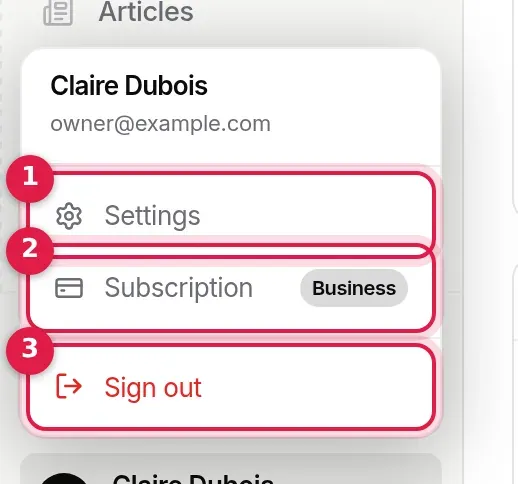
- Settings: opens the window described on this page.
- Subscription: opens the subscription window; the badge shows your current organisation’s plan (see Plan and billing).
- Sign out (see Account and sign-in › Signing out).
Profile
Section titled “Profile”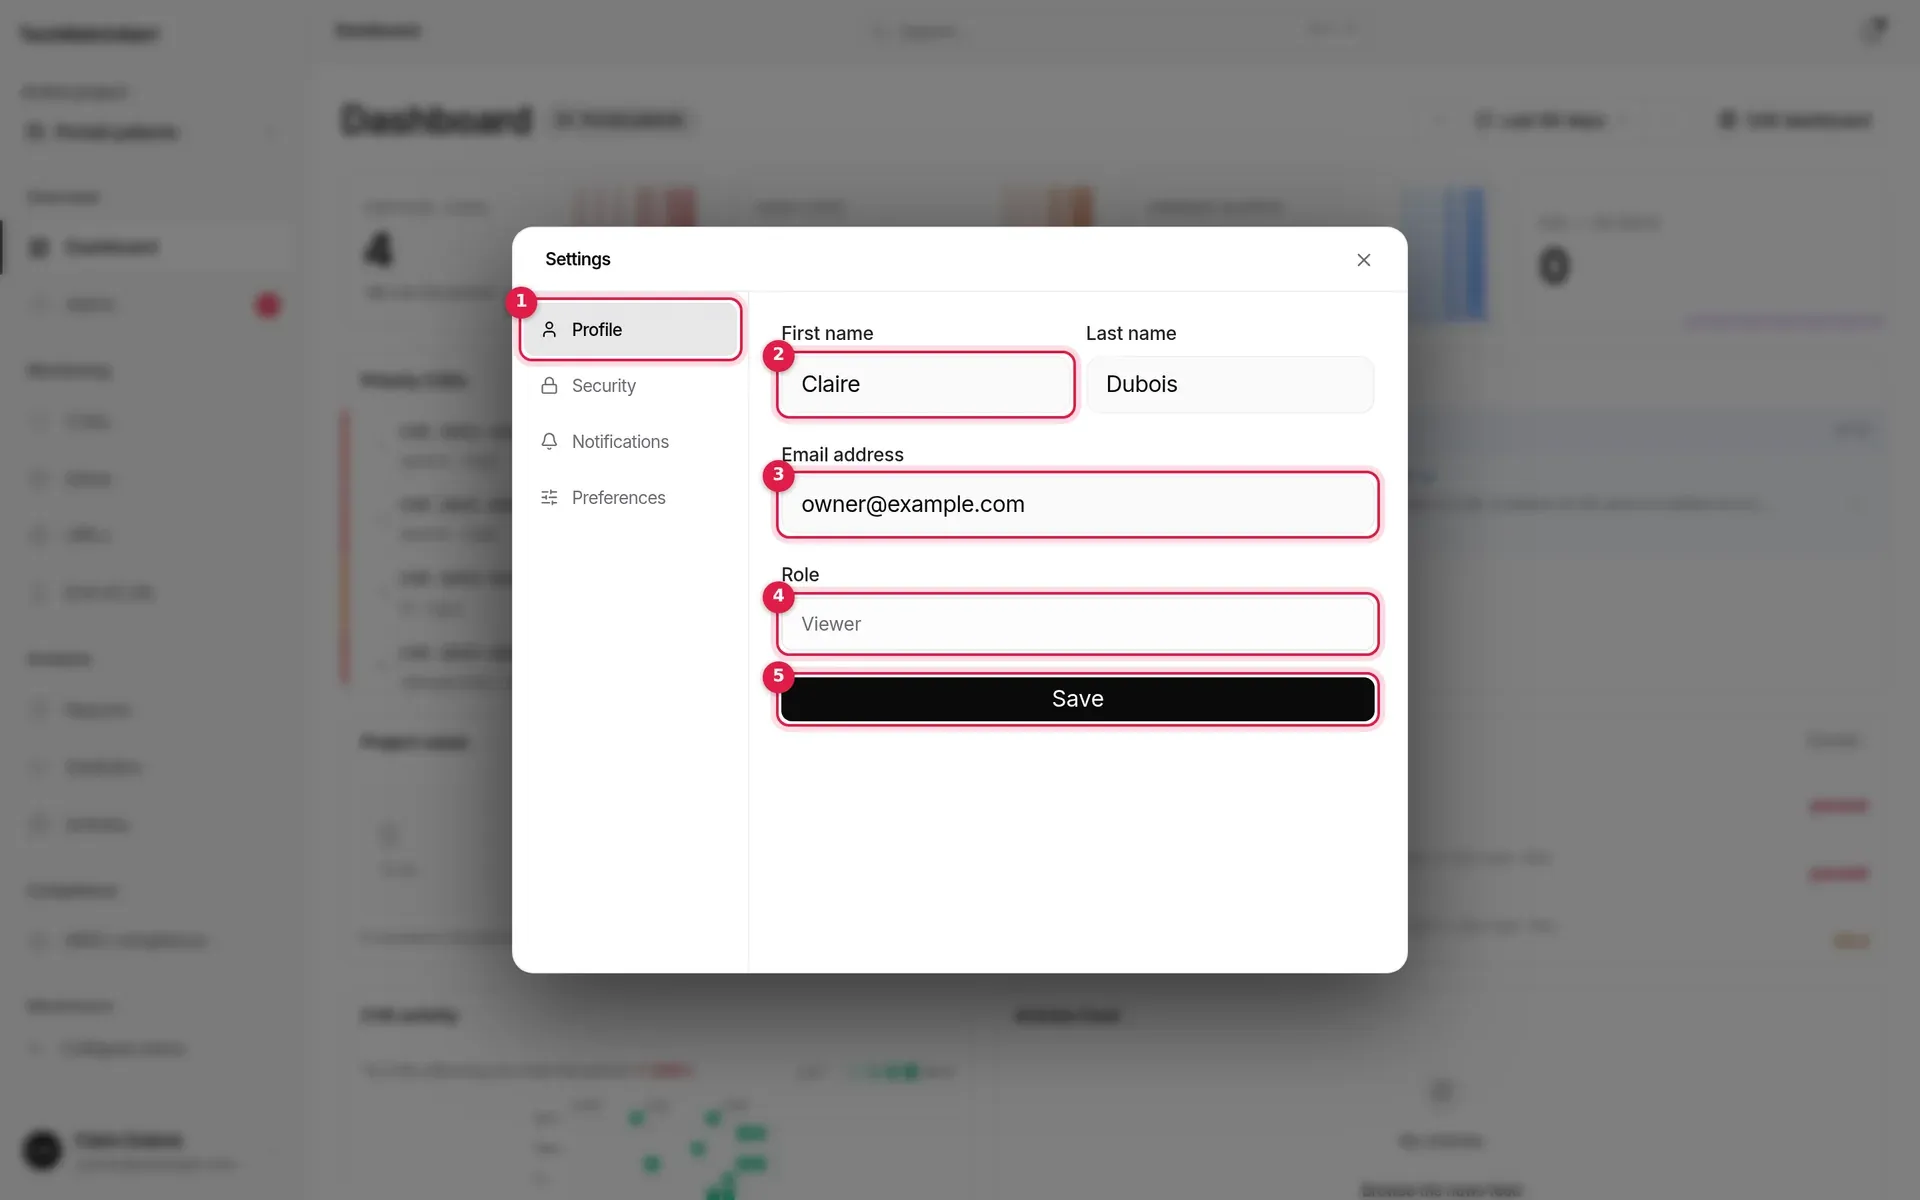
- The tabs: Profile, Security, Notifications, Preferences, Connected apps. The arrow keys move between them; Escape closes the window.
- First name and Last name: your name as shown throughout the app (members, histories, audit log). It is stored as a single field: the first word becomes the first name, the rest the last name.
- Email address: your sign-in identifier. Changing it goes through a confirmation (see below).
- Role: your account’s role on the platform, read-only. It is separate from your organisation and project roles (see Team, roles and groups).
- Save: the button reads Saved once the change has gone through.
Changing your email address
Section titled “Changing your email address”As soon as you edit the address, a Current password field appears below it: it is required.
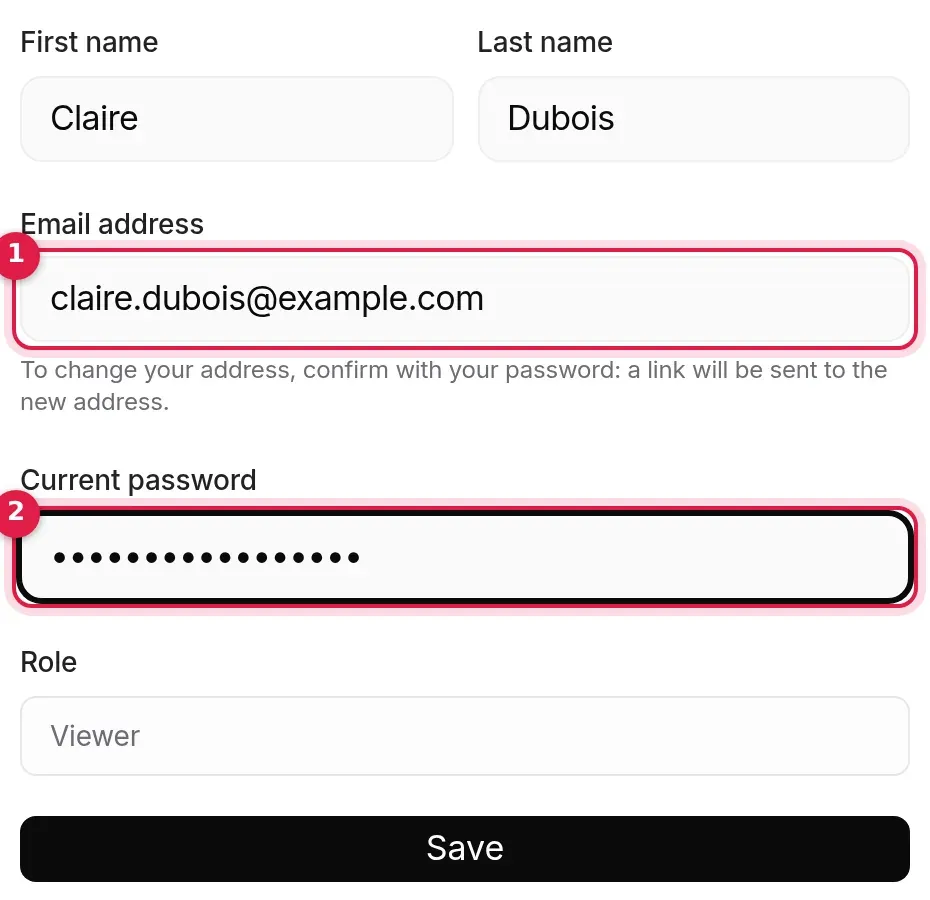
- The new address, with the reminder that “a link will be sent to the new address”.
- The account’s current password.
- Enter the new address, then your current password.
- Click Save. The message “A confirmation email has been sent to …” appears; the account address does not change yet.
- Open the email received at the new address and click the link, valid for one hour, from any device.
- The Email address changed. screen confirms the change.
What happens then:
- the account address becomes the new one, already confirmed; it is the one to type at your next sign-in;
- all your other sessions are signed out; the device that opened the link, if it was signed in to this account, stays signed in;
- the old address receives a notice of the change, so that a takeover does not go unnoticed;
- the change is recorded in the audit log.
Rules applied: correct password, an address different from the current one and not taken (an address already used by another account is refused, including at the time of the click), one request at a time (the latest cancels the previous one), 5 requests an hour at most. An email invitation stays tied to the address it was sent to.
Security
Section titled “Security”Changing your password
Section titled “Changing your password”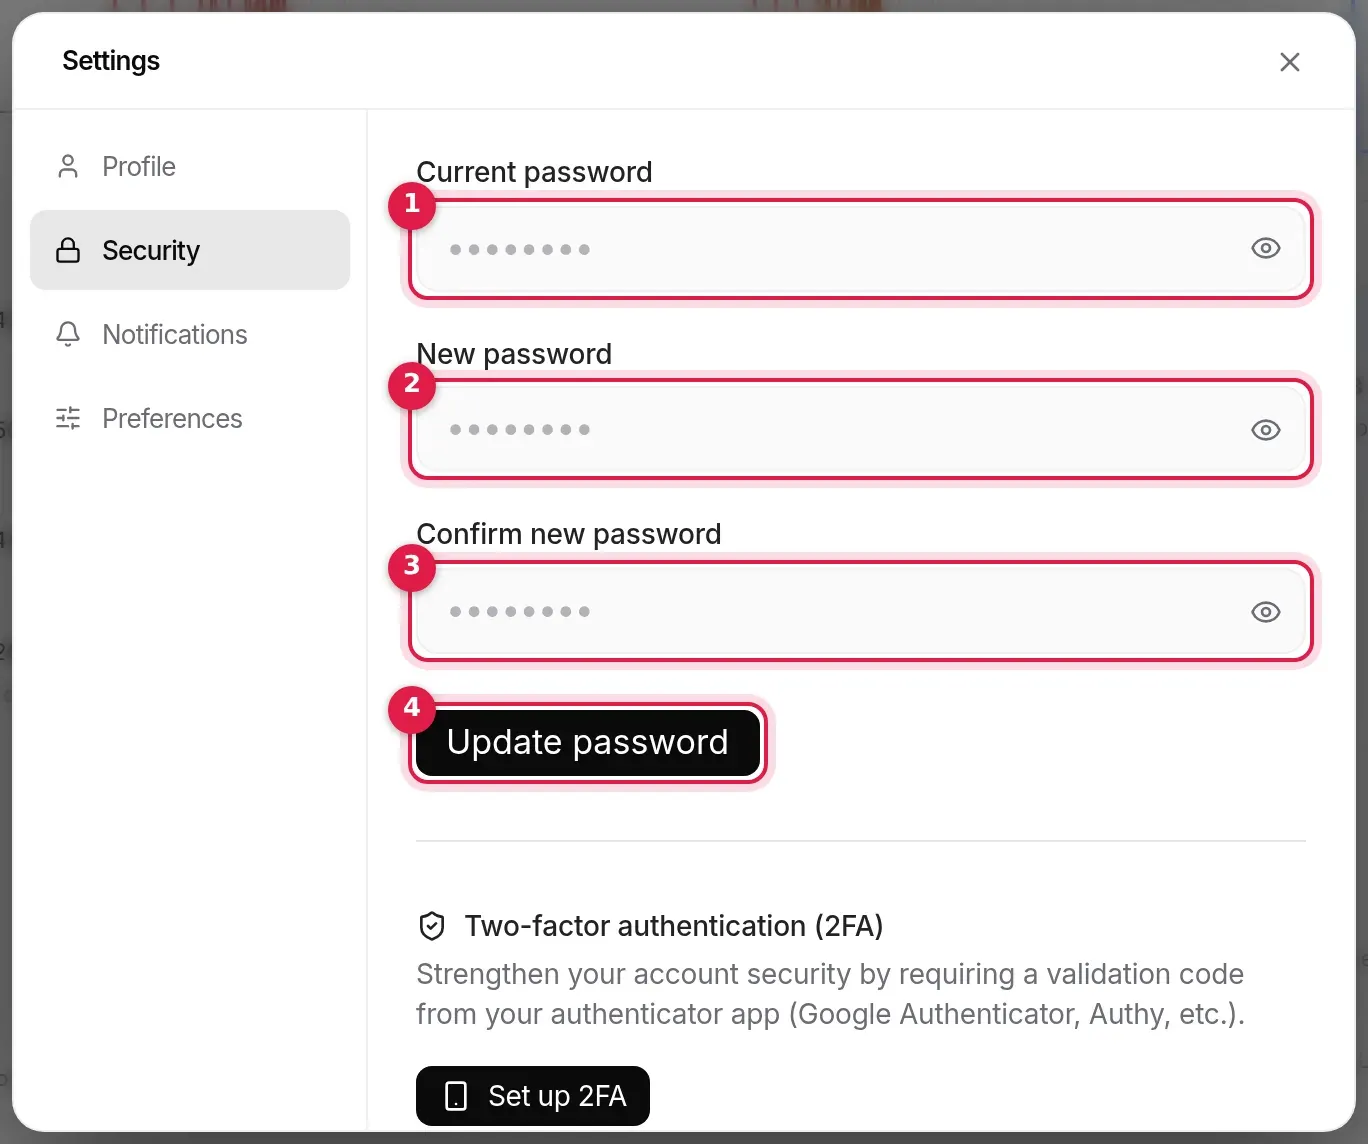
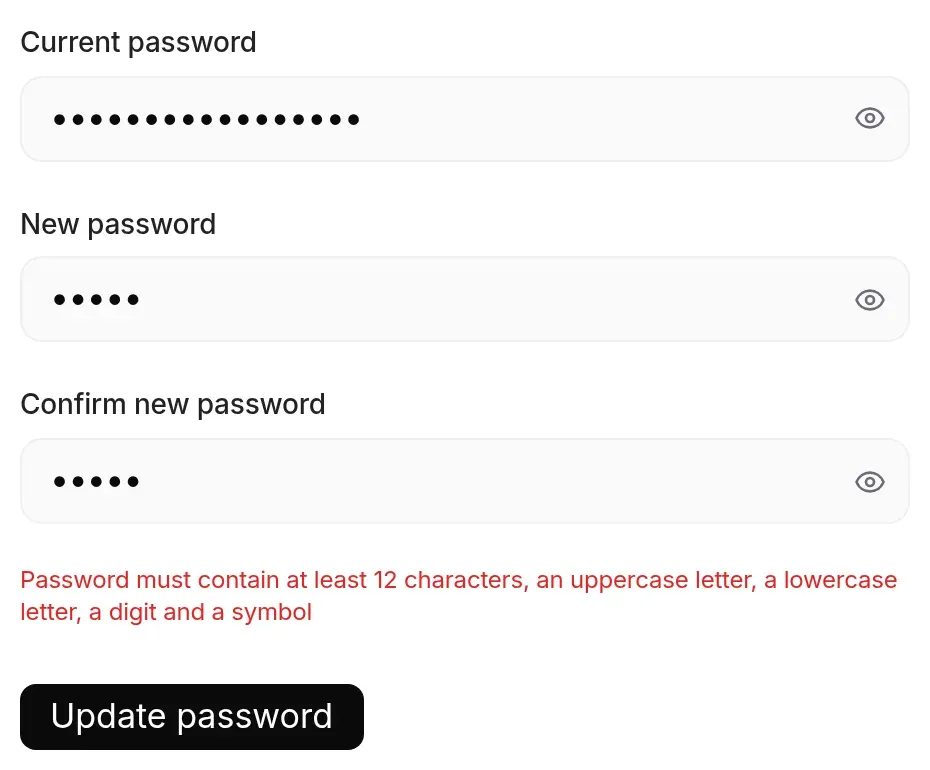
- Current password.
- New password.
- Confirm new password.
- Update password.
The eye at the end of each field shows or hides what you typed.
Rules checked before sending, then by the server (the same as at sign-up and reset):
- at least 12 characters, including an uppercase letter, a lowercase letter, a digit and a symbol (any character that is neither a letter nor a digit);
- both entries of the new password must match;
- the current password must be correct (a failure is logged).
Two-factor authentication (2FA)
Section titled “Two-factor authentication (2FA)”Two-factor authentication adds, at every sign-in, a 6-digit code from an authenticator app (Google Authenticator, Authy, FreeOTP…). Using it when signing in is covered in Account and sign-in › Two-factor authentication.
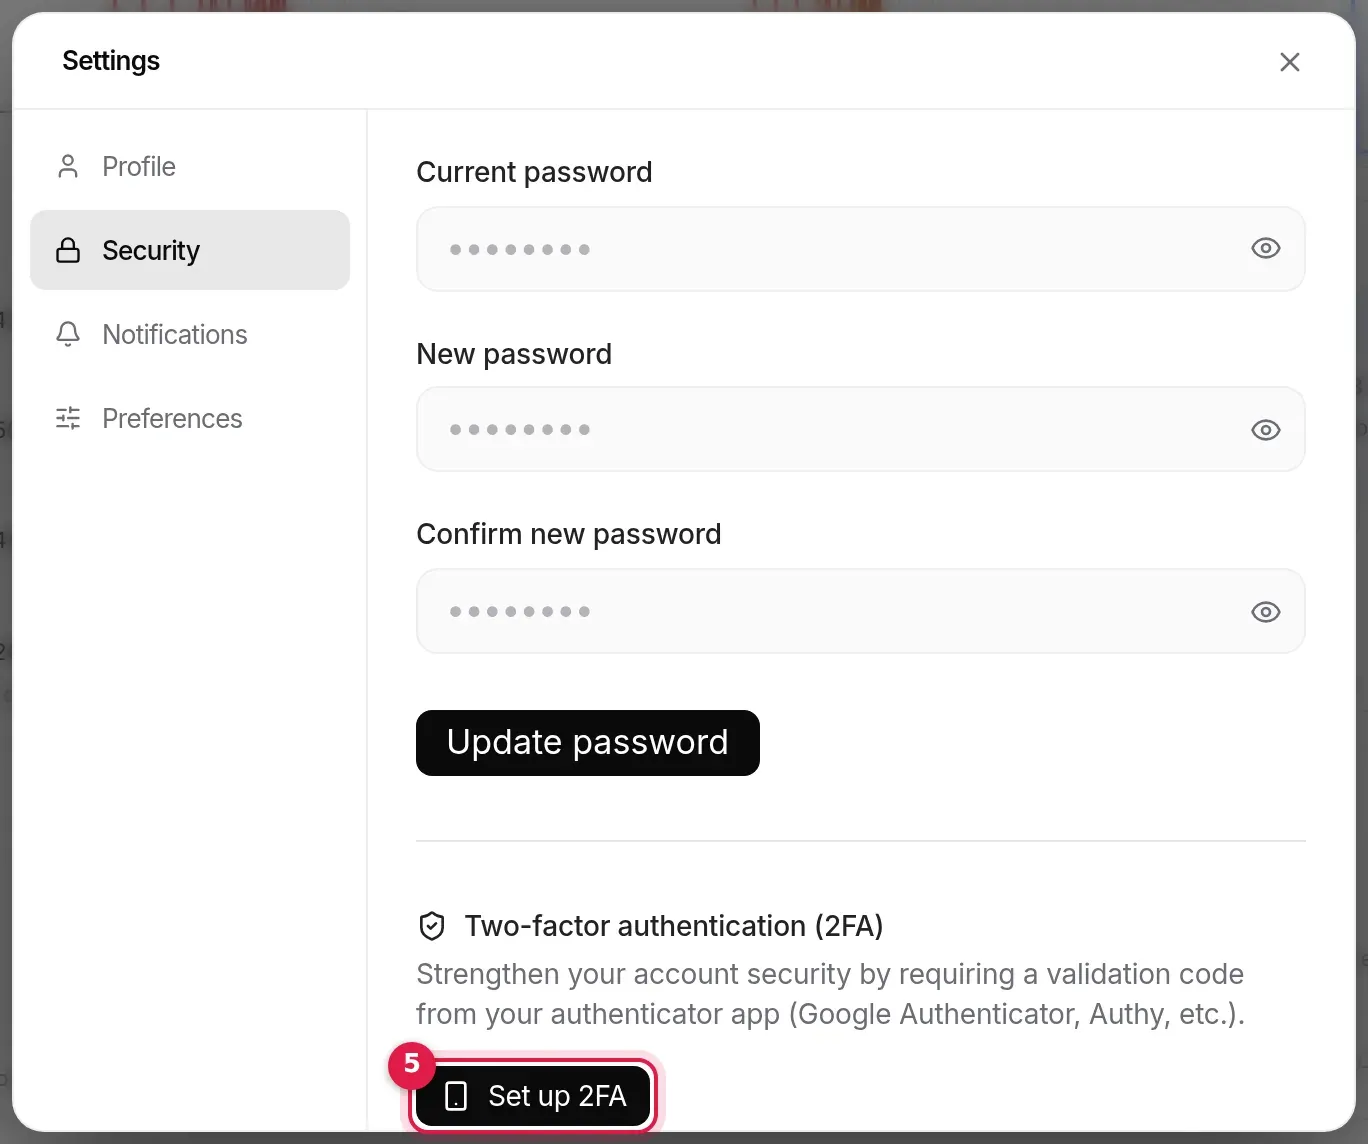
- In the Security tab, click Set up 2FA (marker 5).
- Scan the QR code with your app, or type the key shown under Manual entry.
- Enter the 6-digit code shown by the app, then click Enable (active once all 6 digits are entered).
- Keep your recovery codes: click Download (text file) or Copy. The I’ve saved my codes button only becomes active after one of the two.
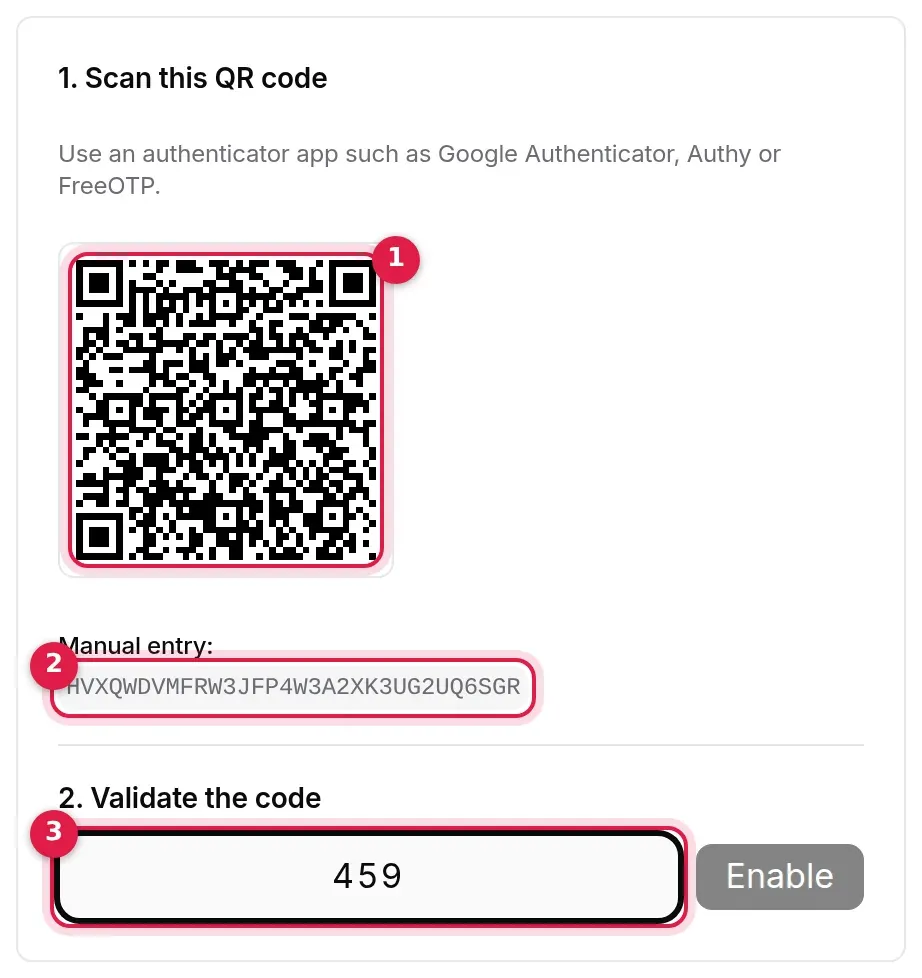
- The QR code to scan.
- The key to type by hand if you cannot scan.
- The app’s 6-digit code.
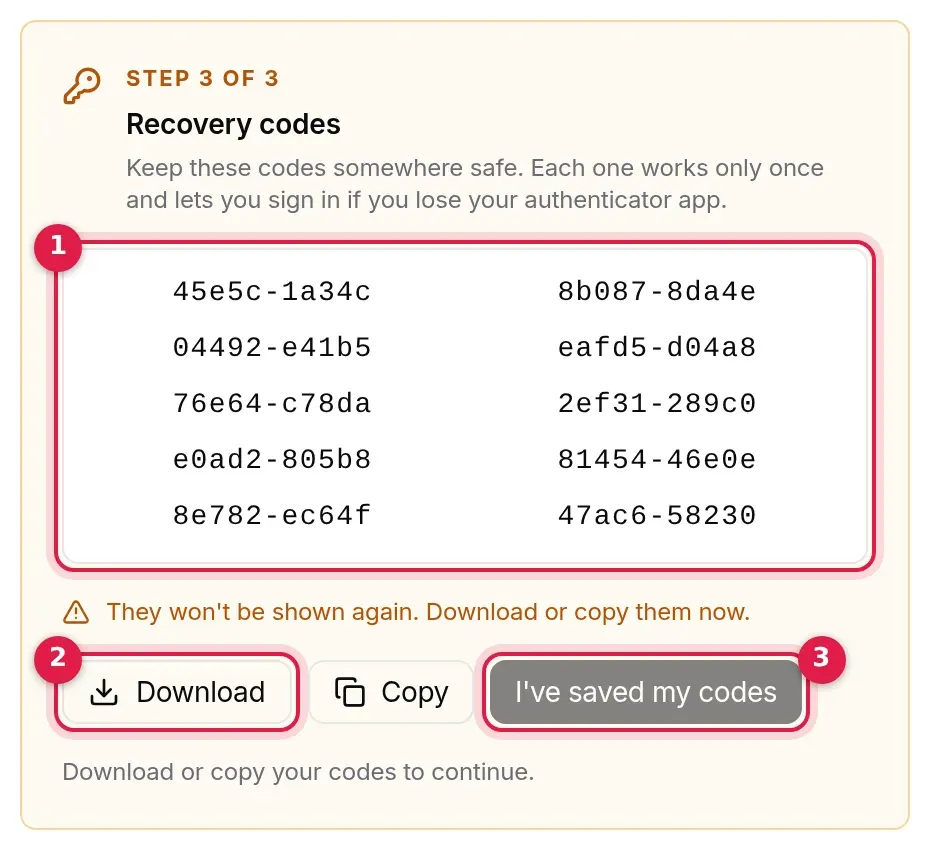
- Ten recovery codes, formatted
xxxxx-xxxxx. Each works once and stands in for the app’s code if you lose it. - Download or Copy.
- I’ve saved my codes: completes the set-up.
The codes are shown only once: only their fingerprints are stored. Turning on 2FA ends your other sessions; the device you turn it on from stays signed in.
Once 2FA is on, the tab shows its state:
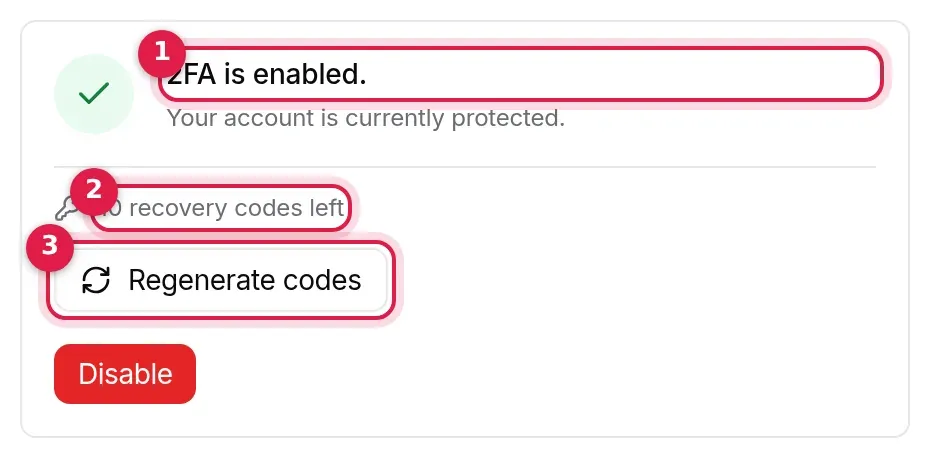
- 2FA is enabled.
- The number of recovery codes remaining.
- Regenerate codes: enter a code from your app, then Generate new codes. A new set of ten codes is shown; the old ones stop working.
Disable also asks for a code from the app.
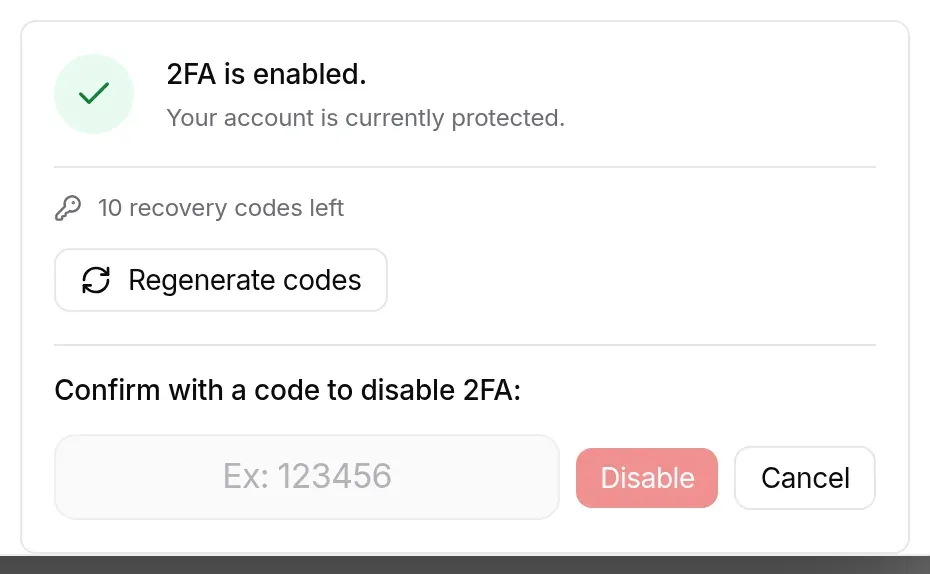
Operations that require a code (turning on, turning off, regenerating codes) accept 5 attempts per quarter of an hour; beyond that, the message “Trop d’essais de code. Réessayez dans 15 minutes.” (too many code attempts, try again in 15 minutes) is shown. A code that has been accepted cannot be used again.
Delete my account
Section titled “Delete my account”At the bottom of the Security tab, the red Delete my account area. As for an organisation, deletion happens in three steps: the request (nothing changes), the confirmation through the link sent to the account’s address (valid for 24 hours, once), then the permanent erasure 30 days later. Until then, support can restore the account.
Before any click, the area tells you:
- what blocks: being the only owner of an organisation that has other members. Transfer its ownership (member’s page › Transfer ownership) or remove the members; the Open link leads to the organisation’s Members tab. An organisation that manages clients or keeps a NIS2 incident register blocks too;
- the organisations deleted with the account: those where you are the only member, personal space included. They follow the organisation deletion and are restored with the account;
- the organisations you will leave: those you share with others.
- Click Delete my account (inactive while something blocks).
- Enter your password and, if two-factor authentication is on, a code from the app.
- Tick “I understand that my account and the organizations listed will be deleted”, then Get the confirmation link.
- In the email, open the link and click Confirm the deletion.
Once confirmed, the account is deactivated: all sessions are signed out, sign-in is refused, no alert is sent any more, and the subscription of the organisations deleted with it is cancelled. The address stays reserved until the erasure.
What is erased after 30 days, and what remains (GDPR):
- erased: the account (address, name, password, 2FA, preferences, notifications, sessions), your personal projects, the organisations deleted with it, invitations sent to your address;
- kept, without your name: what you wrote in the organisations you share (comments, cases, discussions, stack) belongs to the team;
- anonymised: the audit log keeps its entries, but the author becomes “[compte supprimé]” (deleted account), with no address or IP.
If your organisation enforces SSO, ask support for the deletion. If you sign in with SSO and have no password, set one first (“Forgot password”).
Notifications
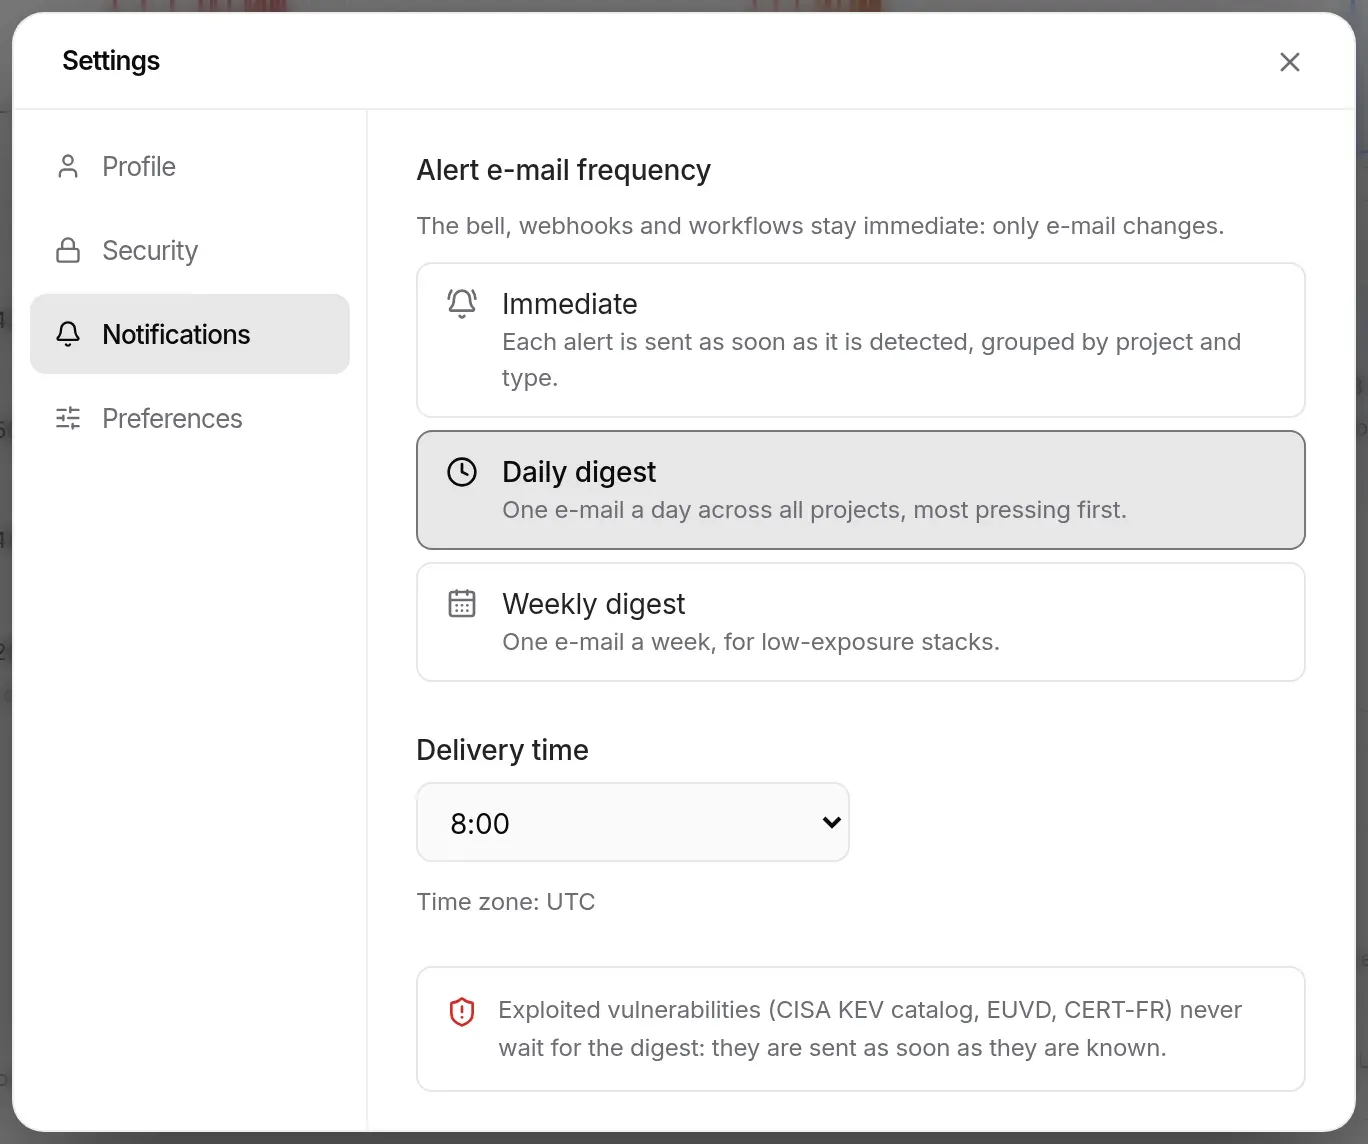
Section titled “Notifications”The Notifications tab sets how often you receive alert emails: immediately, as a daily digest or as a weekly digest, with the sending day and time. The bell, webhooks and workflows stay immediate; exploited flaws never wait for the digest. Everything is detailed in Notifications and channels › Your preferences.
Preferences
Section titled “Preferences”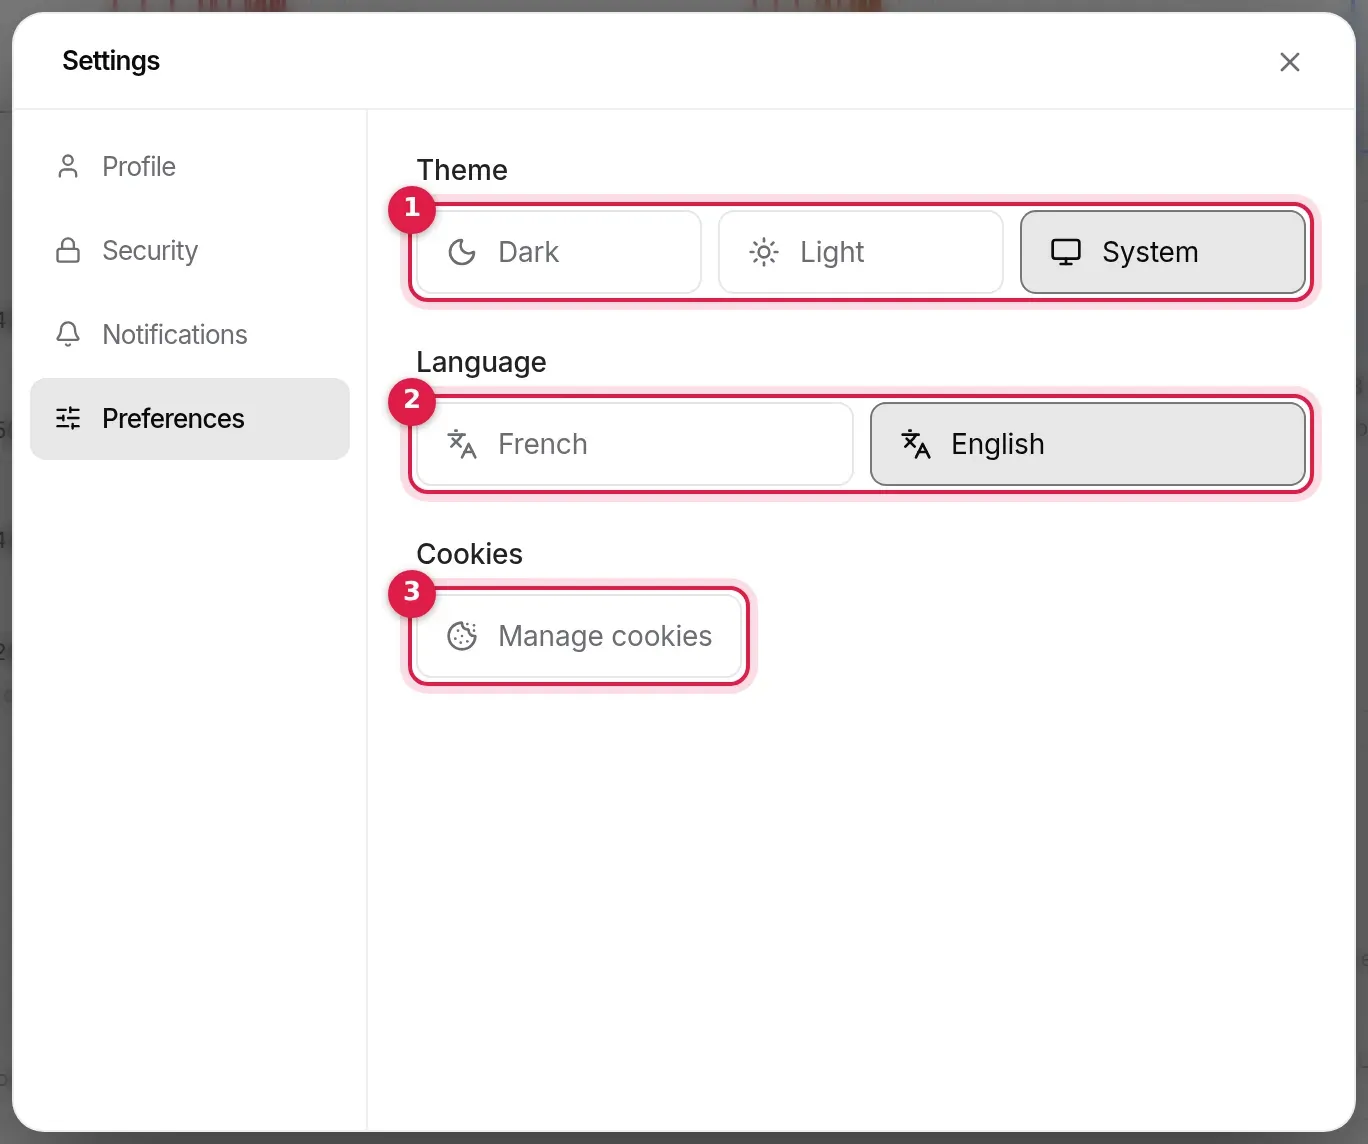
- Theme: Dark, Light or System. System follows the light or dark setting of your computer or phone, and changes with it; it is the default. It applies at once and is remembered in this browser.
- Language: French or English. The app reloads in the chosen language, on the same page. Dates follow the language: British English in English, “30 Aug 2026, 15:39” (day before month, 24-hour clock); in French, “30 août 2026, 15:39”.
- Cookies › Manage cookies: reopens the consent banner so you can change your choice about audience measurement.
Connected apps
Section titled “Connected apps”The Connected apps tab lists the applications you have given access to your data, such as Claude through the MCP connector: the application’s address and the name it gives itself, the organization, the permissions (Read, Write, Stays connected), the grant date and the last use. Revoke cuts access immediately; the application will have to ask for your authorization again.
What the window does not offer
Section titled “What the window does not offer”- Session list: there is no screen of signed-in devices. Changing your password ends every session.
- Personal API keys and billing: they live in the organisation (API keys and Plan and billing pages, see Organisations).
Frequently asked questions
Section titled “Frequently asked questions”I lost my phone and my 2FA. Sign in with one of your recovery codes instead of the app’s code (see Account and sign-in), then disable and re-enable 2FA on your new phone.
I can no longer see my recovery codes. They are shown once only. If you no longer have them, Regenerate codes: a new set replaces the old one.
The theme changes when I switch browser. The theme is remembered per browser, not in your account.