Clients
Each client is a TechWatchAlert organisation attached to your partner organisation. It keeps its projects, stack and alerts, kept apart from those of your other clients; your team gets in without an invitation, and you choose its plan, Team or Pro, paid for through your Partner subscription.
- Who it is for: owners and administrators of the partner organisation.
- Where: Partner space › Clients; a click on a client opens its client page.
- Prerequisite: the Partner plan must be active to add, attach or change a client’s plan (see Partner plan inactive).
The client list
Section titled “The client list”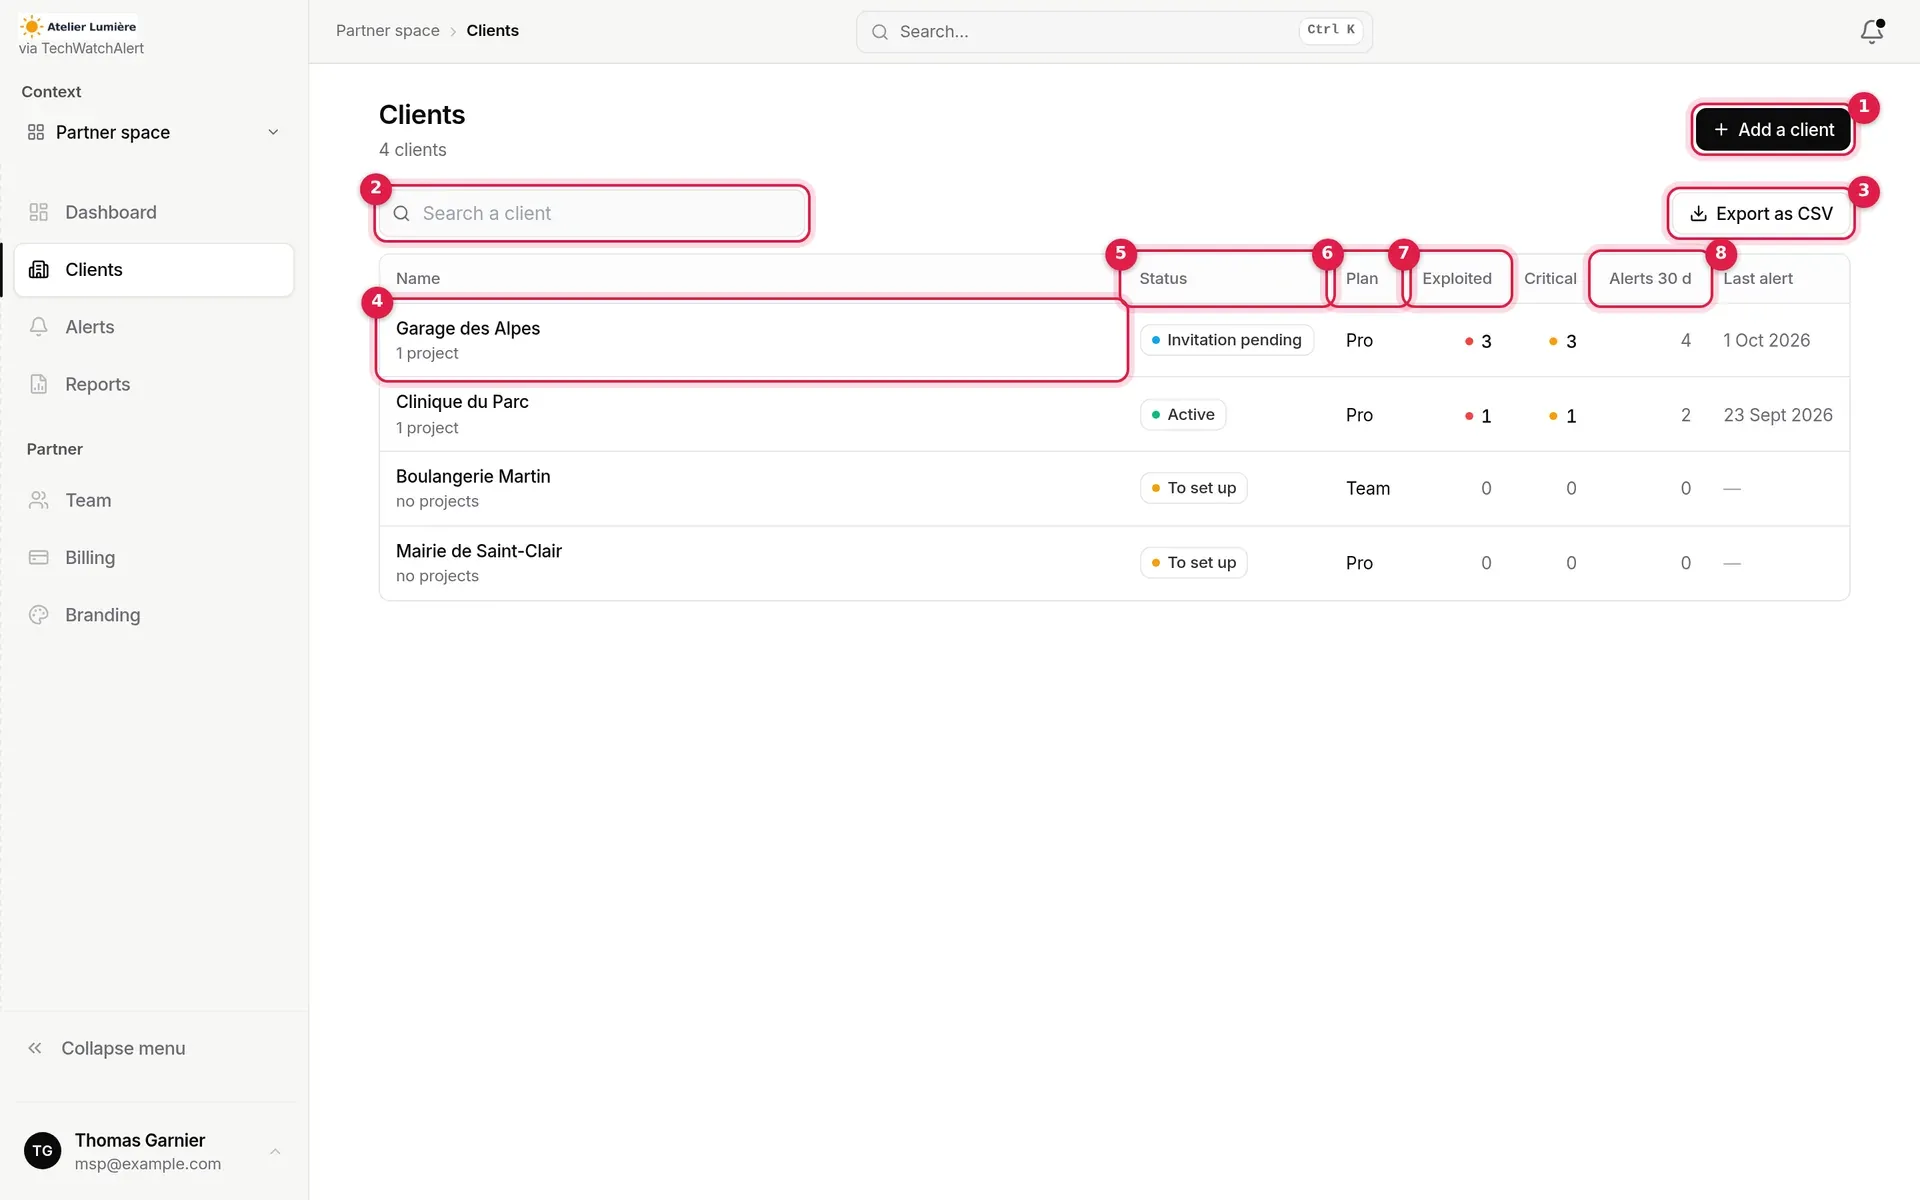
- Add a client (see below).
- Search a client: filters the list as you type, ignoring case and accents.
- Export as CSV: downloads the rows shown (
clients.csv, “;” separator, readable by Excel). - Name of the client, its number of projects and “NIS2” if the module is enabled on one of them. A click on the row opens the client page.
- Status (see Statuses).
- Plan: Team or Pro.
- Exploited and Critical: alerts still open whose CVE is exploited, or critical (a coloured dot shows there are some).
- Alerts 30 d and Last alert.
Order: the most exposed client first (most open exploited, then critical, then alerts over 30 days), then by name. The counters only cover projects you are a member of. On a narrow screen, the number columns are hidden.
Statuses
Section titled “Statuses”| Status | Rule applied |
|---|---|
| To set up | The client has no project, or no component in its projects’ stack. |
| Invitation pending | Project and stack are there; a contact invitation is awaiting an answer, and none of the client’s contacts is a member yet. |
| Active | Every other case. |
Only named, unexpired invitations count. The partner’s team, present at the client’s by delegation, is not a “client contact”.
The client page
Section titled “The client page”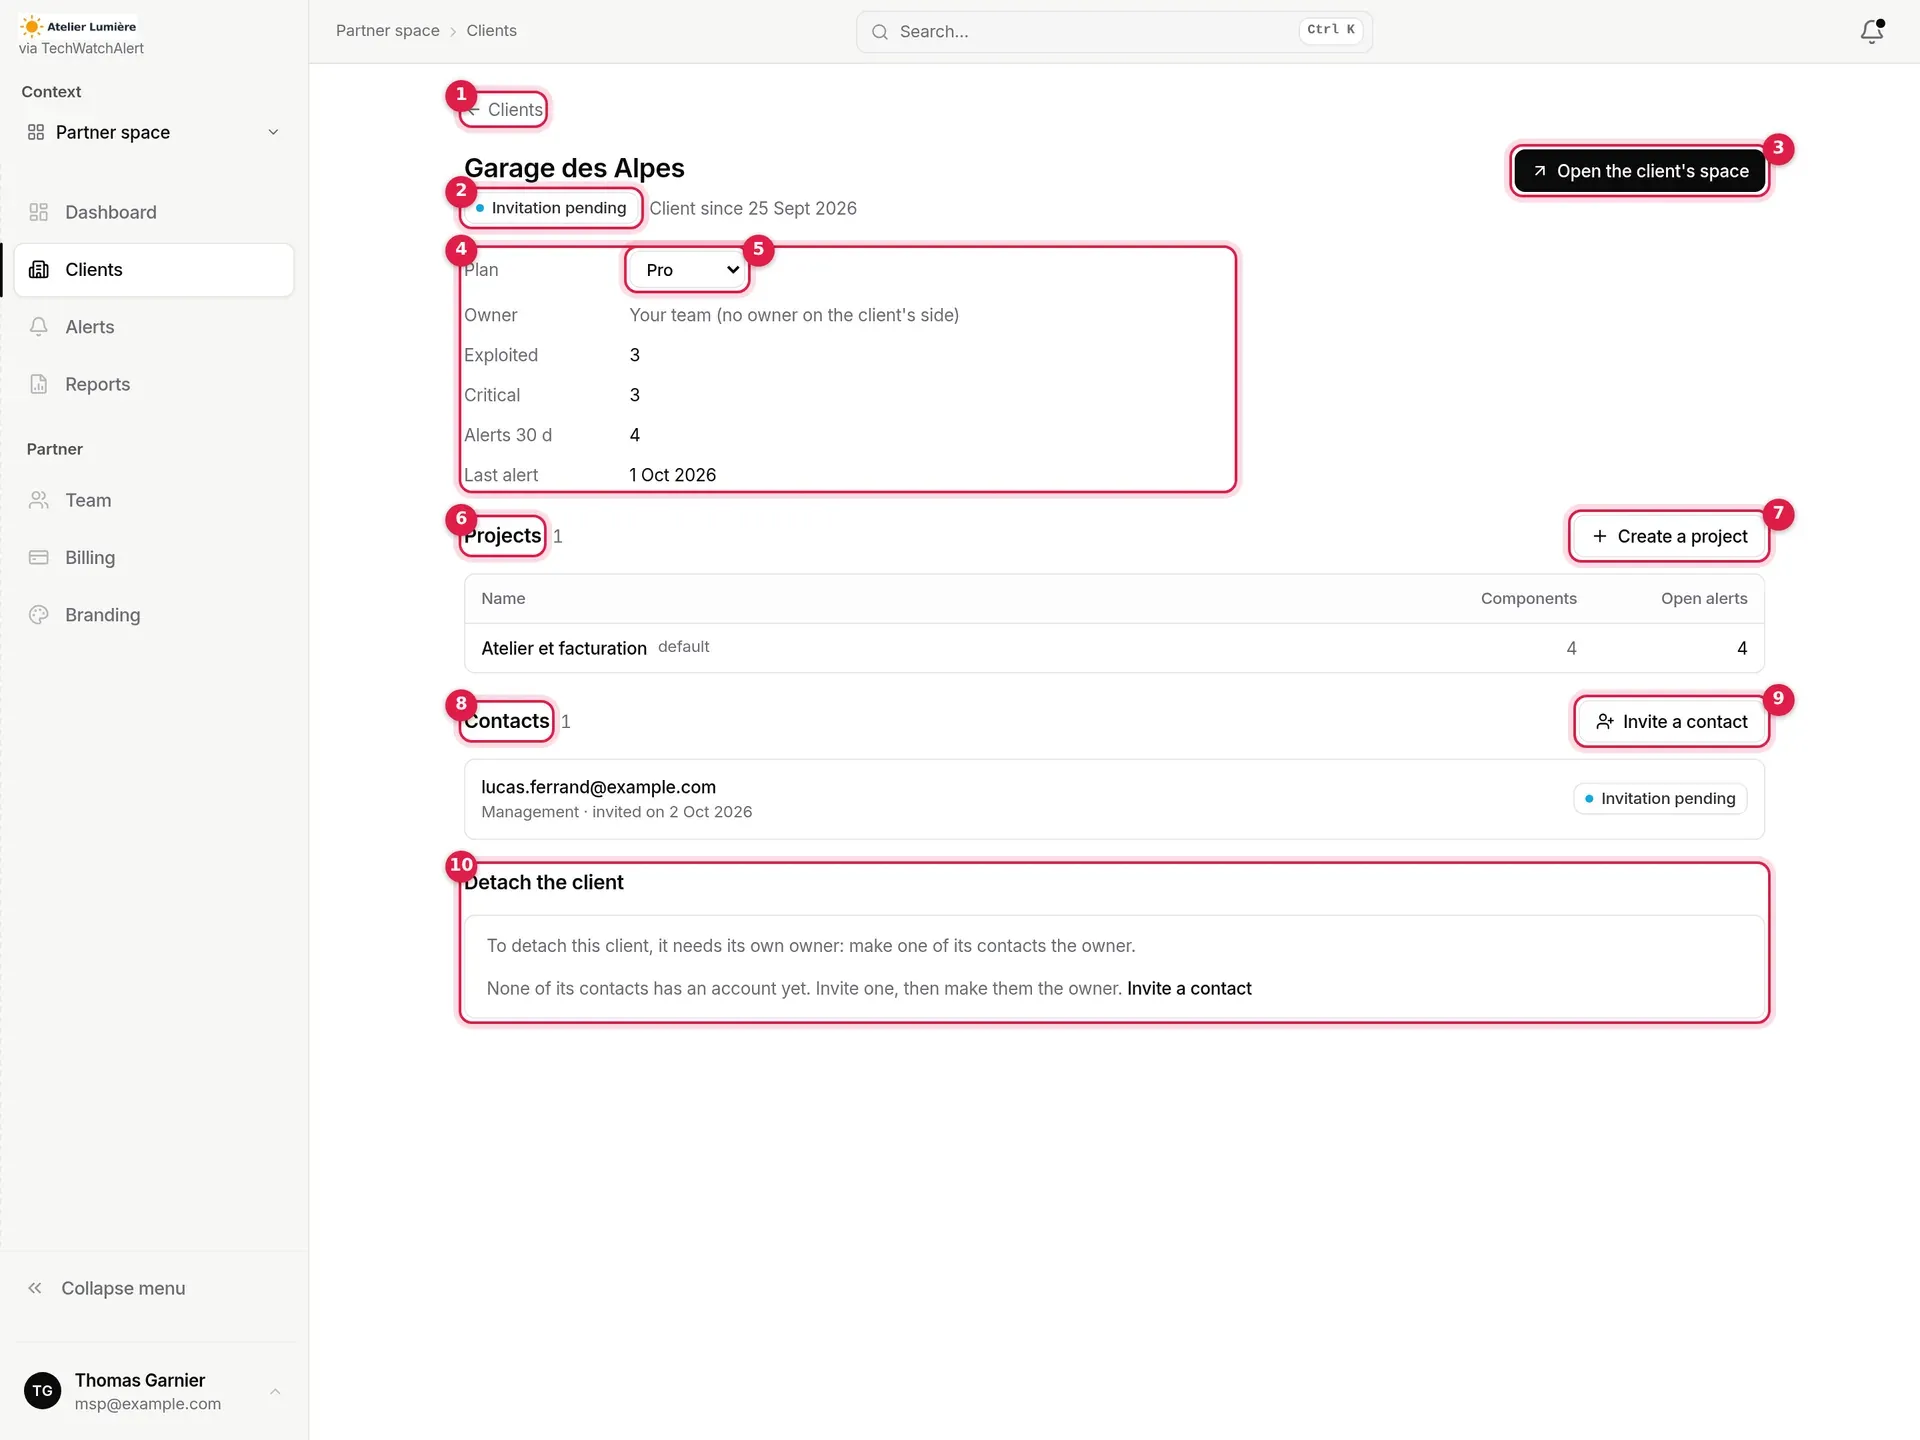
- Clients: back to the list.
- Status and the client’s start date (“Client since …”).
- Open the client’s space: opens its default project on its dashboard. Greyed out while the client has no project.
- Properties: plan, owner, and the Exploited, Critical, Alerts 30 d and Last alert indicators (across all the client’s projects).
- Plan: Team or Pro, which you can change at any time.
- The client’s Projects.
- Create a project at the client’s.
- The client’s Contacts.
- Invite a contact.
- Detach the client.
The client’s plan
Section titled “The client’s plan”A plan change applies straight away and billing follows. Switching to Team a client that has NIS2 enabled asks for confirmation: Team does not include NIS2, so the module will be locked for this client; its NIS2 data is kept and returns with Pro.
The Owner row shows the address of the client’s owner, or “Your team (no owner on the client’s side)” for a client created from the Partner space: your organisation’s owners stand in until the client has an owner of its own.
Getting started
Section titled “Getting started”While a step is missing, the Getting started section lists the three steps and their progress:

| Step | Done when | Action offered |
|---|---|---|
| Create a project | the client has at least one project | Create |
| Fill in the stack | at least one component is in the stack of one of its projects | Open the stack (default project; not shown without a project) |
| Invite a client contact | a contact is a member, or an invitation is pending | Invite |
Projects
Section titled “Projects”The table gives, for each project, its name (“default”, “NIS2” pill), the number of Components in its stack and its Open alerts. A click opens the project at the client’s, on its dashboard.
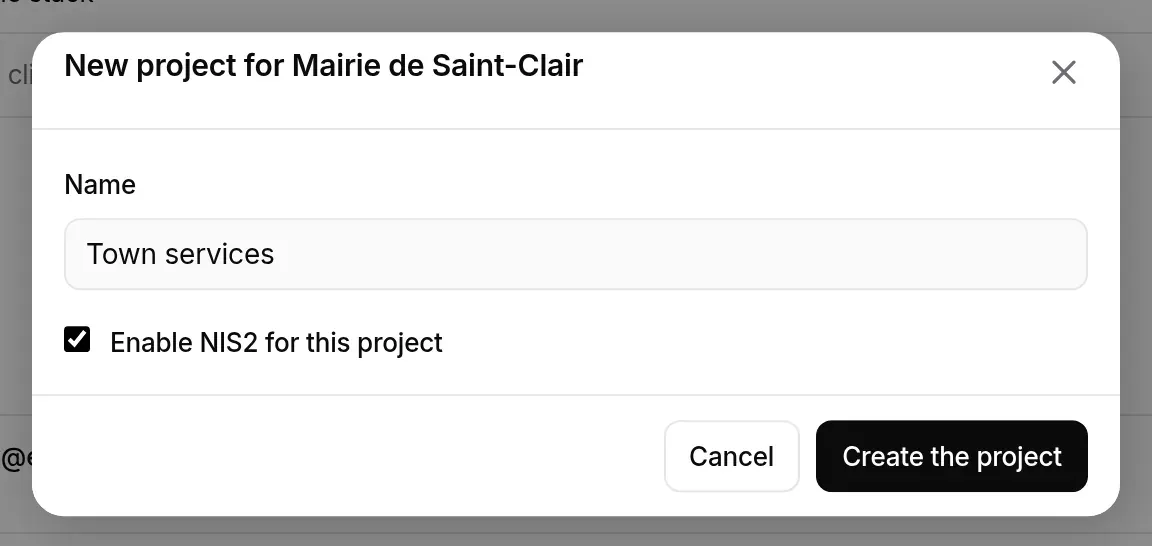
Create a project opens a window: the name (100 characters at most) and, for a client on Pro, the Enable NIS2 for this project box (on Team: “NIS2 is included in the Pro plan.”). The project is created in the client’s organisation, within its plan’s quota; your team has access straight away.
Contacts
Section titled “Contacts”The list gathers the client’s members (not your team) and pending invitations, with their profile: Read-only, Management, or “Custom access” for access set by hand. The owner has the Owner pill; an invitation, the Invitation pending pill and its date.

Inviting a contact
Section titled “Inviting a contact”The client’s contacts use TechWatchAlert like any member: they are members of the client’s organisation, never of yours.
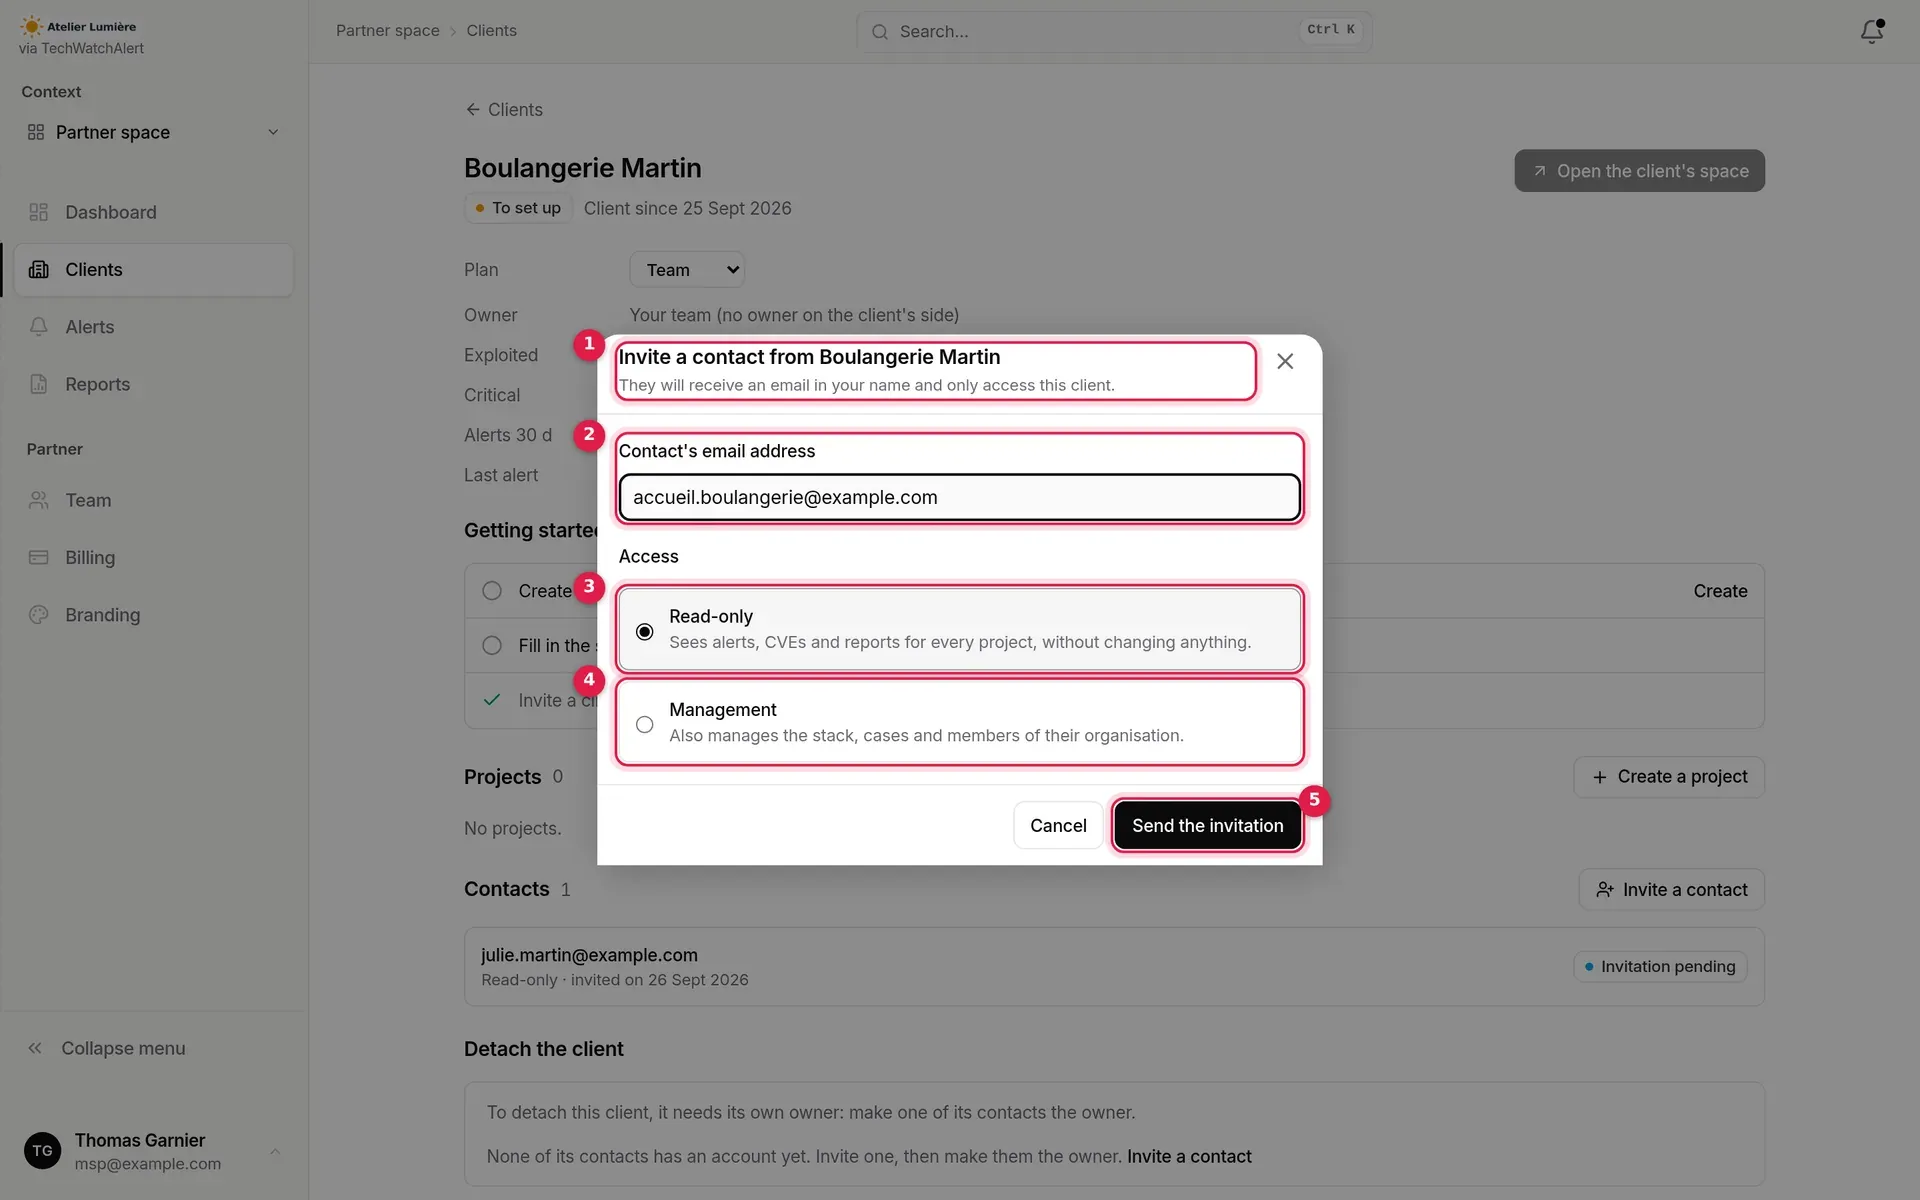
- Title: the contact will receive an email in your name and will only access this client.
- Contact’s email address.
- Read-only profile (default).
- Management profile.
- Send the invitation.
-
On the client page, click Invite a contact (or Invite in Getting started).
-
Enter the email address and choose the profile.
-
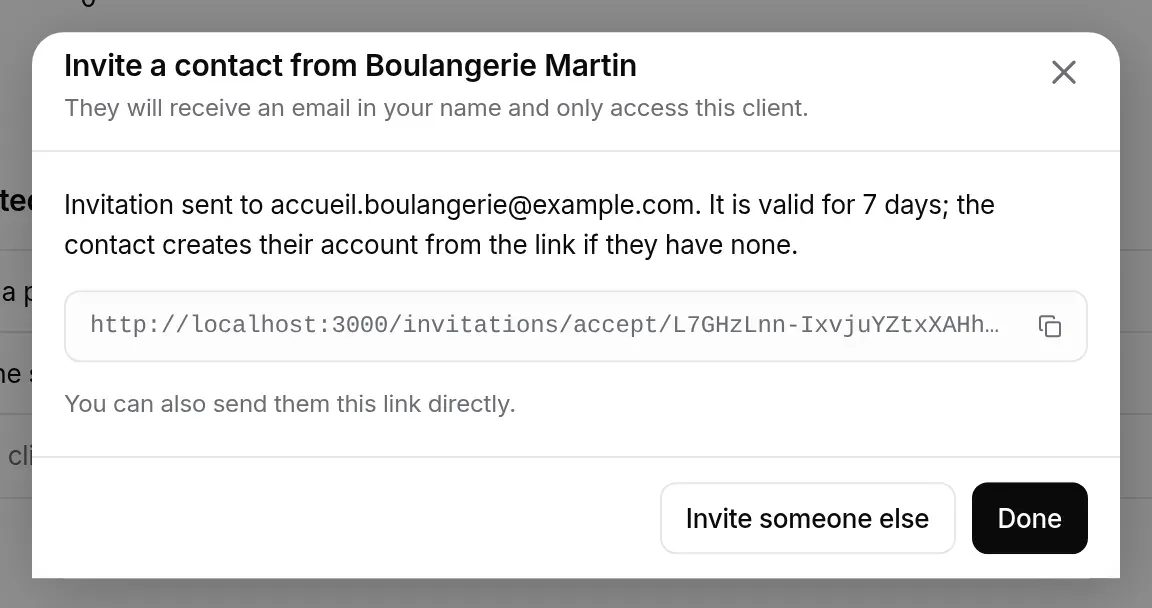
Click Send the invitation. The window confirms it was sent and shows the invitation link, to copy and pass on another way. Invite someone else clears the form; Done closes the window.
| Profile | Role in the client’s organisation | Role on its projects | What the contact can do |
|---|---|---|---|
| Read-only | Member | Viewer | See alerts, CVEs and reports for every project, without changing anything. |
| Management | Administrator | Administrator | Also manage the stack, cases and members of their organisation. |
Useful rules:
- each profile is carried by a group of the client’s organisation, “Client · lecture seule” or “Client · gestion”, created at the first invitation; it gives access to all its projects, present and future, and the client’s administrators can change it;
- the invitation is valid for 7 days; the contact creates their account from the link if they have none;
- the invitation goes through the usual flow: a second invitation to the same address is refused while the first is pending, and the contact takes a member seat at the client’s, within its plan’s limit.
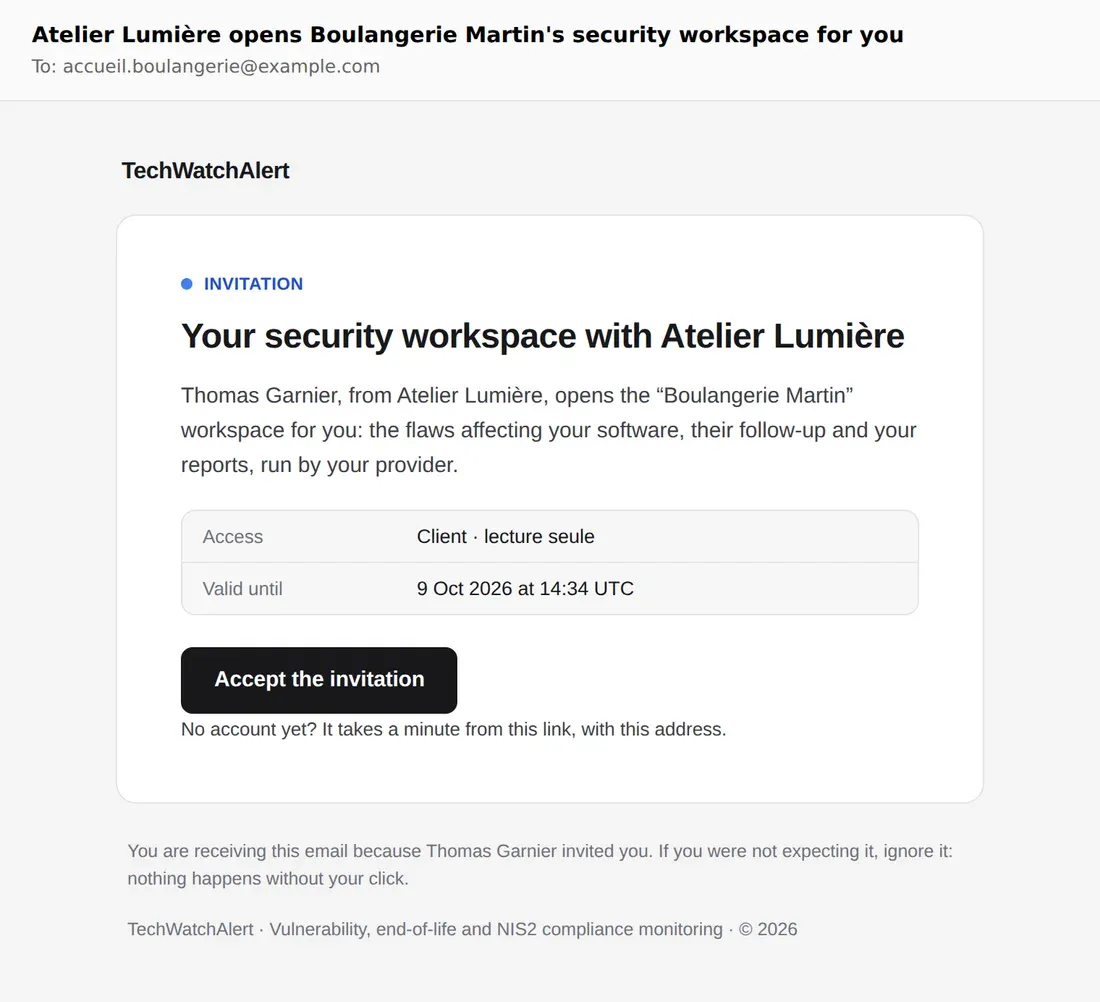
The contact receives an email naming your organisation, the one they know, the access granted and the expiry date:
Adding a client
Section titled “Adding a client”Add a client (dashboard, client list or context selector) opens a window with two tabs: New client and Attach.
New client, in three steps
Section titled “New client, in three steps”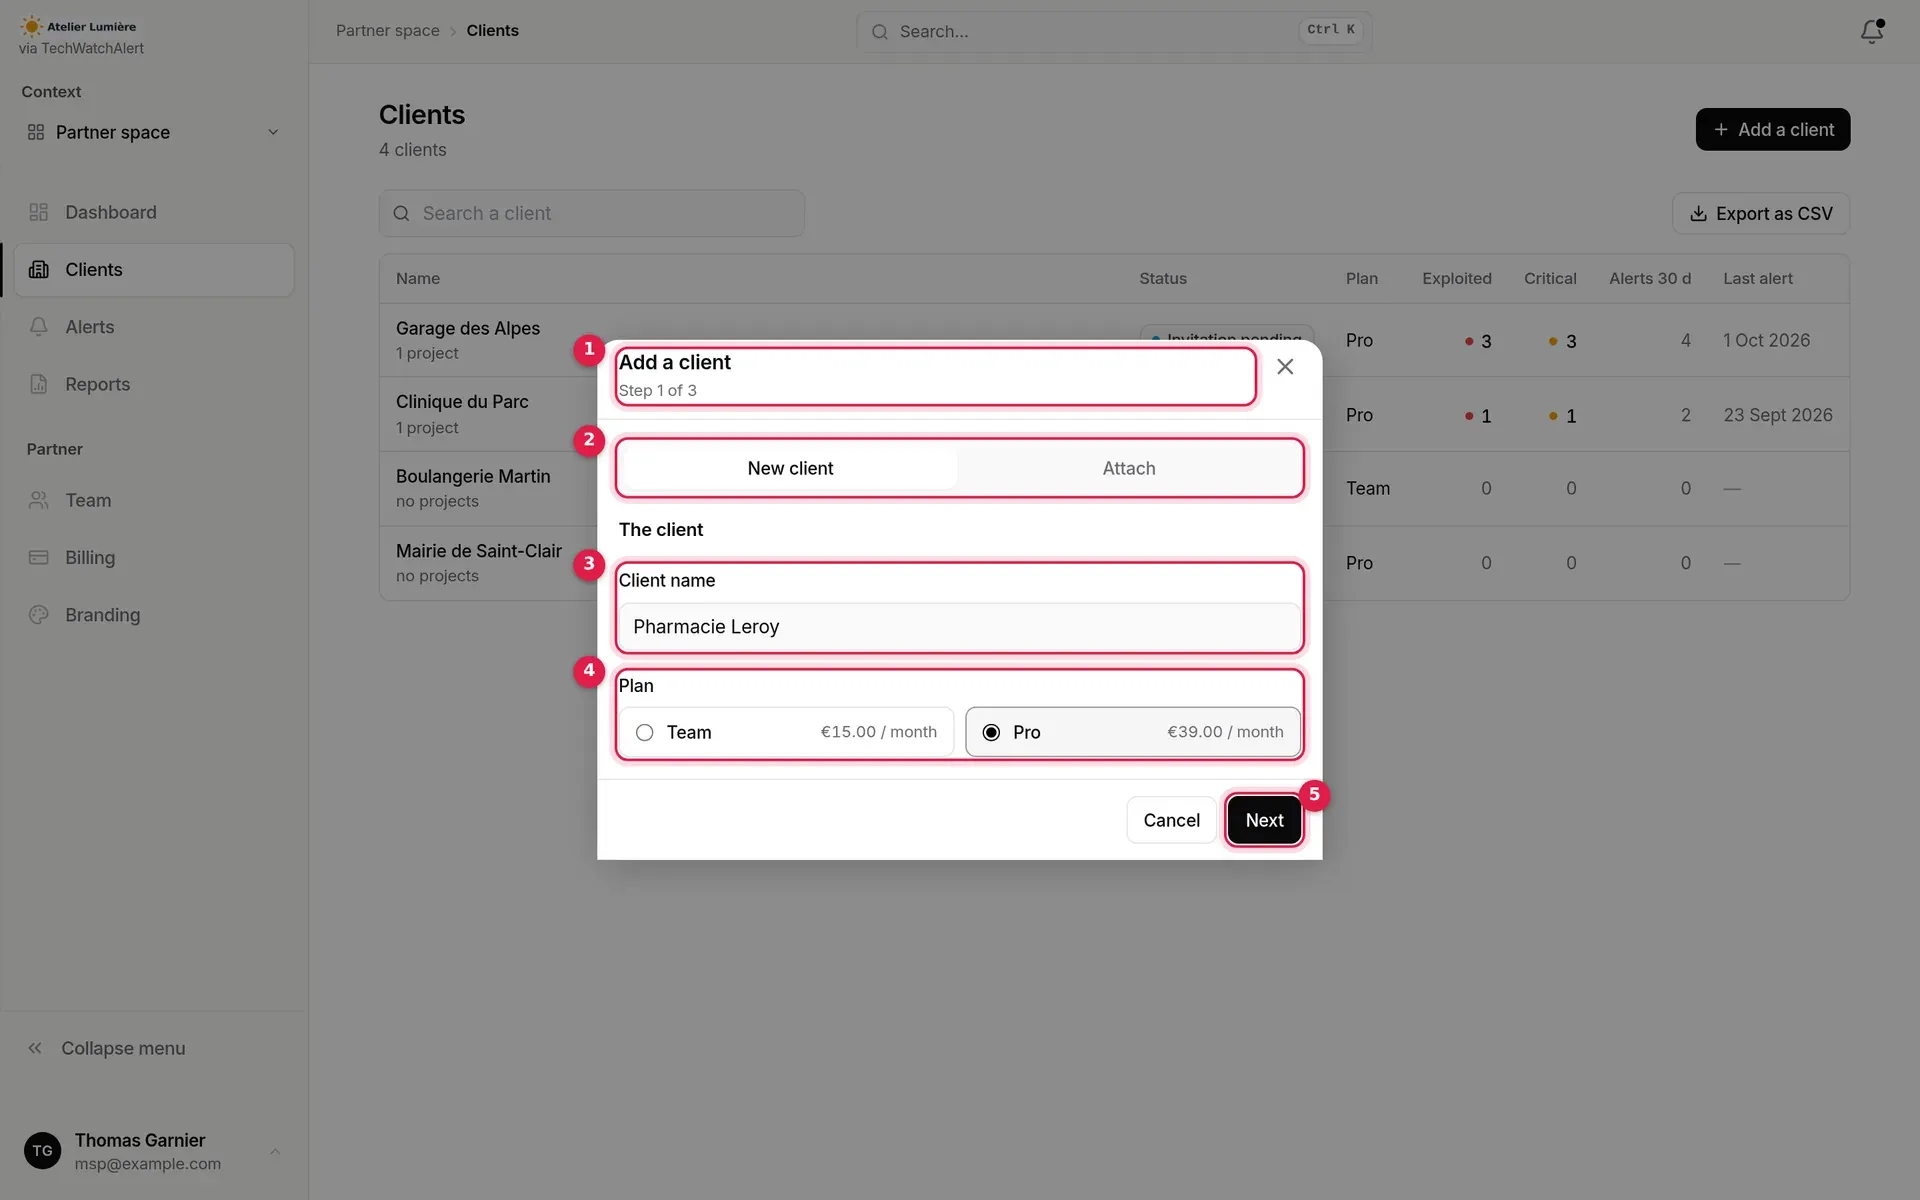
- Title and progress (“Step 1 of 3”).
- New client and Attach tabs.
- Client name (100 characters at most).
- Plan: Team or Pro, with the monthly price of the tier reached.
- Next (on the last step, Create client).
-
The client: its name and plan.
-
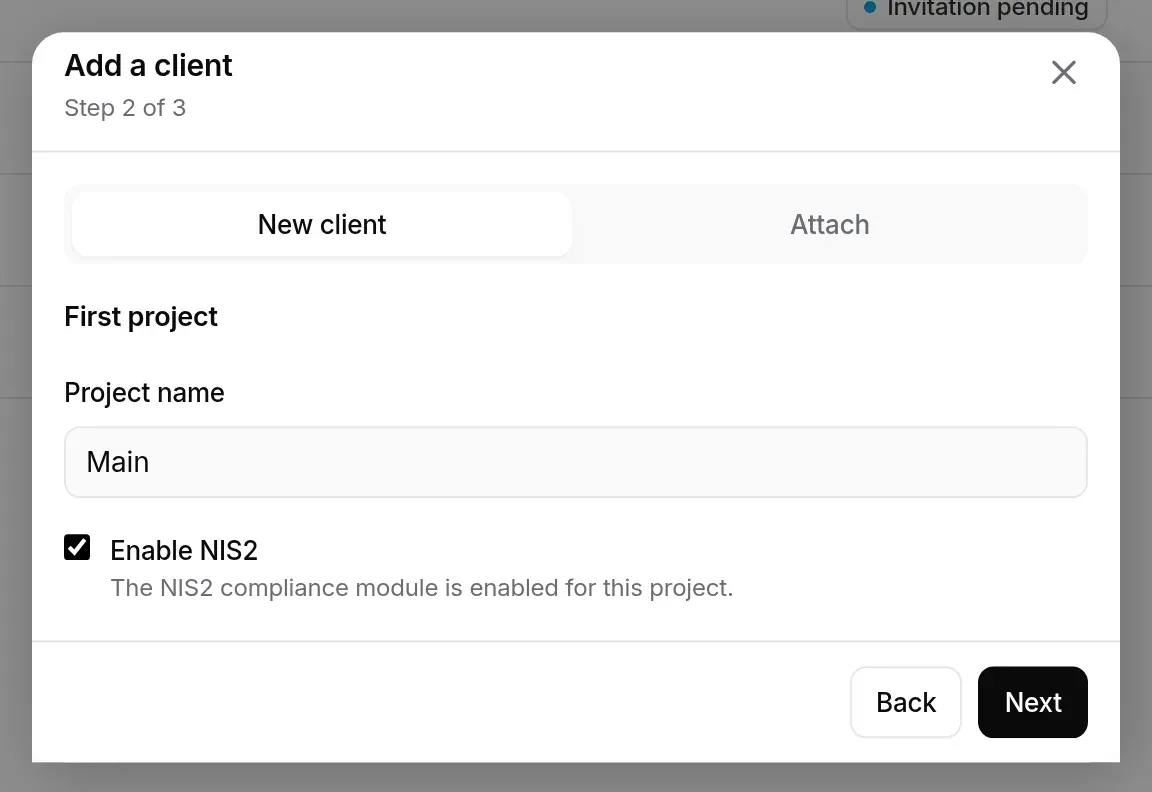
First project: its name (“Main” by default) and, on Pro, the Enable NIS2 box.
-
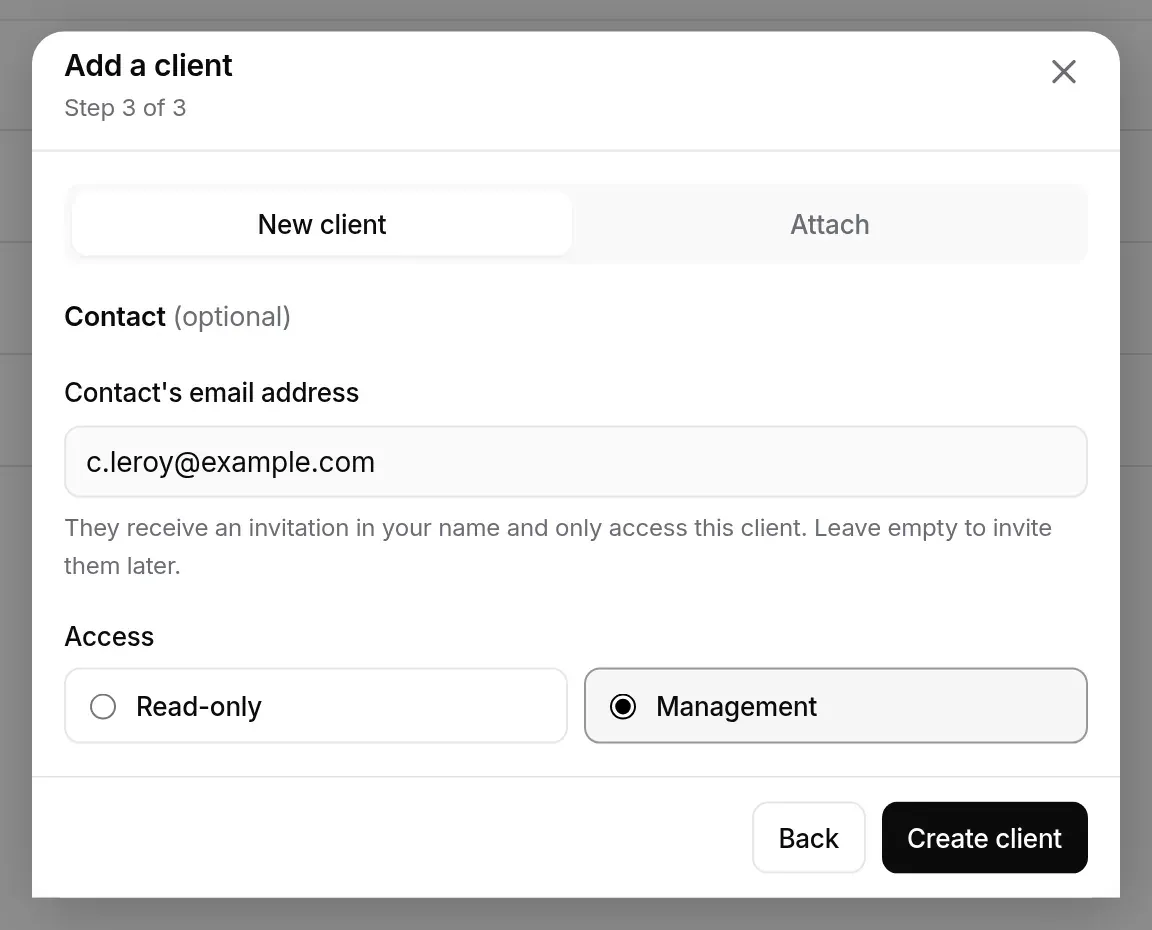
Contact (optional): a contact’s email address and access, Read-only or Management. Leave it empty to invite them later.
-
Click Create client. The organisation, its default project and the invitation are created together; a message confirms it and the client page opens, with its getting-started steps.
Back returns to the previous step without losing anything. A client created this way has no owner of its own: your organisation’s owners stand in until you make one of its contacts the owner.
Attaching an existing organisation
Section titled “Attaching an existing organisation”The Attach tab entrusts your partner organisation with an organisation that already exists, along with its projects, stack and history.
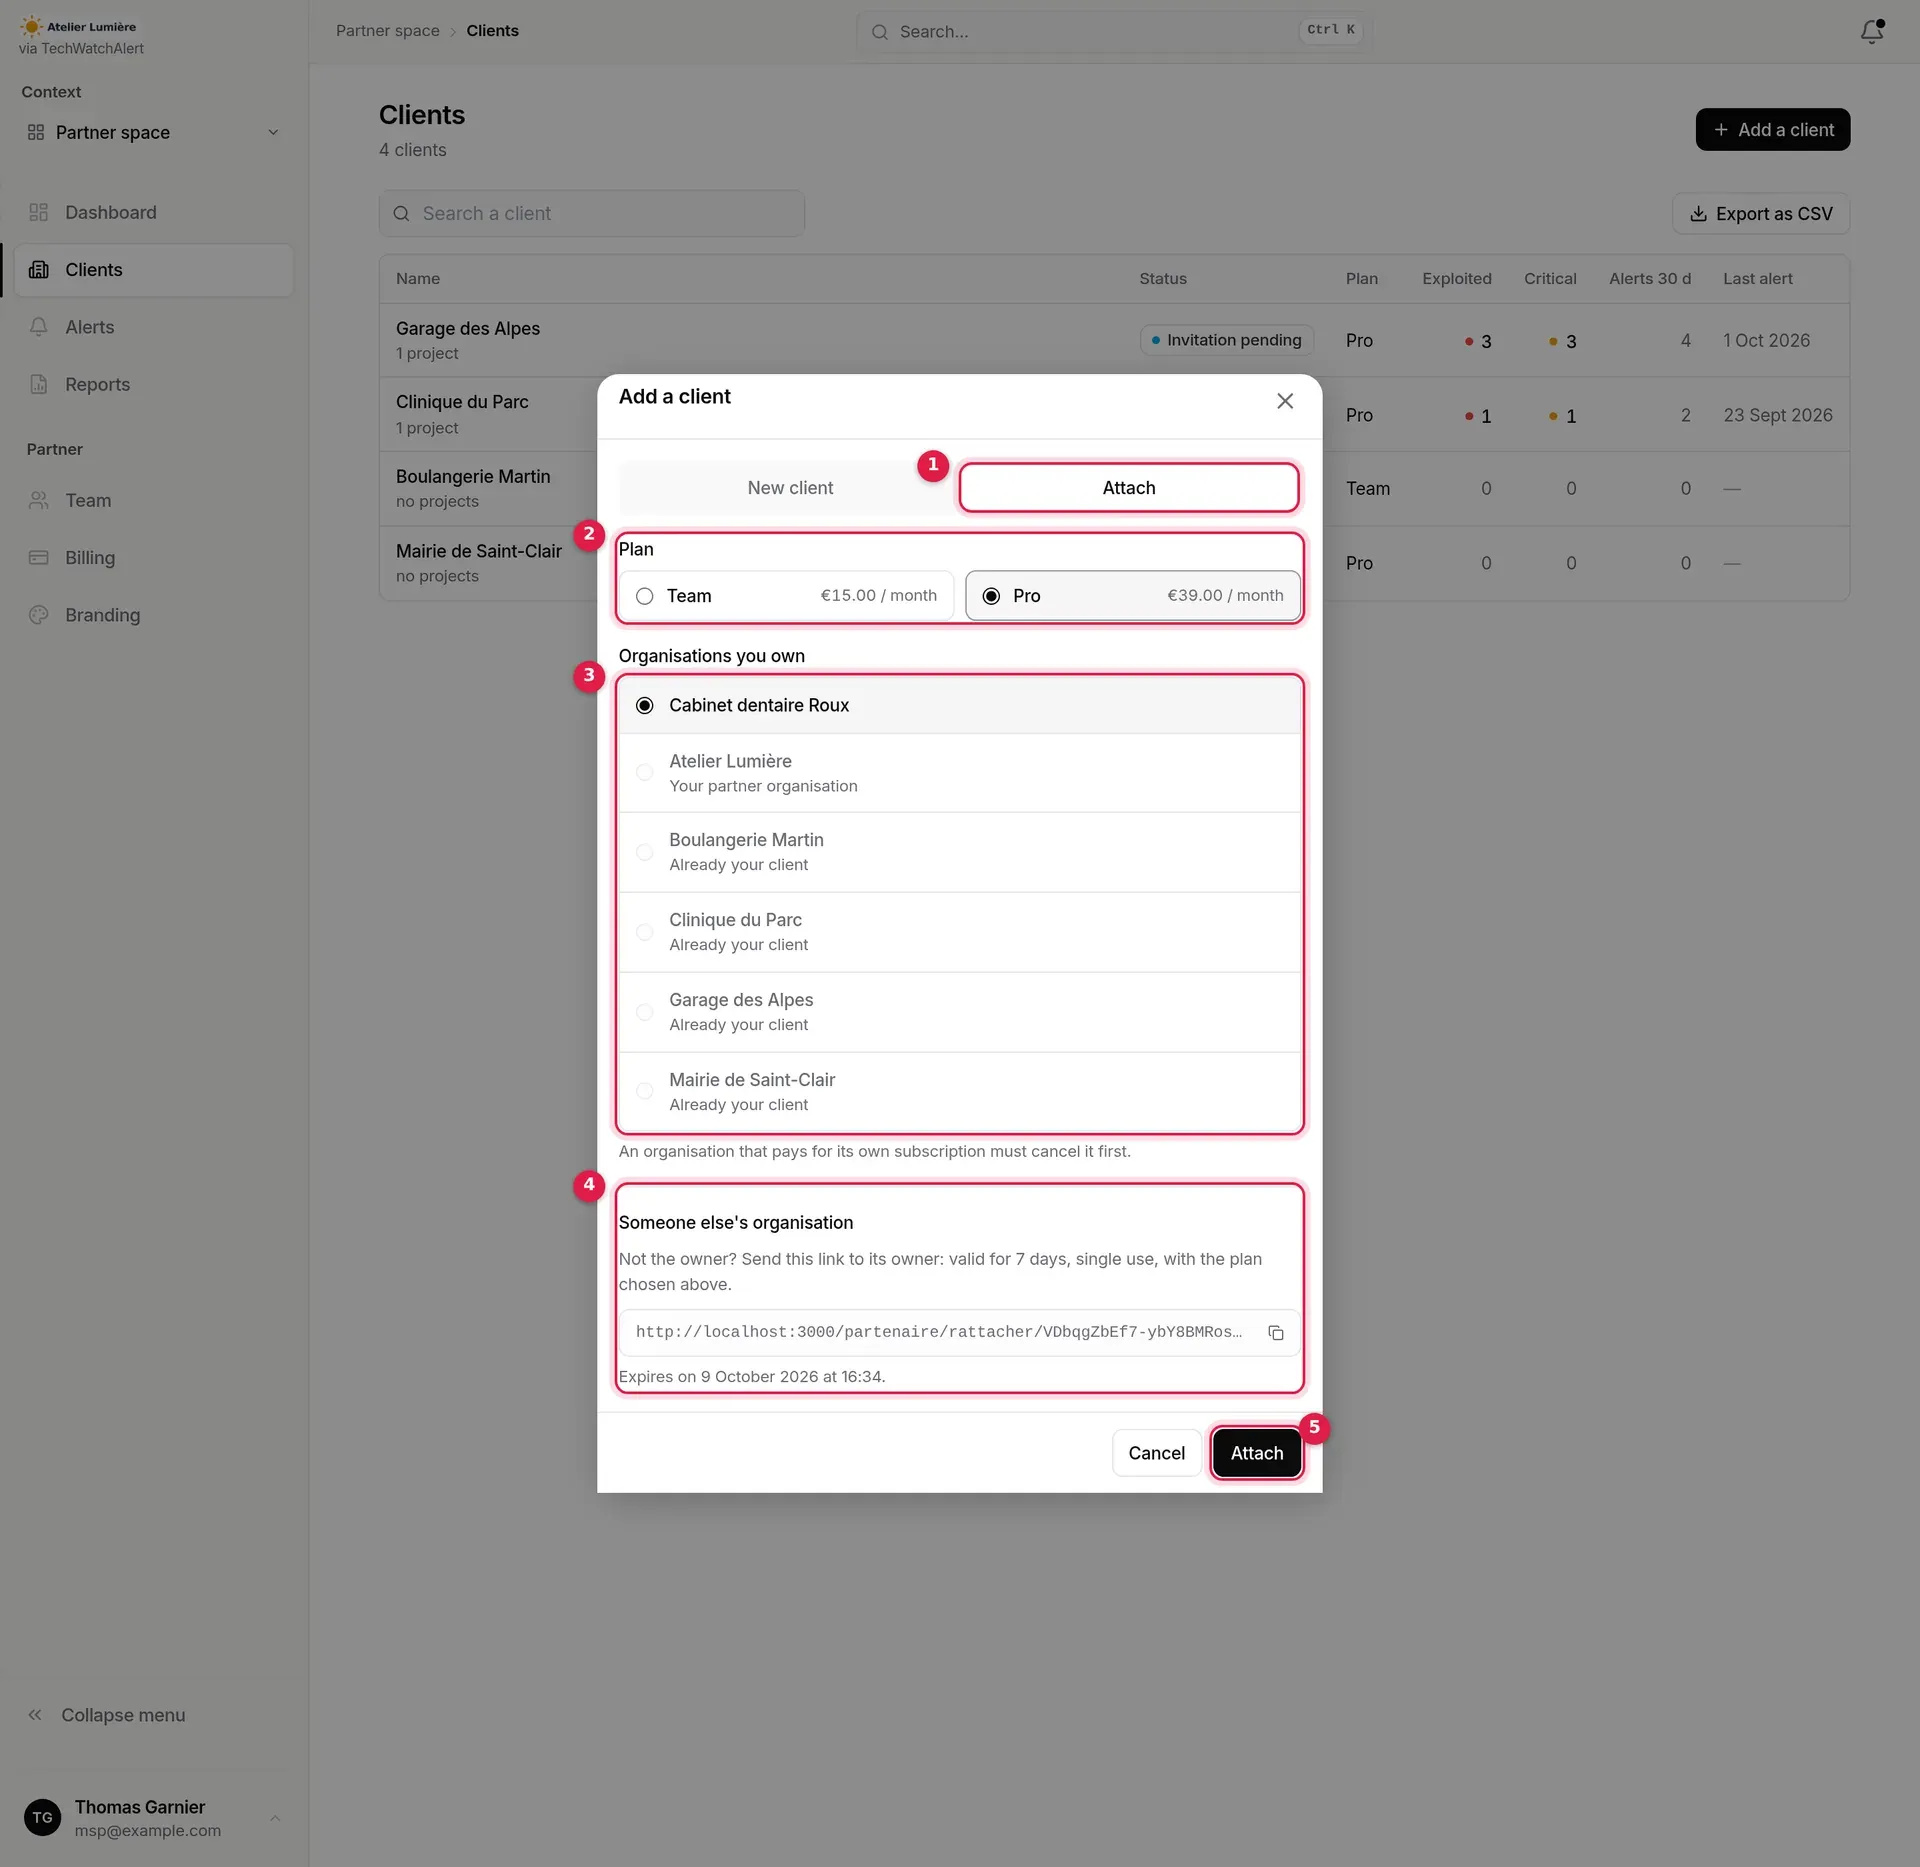
- Attach tab.
- Plan of the client once attached.
- Organisations you own: those that cannot be attached are greyed out, with the reason (“Your partner organisation”, “Already your client”, “Already a client of partner”, “Personal space: cannot be attached”).
- Someone else’s organisation: the attachment link, once created, with its expiry date.
- Attach: attaches the chosen organisation.
You own it: choose the organisation, then Attach. An organisation that pays for its own subscription must cancel it first; otherwise attaching is refused with that message and the organisation is greyed out from then on.
You do not own it: choose the plan, then Create a link (plan) and send the link shown to its owner (copy button). The link is valid for 7 days, can be used only once and carries the chosen plan.
The attachment link, on the owner’s side
Section titled “The attachment link, on the owner’s side”The owner opens the link (after signing in if needed) and lands on this page:
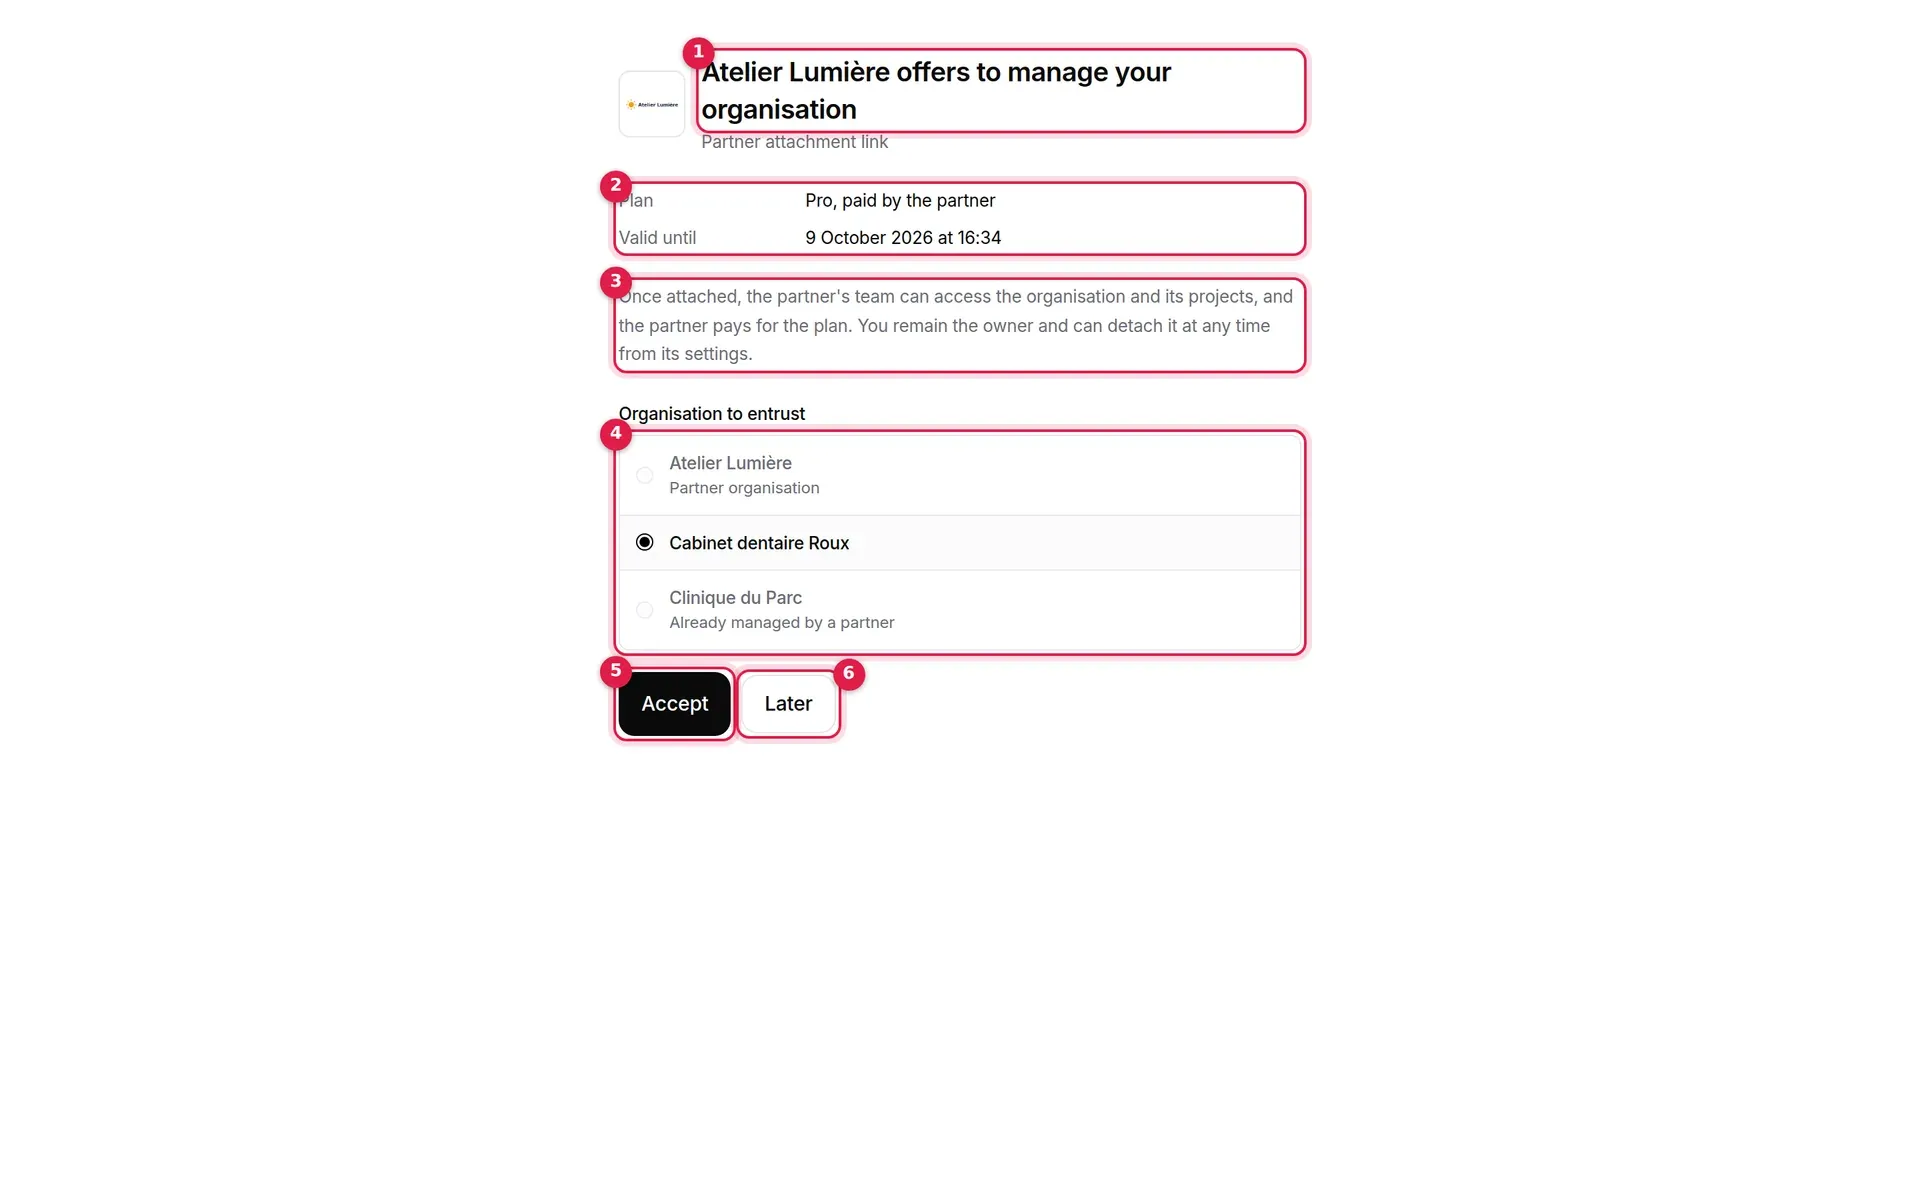
- Who offers to manage the organisation (partner’s logo and name).
- Plan (“plan, paid by the partner”) and expiry date.
- Effects of attaching.
- Organisation to entrust: the organisations they own; those that cannot be entrusted are greyed out with the reason (already managed by a partner, partner organisation, own subscription to cancel first, personal space).
- Accept: attaches the chosen organisation; the page confirms “Organisation attached”.
- Later: back to the dashboard without doing anything.
The same rules apply as for direct attaching. The client appears in your list straight away. An unknown, expired or already used link shows “Invalid attachment link”, with the reason.
Making an owner and detaching
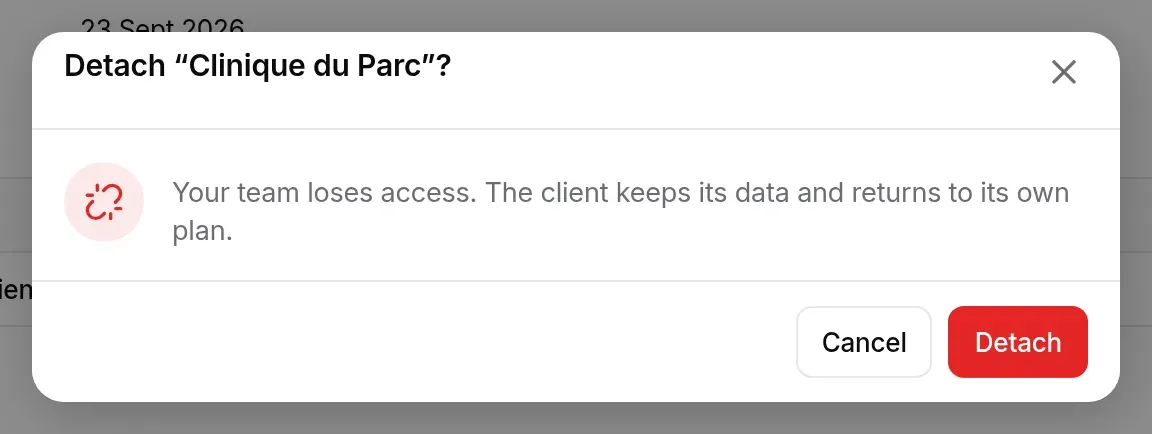
Section titled “Making an owner and detaching”Detaching a client makes it independent: your team loses access, the client keeps its data and returns to its own plan, and it is no longer billed on your subscription. This is only possible if the client has its own owner; otherwise it would be left without one.
The client has its own owner (attached organisation, or an owner you designated): the Detach the client section offers the Detach button, which asks for confirmation. The client disappears from your list.

The client has no owner of its own: the section offers to designate one among its member contacts (who have an account), with Choose a contact then Make owner. The same button appears on each member contact’s row. If no contact has an account yet, the section suggests inviting one.

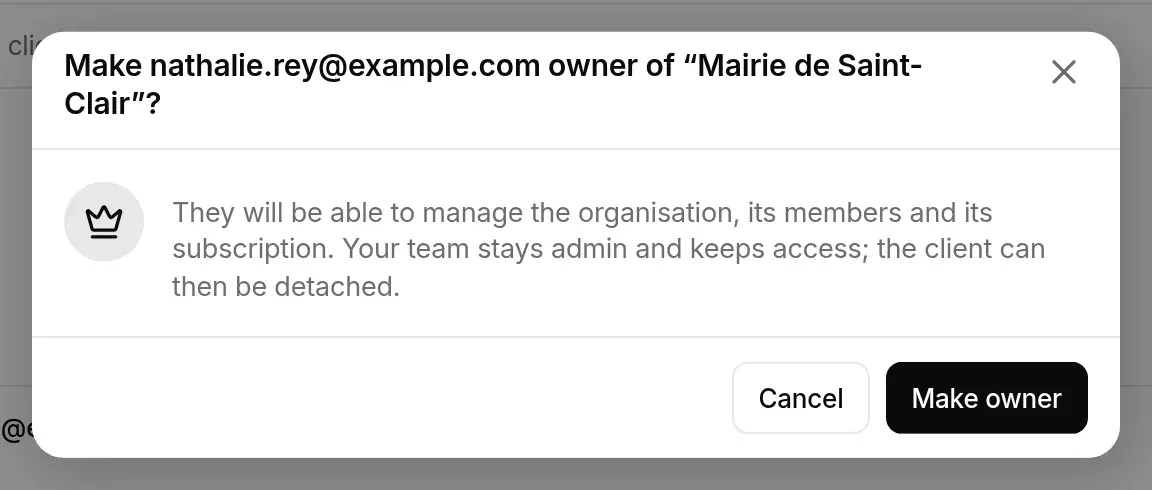
Make owner makes the contact the owner of the client’s organisation: they join the Administrateurs group (all rights on all projects) and receive a notification. Your team stays administrator and keeps access. The client can then be detached. Only a client contact can become owner, never a member of your team.
Your team’s access to clients
Section titled “Your team’s access to clients”- Who: the owners and administrators of your partner organisation; a plain member does not have this access.
- Which rights: at each client’s, administrator access (owner for your owners while the client has no owner of its own), and a system group “Partenaire · your organisation” that opens all projects, present and future, as administrator.
- Always up to date: access follows your team whenever a client is added or leaves, whenever your team changes, and every night. A technician added as administrator sees all your clients straight away; if they leave, they lose access everywhere.
- On the client’s side: in the client’s members, these accesses carry the “Partner · your organisation” label; they take no seat and the client cannot remove them.
To add a technician, see Team.
Who can do what
Section titled “Who can do what”| Action | Partner owner | Partner administrator | Partner member | Client contact |
|---|---|---|---|---|
| See the client list and client pages | Yes | Yes | No | No |
| Add or attach a client, create a link | Yes (plan active) | Yes (plan active) | No | No |
| Attach an organisation directly | If they own it | If they own it | No | No |
| Change a client’s plan, create a project for it | Yes (plan active) | Yes (plan active) | No | No |
| Invite a contact, make an owner, detach | Yes | Yes | No | No |
| Accept an attachment link | — | — | — | The organisation’s owner |
The Detach button does not appear. The client has no owner of its own. Invite a contact, wait for them to accept, make them the owner, then detach.
Open the client’s space is greyed out. The client has no project yet: create one from its client page.
What happens to a detached client? It keeps all its data and returns to its own plan; your team no longer has access.