Projects
A project is a monitoring scope, and all the work is attached to it: its stack, its alerts and their cases, its workflows and webhooks, its reports and its members. This content is shared by the project’s team: the stack is the same for everyone, each CVE has a single alert and a single case there, and what has been done stays in place when a member leaves. The business settings belong to the project too: prioritisation policy, end-of-life warning lead times and webhook sending (the Team notifications card of the General page). Every project belongs to an organisation, which carries the subscription and the access groups (see Organisations).
- Who it is for: any project member can open and read its settings; changing them requires being Admin or Owner of the project (details in Who can do what).
- Where: Organizations › (your organisation) › Projects, then click the project: its pages open in the settings sidebar, under Projects. Quicker: the cog next to a project in the sidebar’s project selector, or the command palette (Ctrl K): “General”, “Members”, “Alerts”, “Integrations” and “Compliance” open the matching page of the active project.
Finding a project
Section titled “Finding a project”From the project selector
Section titled “From the project selector”The Active project selector at the top of the sidebar lists your projects, grouped by organisation. Hovering over a row reveals a cog.
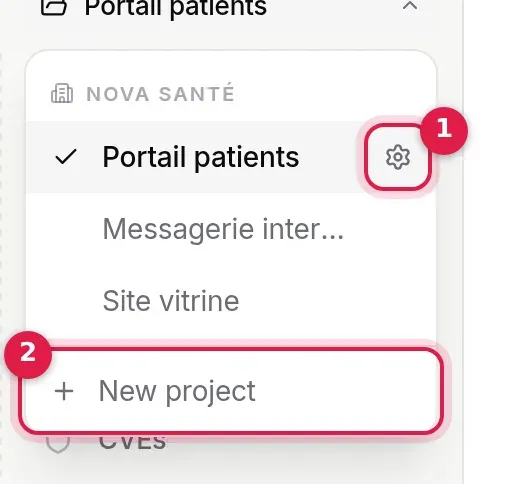
- Project settings: opens the project’s General page directly.
- New project: opens the creation window (see Creating a project).
An organisation hidden from the Organizations page (eye icon) disappears from this selector, projects included; it remains reachable from the Organizations page.
From the organisation
Section titled “From the organisation”The Projects page of an organisation’s settings is the table of its projects: name and description, tags, NIS2 status, member count and your role. Filter by tag or search by name; New project (organisation Admins and Owner) creates a project in this organisation; clicking a row opens its settings. On a phone, each project is a card.
Tags are read in the table; you add them from the project’s General page, and the catalogue is managed on the organisation’s Tags page.
The list only shows projects you are a member of.
Creating a project
Section titled “Creating a project”Two routes lead to the same form: the window (the New project button on the organisation’s Projects page or overview, or New project in the selector) and the page /projects/new.
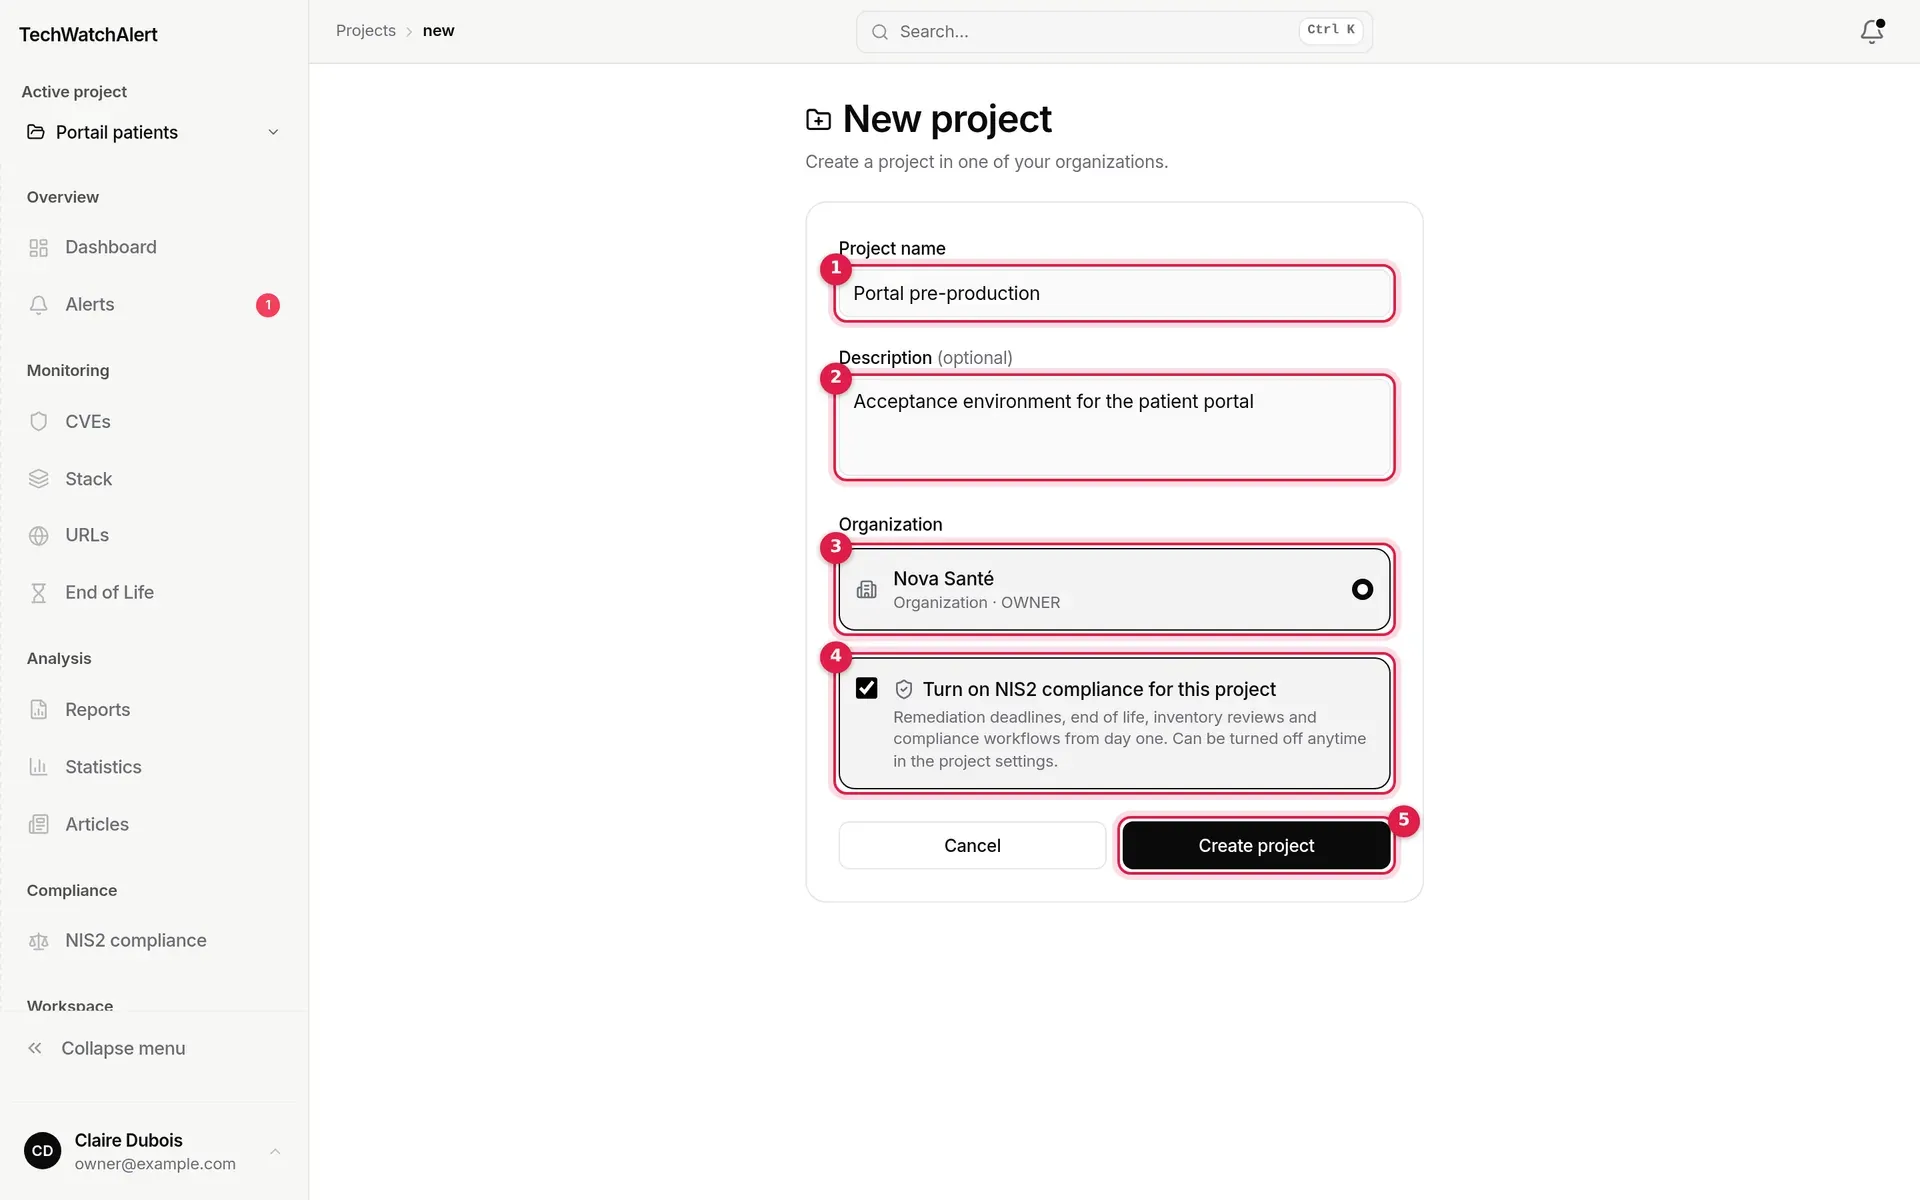
- Project name (required): the create button stays greyed out while it is empty.
- Description (optional).
- Organisation: only those where you are Owner or Admin are listed (your role appears under the name). The active project’s organisation is preselected, failing that your current organisation, failing that the first in the list.
- Turn on NIS2 compliance for this project: only shown if the organisation’s plan includes NIS2 and you can turn it on (organisation Owner or Admin). Unticked by default.
- Create project.
A project always belongs to an organisation: there is no longer a “personal” project to create. If you are not Admin or Owner of any organisation, the create button stays greyed out; create an organisation first (see Organisations) or ask an Admin to create the project.
- Enter the name, and a description if it helps your colleagues.
- Check the organisation that will receive the project, and change it if needed. From an organisation’s settings, the window does not ask: the project belongs to that organisation.
- Tick Turn on NIS2 compliance if the project is in your NIS2 scope (see NIS2 › Turning NIS2 on for a project).
- Click Create project.
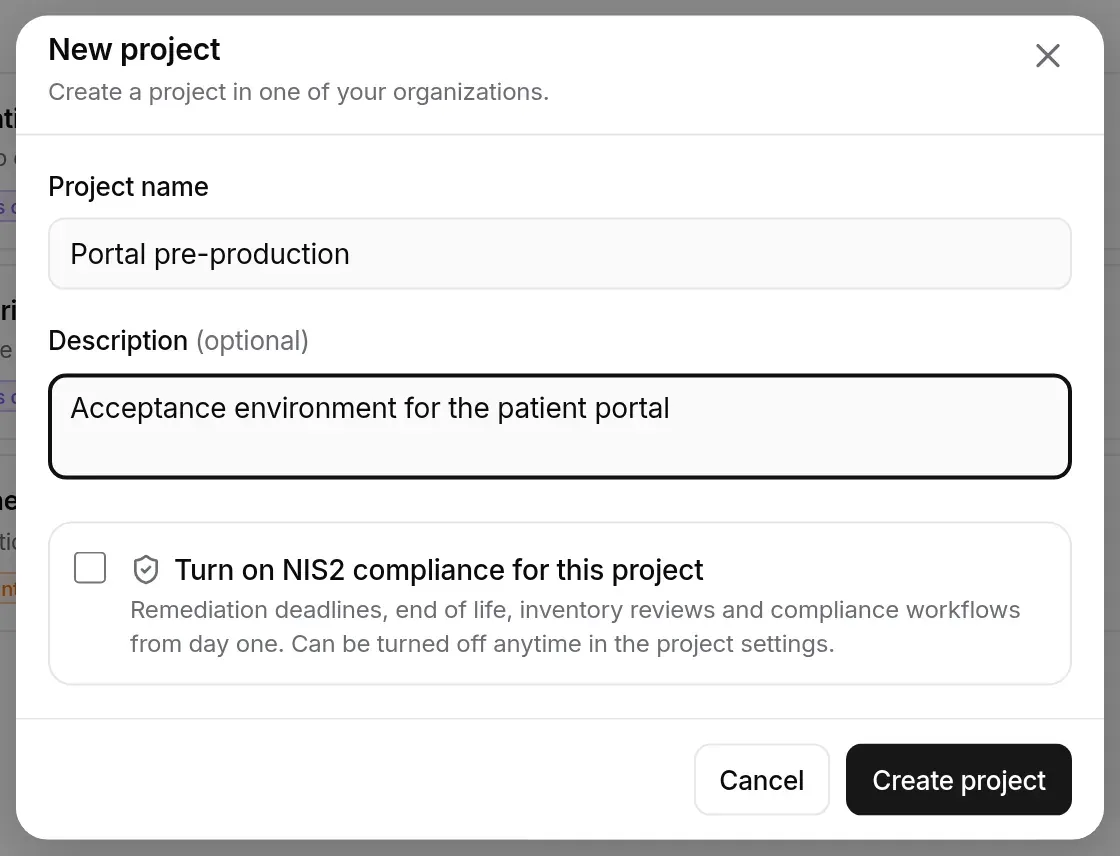
What creation does:
- You are the Owner of the new project.
- The project gets a default dashboard and the monitoring workflows (new CVE, CVE that becomes exploited, end of life, end of support, new version): without them no alert would ever be created (see Workflows).
- Members of the groups covering “all projects” (including the Administrateurs system group) get access straight away.
- NIS2 box ticked: the project’s compliance workflows are created immediately.
- You are then taken to the new project’s settings (from the window) or to the dashboard with the new project active (from the page).
Rules enforced by the server:
- Creating a project requires being Admin or Owner of its organisation. A request that names no organisation creates the project in your current organisation, under the same rules.
- The number of projects is capped by the organisation’s plan: 1 on Free, 5 on Team, unlimited on Pro and Business (see Plan and billing). Beyond that, creation is refused: the organisation’s Owner sees the subscription window open, others get a message asking them to contact the Owner.
- Ticking NIS2 on a plan that does not include it is refused before anything is created.
A project’s settings
Section titled “A project’s settings”A project’s settings no longer open inside the organisation’s Projects tab with ten more tabs: they are five pages, listed in the settings sidebar under Projects › (the project), each with its own address.
| Page | What you set there |
|---|---|
| General | Name, description and tags; overview; team notifications; criticality; at the bottom, Delete the project |
| Members | Roles, fine-grained rights, removal |
| Alerts | The project’s prioritisation and its exclusion rules: what alerts, and what should not be reported |
| Integrations | A catalogue (webhooks, ticketing, inventory, scan report import), then the setup of webhooks, ticketing and inventory |
| Compliance | NIS2 for this project: activation, workflows and remediation deadlines |
Imported scans (Trivy, Grype, CycloneDX, network scanners) are no longer a setting: they live in Stack › Scans (the Scans button on the Stack page), and the integrations’ “Import a scan report” card leads there.
The breadcrumb says where you are (Nova Santé › Portail patients › Alerts); a project of another organisation opened under the wrong address is sent to the right one. An old personal project, created before projects had to belong to an organisation, has no Members page.
General
Section titled “General”The Identity section holds the project’s name, description and tags. Name and description are fields, saved together with Save (active only after a change; Cancel restores the previous state); leaving the page with changes first asks whether to save them. Editing requires the Project settings right (Admins and Owner by default). Tags are added with + and removed with their cross, immediately (organisation Admins and Owner). Below, Overview: project type (Team), number of members, your role, whether it is the default project.
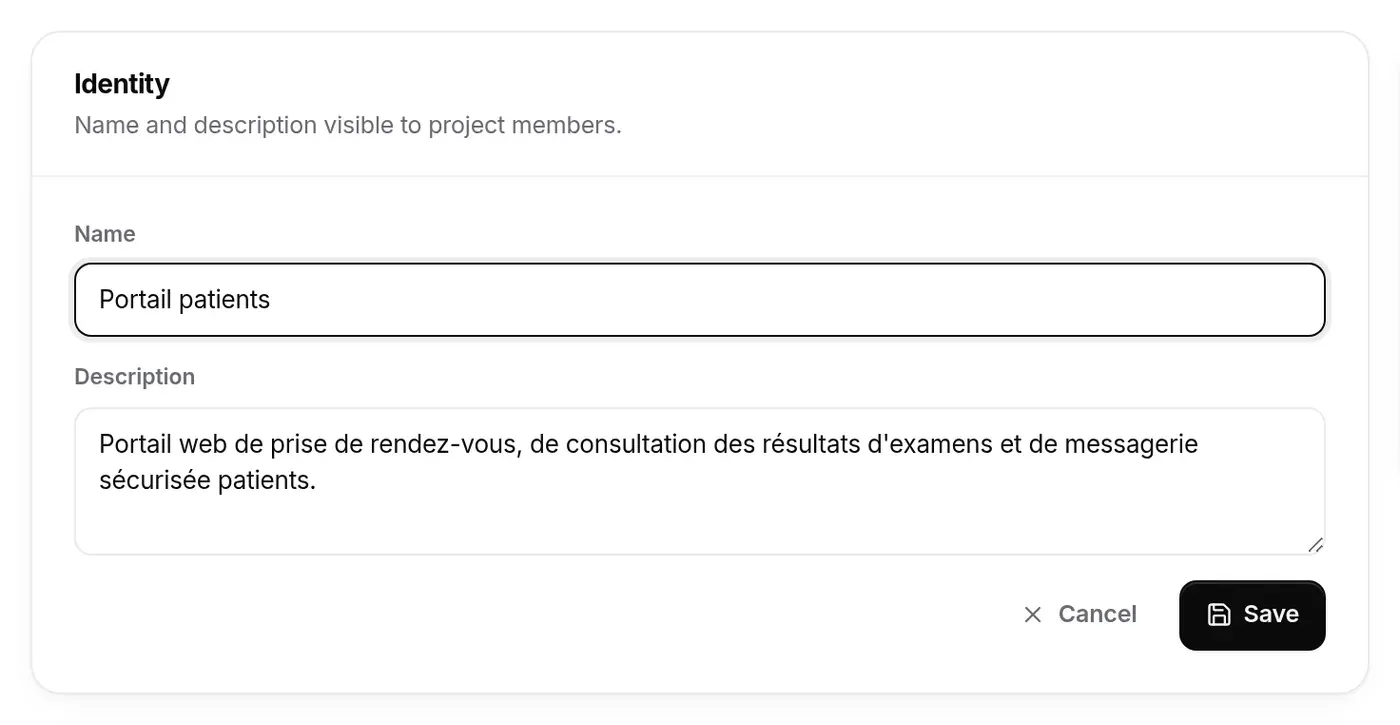
- Save stays greyed out while the name is empty.
- Emptying the description does not clear it: the previous description is kept. Replace it with other text instead.
When the compliance space is active, a business criticality card may appear under the overview (see NIS2).
Team notifications
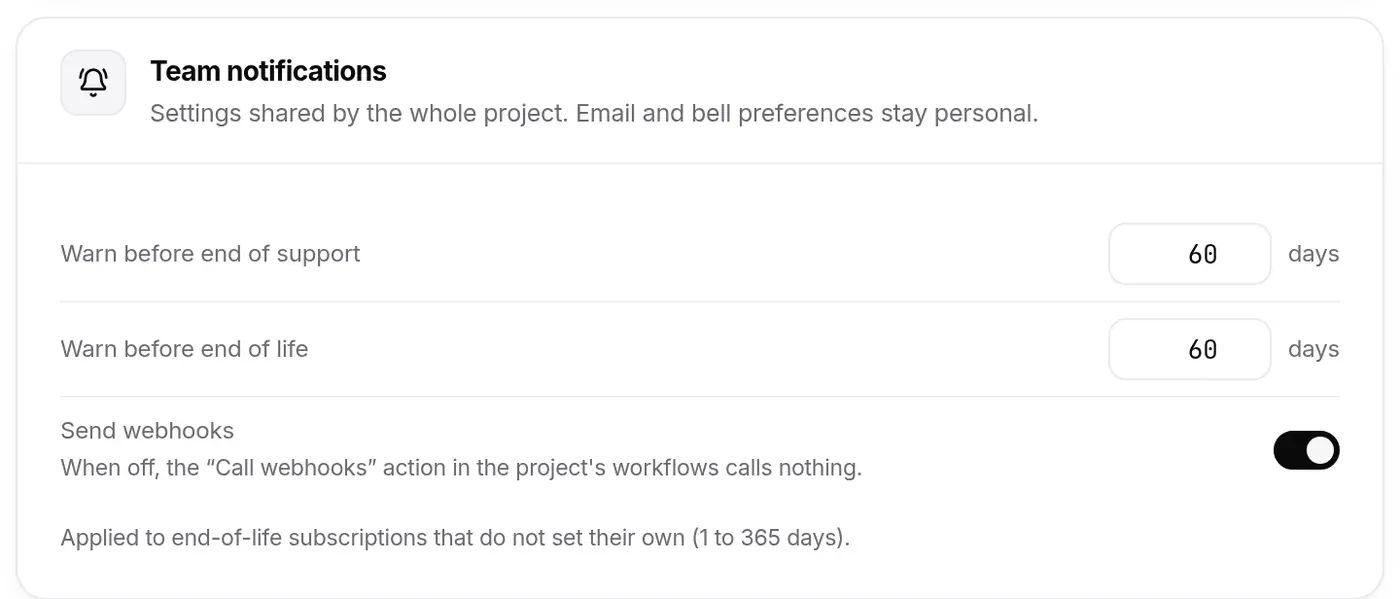
Section titled “Team notifications”The Team notifications card, under Identity, holds the notification settings shared by the whole project. Email and bell preferences stay personal (see Notifications and channels).
-
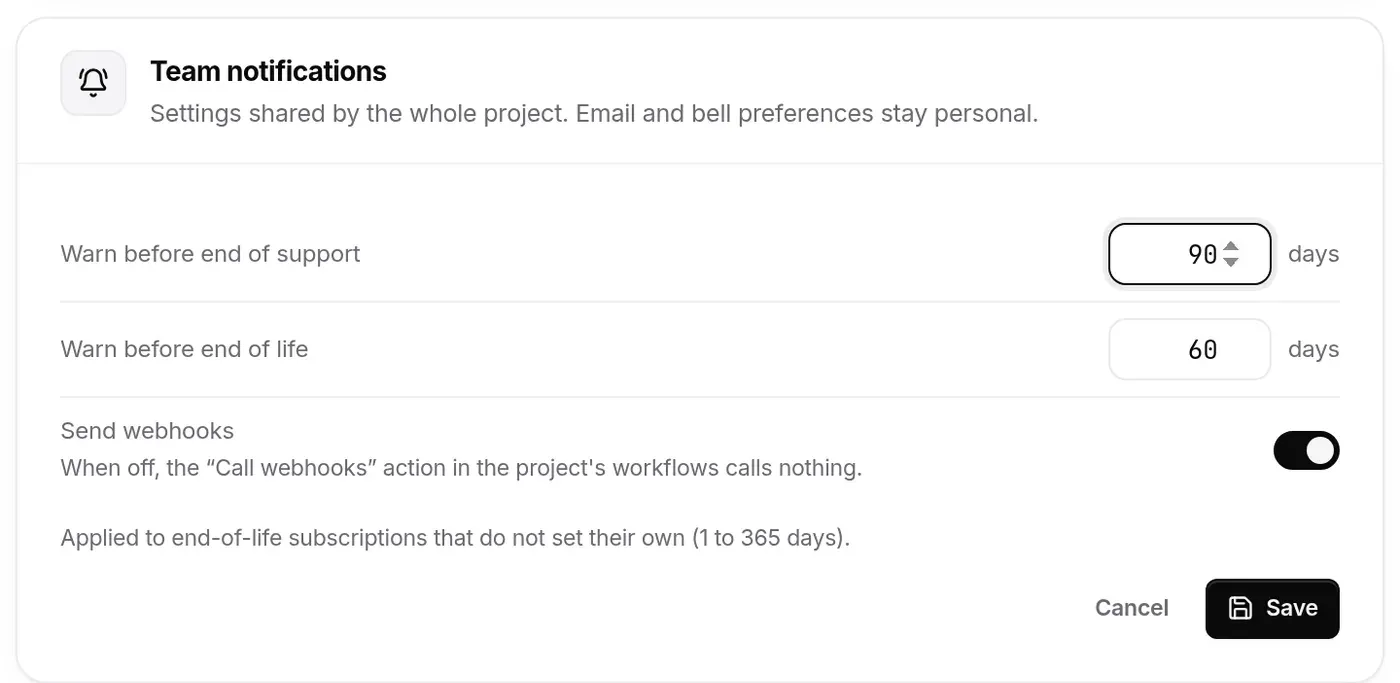
Warn before end of support and Warn before end of life: how many days before these dates the project’s end-of-life subscriptions send their warning, when the subscription does not set its own lead time (see End of life › When are you warned?). From 1 to 365 days; 60 by default. Changing a value shows Cancel and Save; an out-of-range value greys out Save. Needs the “Edit EOL subscription” right (Analyst and above by default); without it, the lead times are shown as text (“60 days”).
-
Send webhooks: the switch turns off or back on, for the whole project, the “Call webhooks” action of its workflows; when off, it calls nothing. It applies on click. The row only appears to people who can see the project’s webhooks; only the “Edit webhook” right (Admin and above by default) can flip it, others read “On” or “Off”.
Every change is recorded in the organisation’s audit log.
Members
Section titled “Members”The page lists the people who can access the project.
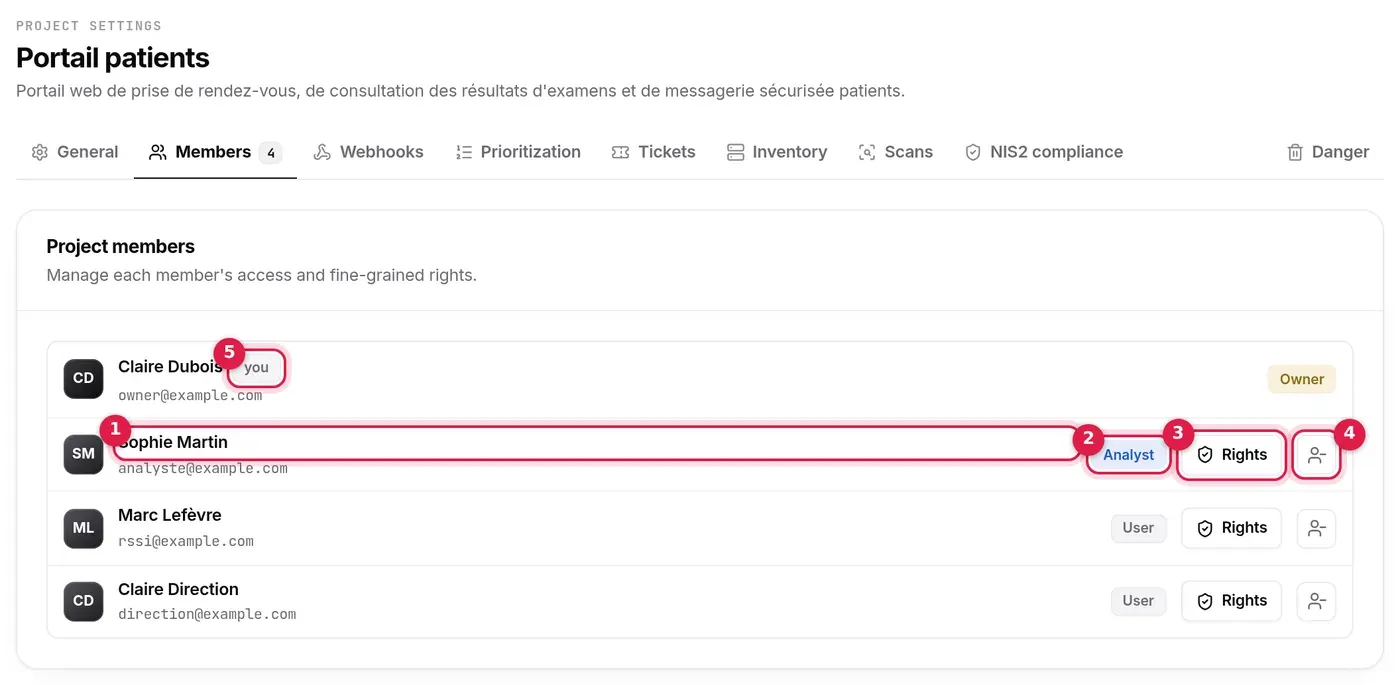
- The member’s name and address.
- Project role: Owner, Admin, Analyst or User (the VIEWER role is displayed as “User”).
- The Custom badge marks a member whose rights differ from their role’s; the you badge, your own row.
- The ⋯ menu (or a right-click on the row): Rights, which opens the member’s fine-grained rights matrix, and Remove from project, with confirmation.
Rights and Remove from project are only offered to those who hold the matching right (the project’s Admins and Owner by default), never on the Owner’s row or your own, and, for an Admin, never on another Admin’s row: only the Owner manages an Admin.
A member’s fine-grained rights
Section titled “A member’s fine-grained rights”The Rights — (name) window shows a Module × action matrix: View, Create, Edit, Delete, plus module-specific Advanced actions (import, export, mark as read, and so on). The boxes ticked at first are those of the member’s role. When space is short (phone, narrow window), each module becomes one row: the View box, then its actions as chips to tick. At the top, the number of custom rights and Reset, which goes back to the role’s rights.
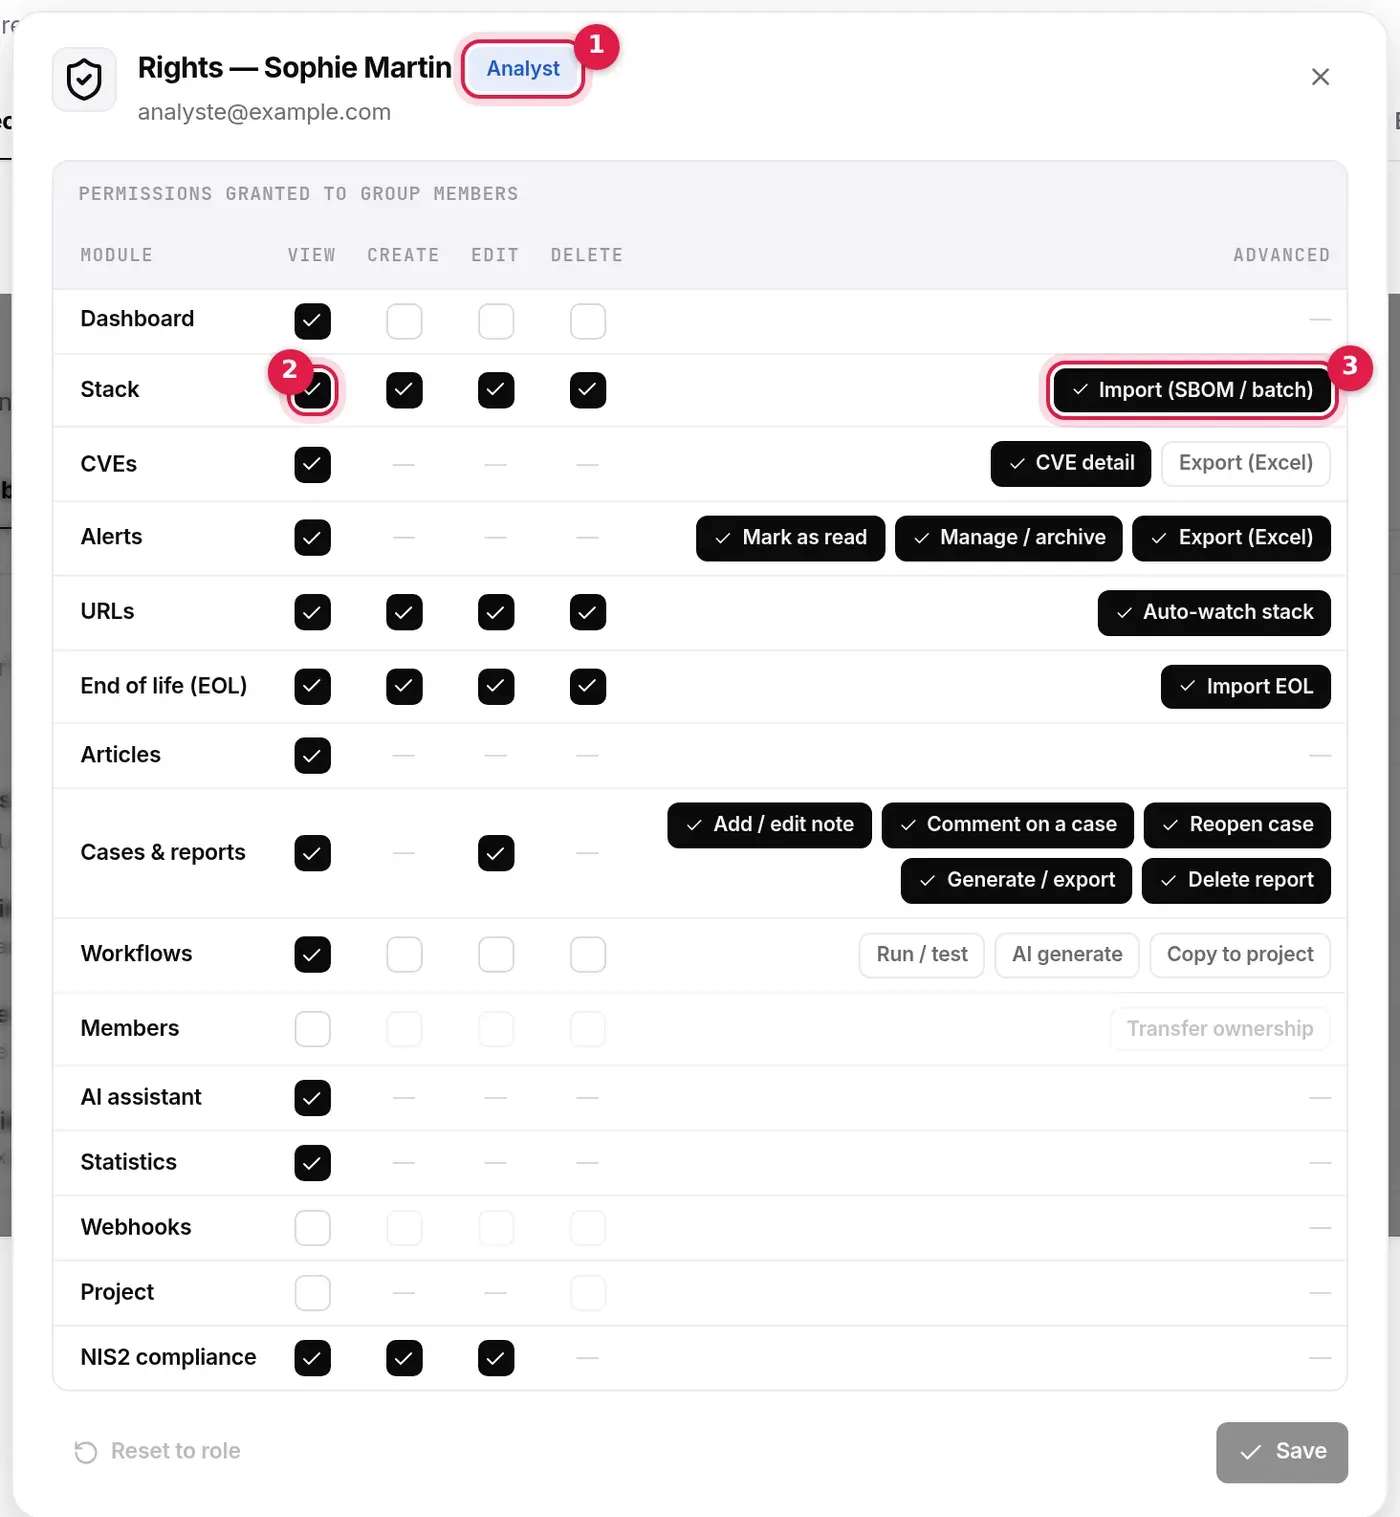
- The member’s role, the starting point of the matrix.
- View: access to the module. Unticked, the other boxes of the row become inert (greyed out).
- Advanced: extra actions, chips that toggle with a click.
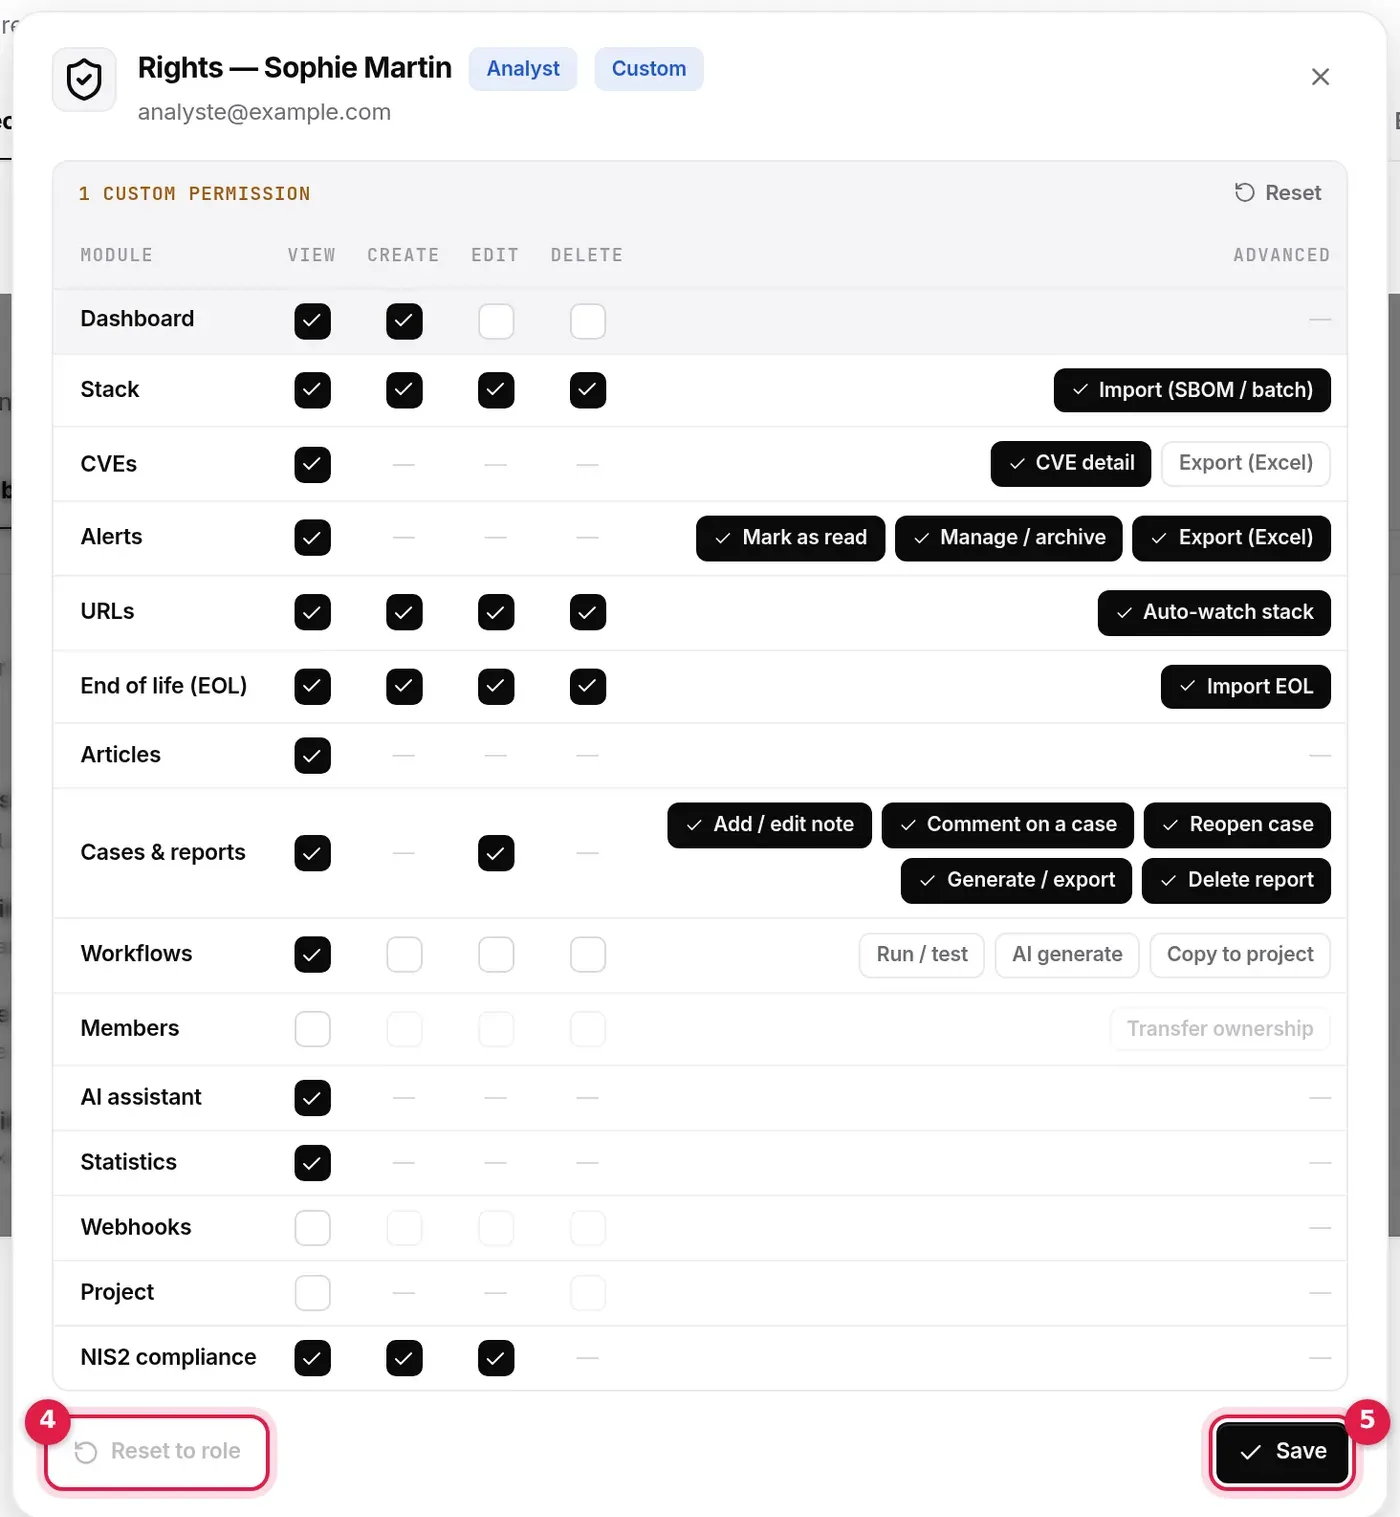
- Reset to role: removes all of the member’s exceptions (active only if there are any).
- Save: active as soon as a box has changed.
As soon as a box departs from the role, the matrix header counts the differences and offers Reset to go back to the role without closing the window.

Rules enforced by the server:
- The Owner’s rights cannot be changed: the Owner always has everything.
- An Admin can neither change another Admin’s rights nor remove them: only the Owner can.
- You cannot grant a right you do not hold yourself: apart from the Owner, ticking a right you do not have is refused.
- Only the exceptions are stored; everything else follows the role. The starting boxes are the role’s default rights, read from the server: the matrix shows exactly what it enforces.
- Cases & reports row: View is “View cases”, Edit is “Change status”; the Advanced chips are “Add / edit note”, “Comment on a case”, “Reopen case”, “Generate / export” and “Delete report”. A case’s tags and assignment need at least one of “Change status”, “Add / edit note”, “Reopen case” (see Handling an alert › Permissions and plan).
- Custom rights apply everywhere: interface buttons, server calls and exports.
Removing a member
Section titled “Removing a member”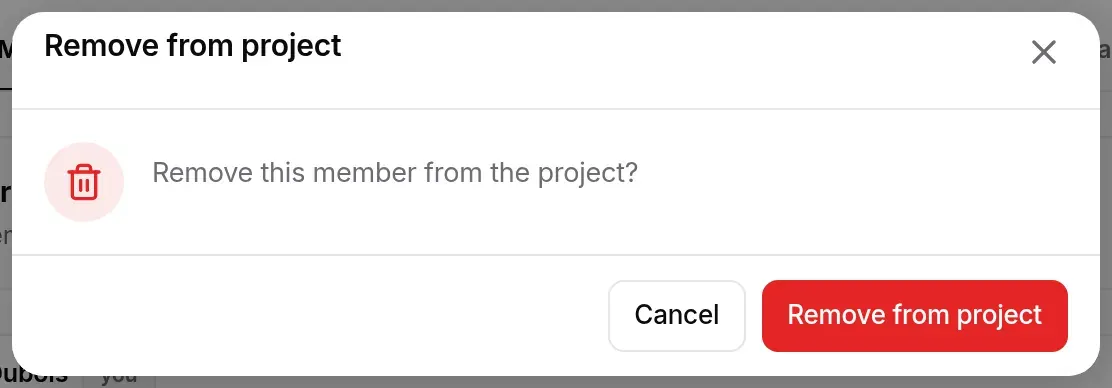
The member loses access to the project and receives a notification. They receive nothing more from the project: their notification preferences for this project are deleted, the invitations they had sent to this project are revoked, and the cases assigned to them go back to “Unassigned”. What belongs to the project stays in place: the stack (including the items they added), the automatic URL tracking they had turned on, the alerts, the cases, and their comments and history lines, still signed with their name. The last Owner cannot be removed. If the member’s access comes from a group, removing them from the group (or from the organisation) is safer: the group could give access back at the next synchronisation.
Alerts
Section titled “Alerts”The Alerts page gathers the two noise settings: prioritisation (what alerts) and exclusions (what should not be reported).
Prioritisation
Section titled “Prioritisation”The prioritisation policy orders the project’s alerts and CVEs and sets the threshold from which a stack CVE triggers an alert. It also drives the “Priority CVEs” widget, the CVE list, reports and the email digest.
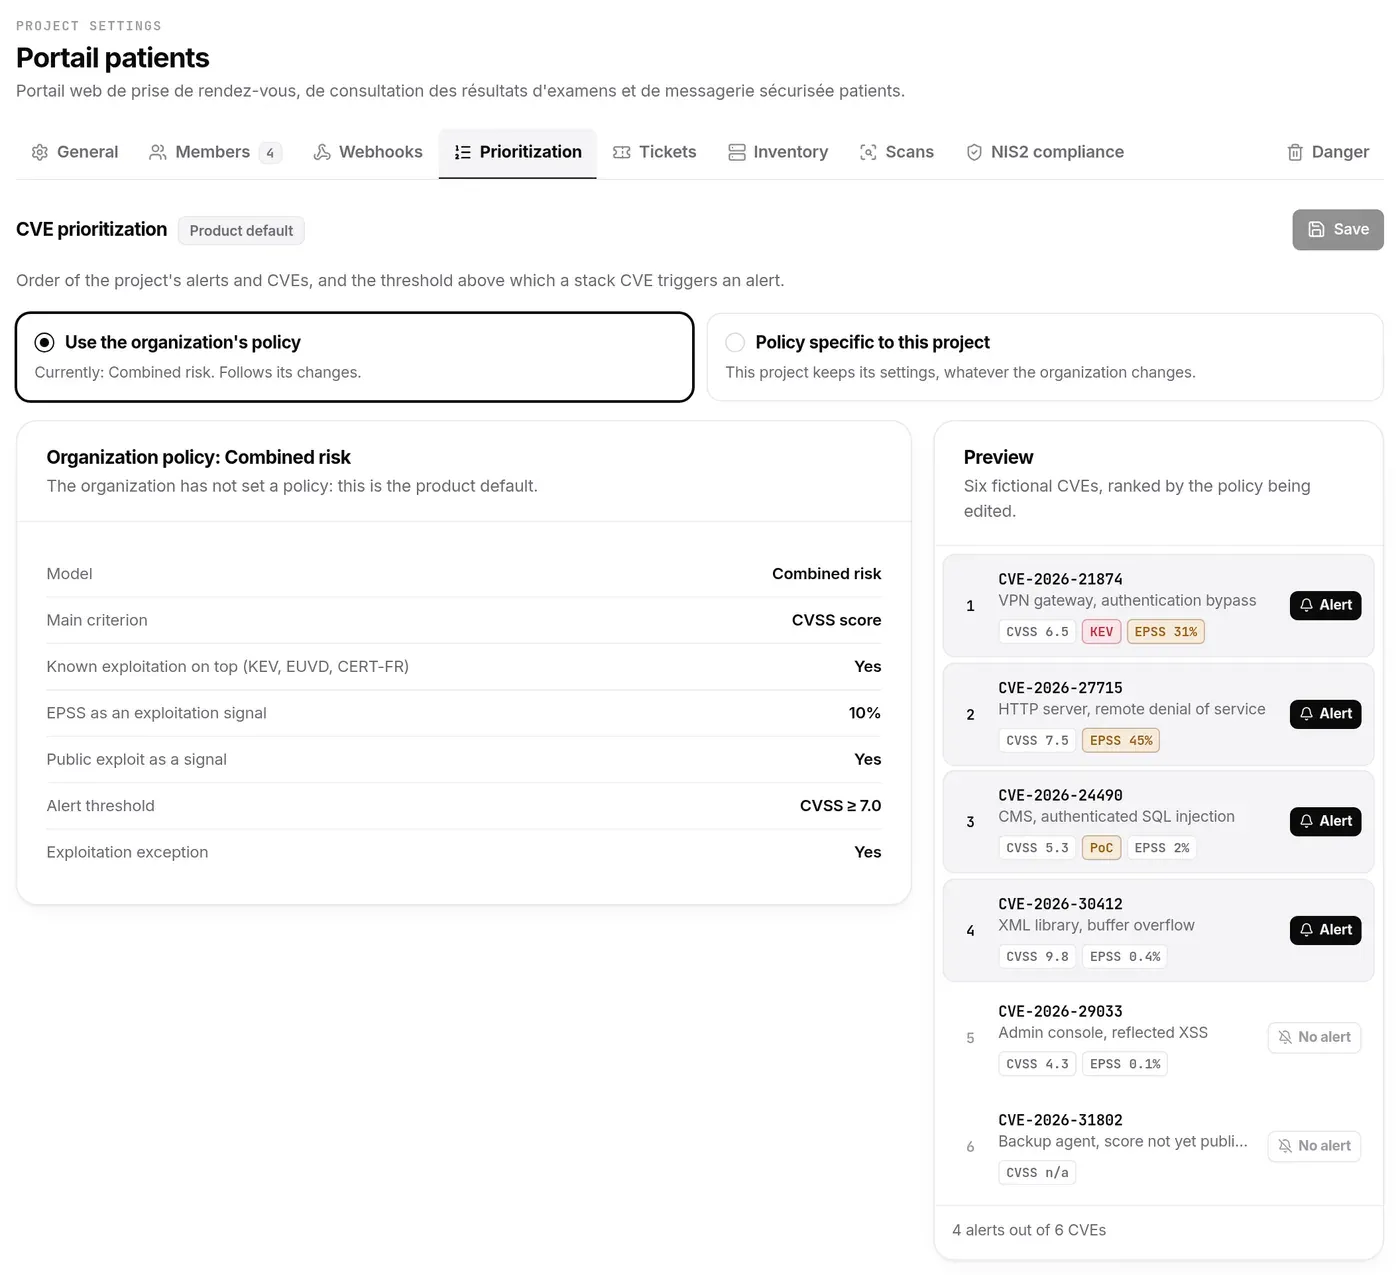
- Use the organization’s policy (the default when a project is created): the project follows the organisation’s policy and its changes. The summary below says which one (Combined risk here, “Product default” when the organisation has not set one).
- Policy specific to this project: the project keeps its settings whatever the organisation changes. Choose a model, then fine-tune it if needed (see Organisations › Prioritisation for the models and settings).
- Preview: six fictitious CVEs, ranked by the policy shown, each marked Alert or No alert.
- Save is only active after a change. Only the project’s Admins and Owner can edit; other members see the policy read-only.
Each stack item can refine the threshold further (see Stack). If you hid the “items that depart from the policy” warning on the Stack page, this section offers Show it again. The Stack page’s link to the project policy opens this section.
To dismiss a single CVE (false positive, component not exposed), close it as Not applicable in the alert (see Handling an alert › Dismissing a CVE). To stop a component from raising alerts, raise its threshold or remove it from the stack. For a whole family of CVEs, set an exclusion rule (next section).
Exclusions
Section titled “Exclusions”The Exclusions section answers “don’t alert me about…”: a list of rules that prevent an alert from being created for the CVEs they target. Nothing disappears without a trace: every CVE set aside can still be looked up.
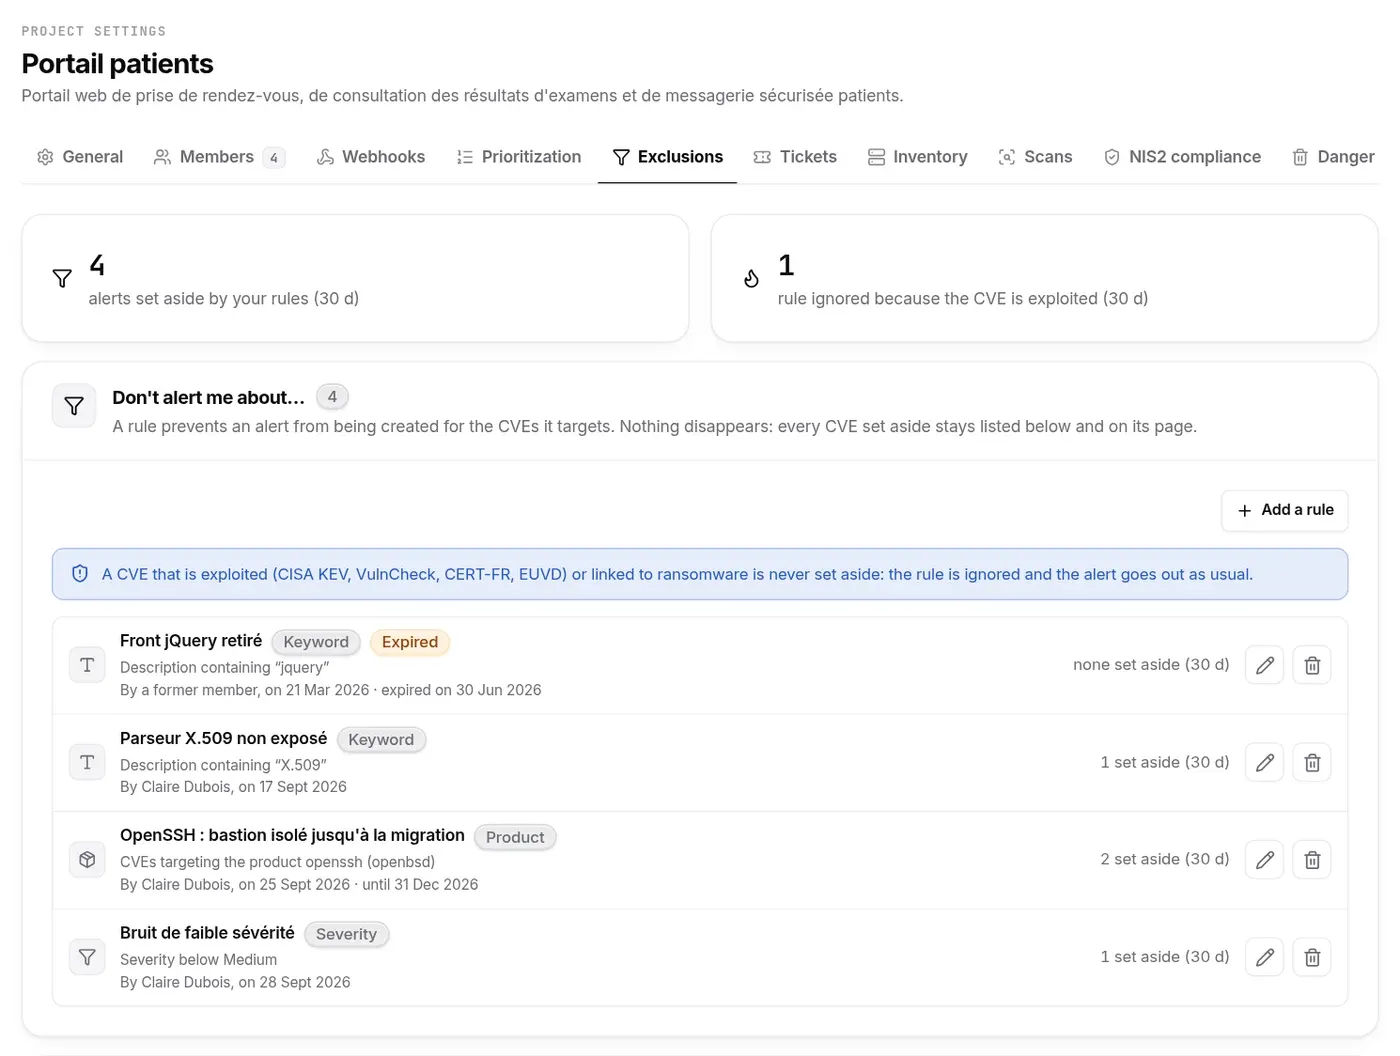
- At the top, two 30-day counters: alerts set aside by your rules, and rules ignored because the CVE is exploited.
- Add a rule (at the top of the section) opens a window: a name, then one criterion:
- Product (from the stack or free text): the stack’s products are suggested, another name can be typed; the optional vendor resolves a name clash;
- Keyword in the description (at least three characters, case-insensitive);
- CNA / assigner: the body that published the CVE, for example “Linux” for the kernel;
- Severity below…: a CVE not yet scored (waiting for the NVD) is never set aside;
- No known affected version: the CVE publishes no version range or bound.
- Last day in effect (optional): after that day the rule shows the Expired badge and no longer applies, without anyone having to remember to remove it.
- Each rule shows its criterion, its author, its date, its end date and how many CVEs it set aside over 30 days. The rule’s ⋯ menu (or a right-click) offers Edit (its name and end date, in a window) and Delete, with confirmation (CVEs already set aside stay recorded; the next ones will alert again).
- Latest CVEs set aside: the trace, with the rule involved. A Rule ignored line flags a CVE the rule targeted but which alerted anyway.
A rule only affects the creation of alerts: an alert that is already open keeps receiving its updates. To find out why a stack CVE has no alert, open its page: the Why this alert? box says “Affected, but set aside by a project exclusion rule”, with the rule’s name and author; in the CVE list of a stack item, the row carries a funnel badge.
All members can read the rules; creating, editing or deleting one requires the Project settings right (Admins and Owner by default). Every change is written to the organisation’s audit log.
Integrations
Section titled “Integrations”The Integrations page starts with a catalogue of cards: Webhooks, Ticketing, Inventory and Import a scan report (which leads to Stack › Scans). A card outside the plan carries a padlock and the plan that opens it. Each card leads to its section, further down the page.
Webhooks
Section titled “Webhooks”A webhook sends a JSON POST to an address of your choice for every new CVE alert in the project. The section is covered in detail in Notifications and channels › Project webhooks.
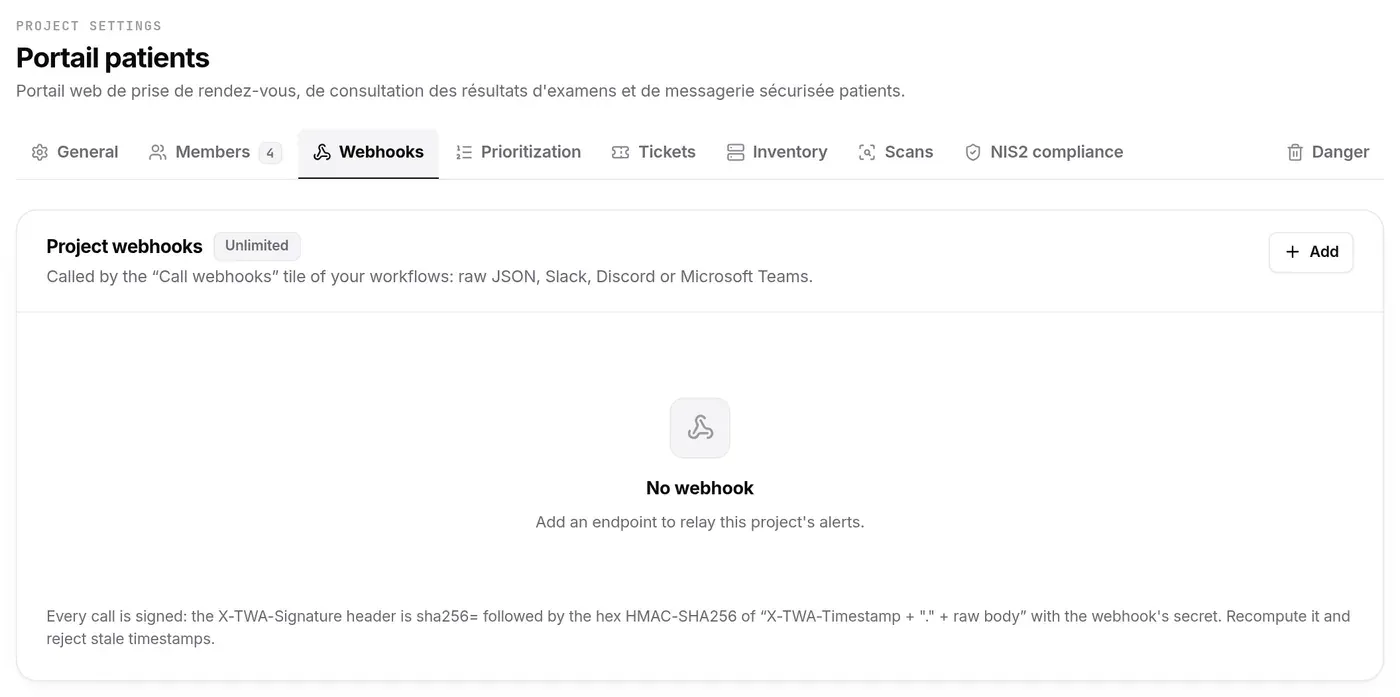
- The section (and its card) only appears to those allowed to see webhooks (Admins and Owner by default). Adding, editing (including enabling, disabling and regenerating the secret) and deleting are three separate rights, set in the matrix.
- Every call is signed; the signing secret is shown only once, when the webhook is created or its secret regenerated. The stored address is only partly shown (host only), as it often carries a token.
- The badge shows the plan’s quota: 5 webhooks per project on Team, unlimited on Pro and Business. On Free the card carries a padlock and the section gives way to the common padlock: Webhooks not included in your plan, the plan that opens them and See plans.
- Each webhook has its sending switch (applied at once) and a ⋯ menu (or a right-click): Edit (name, new address), Regenerate secret and Delete, confirmed. Adding and editing happen in a window.
Tickets
Section titled “Tickets”The tool your team fixes things in: Jira, GitLab or GitHub, one per project. Once configured, a ticket can be opened from an alert or automatically by the “Create a ticket” workflow tile (see Handling an alert › Opening a ticket).
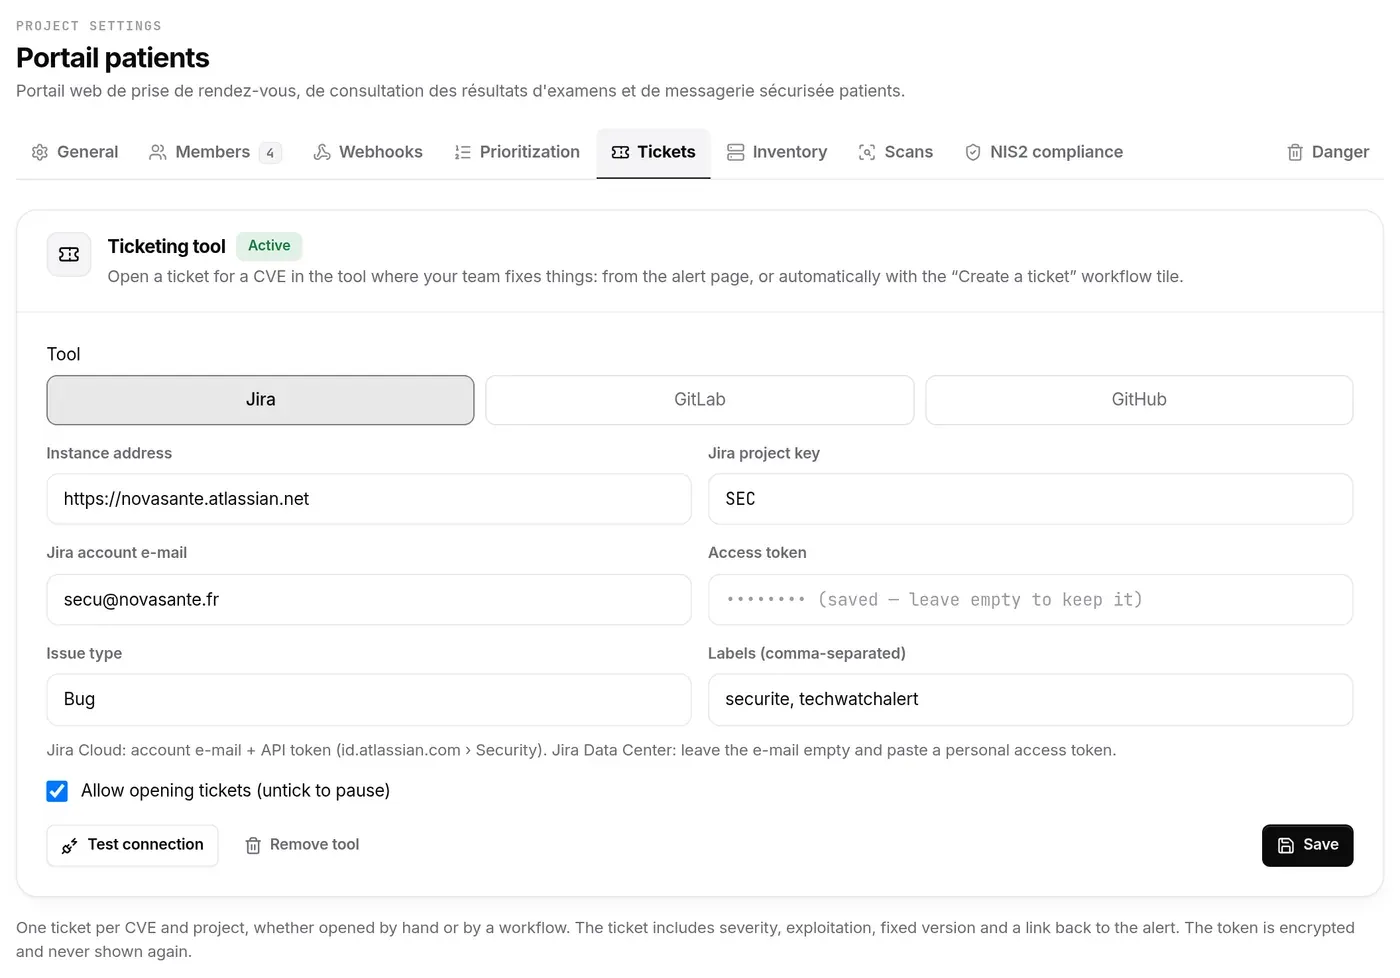
- Configuration is limited to the project’s Admins and Owner: the token is a secret. It never comes back from the server; leaving the field empty keeps the stored one.
- Test connection checks the token and target without creating anything; Remove tool deletes the configuration. Both sit on the left of the section’s footer, Cancel · Save on the right (Save is active as soon as a field has changed).
- The Allow opening tickets box pauses the integration without removing it.
- Tickets are part of case management (Team plan and above). Without it, the card carries a padlock and the section shows Included with case management instead of the form.
Inventory
Section titled “Inventory”The GLPI and Microsoft Intune connectors keep the project’s stack up to date every night from the software actually installed (additions, versions, removals). Items entered by hand are never changed. Details: Imports, connectors and scans.
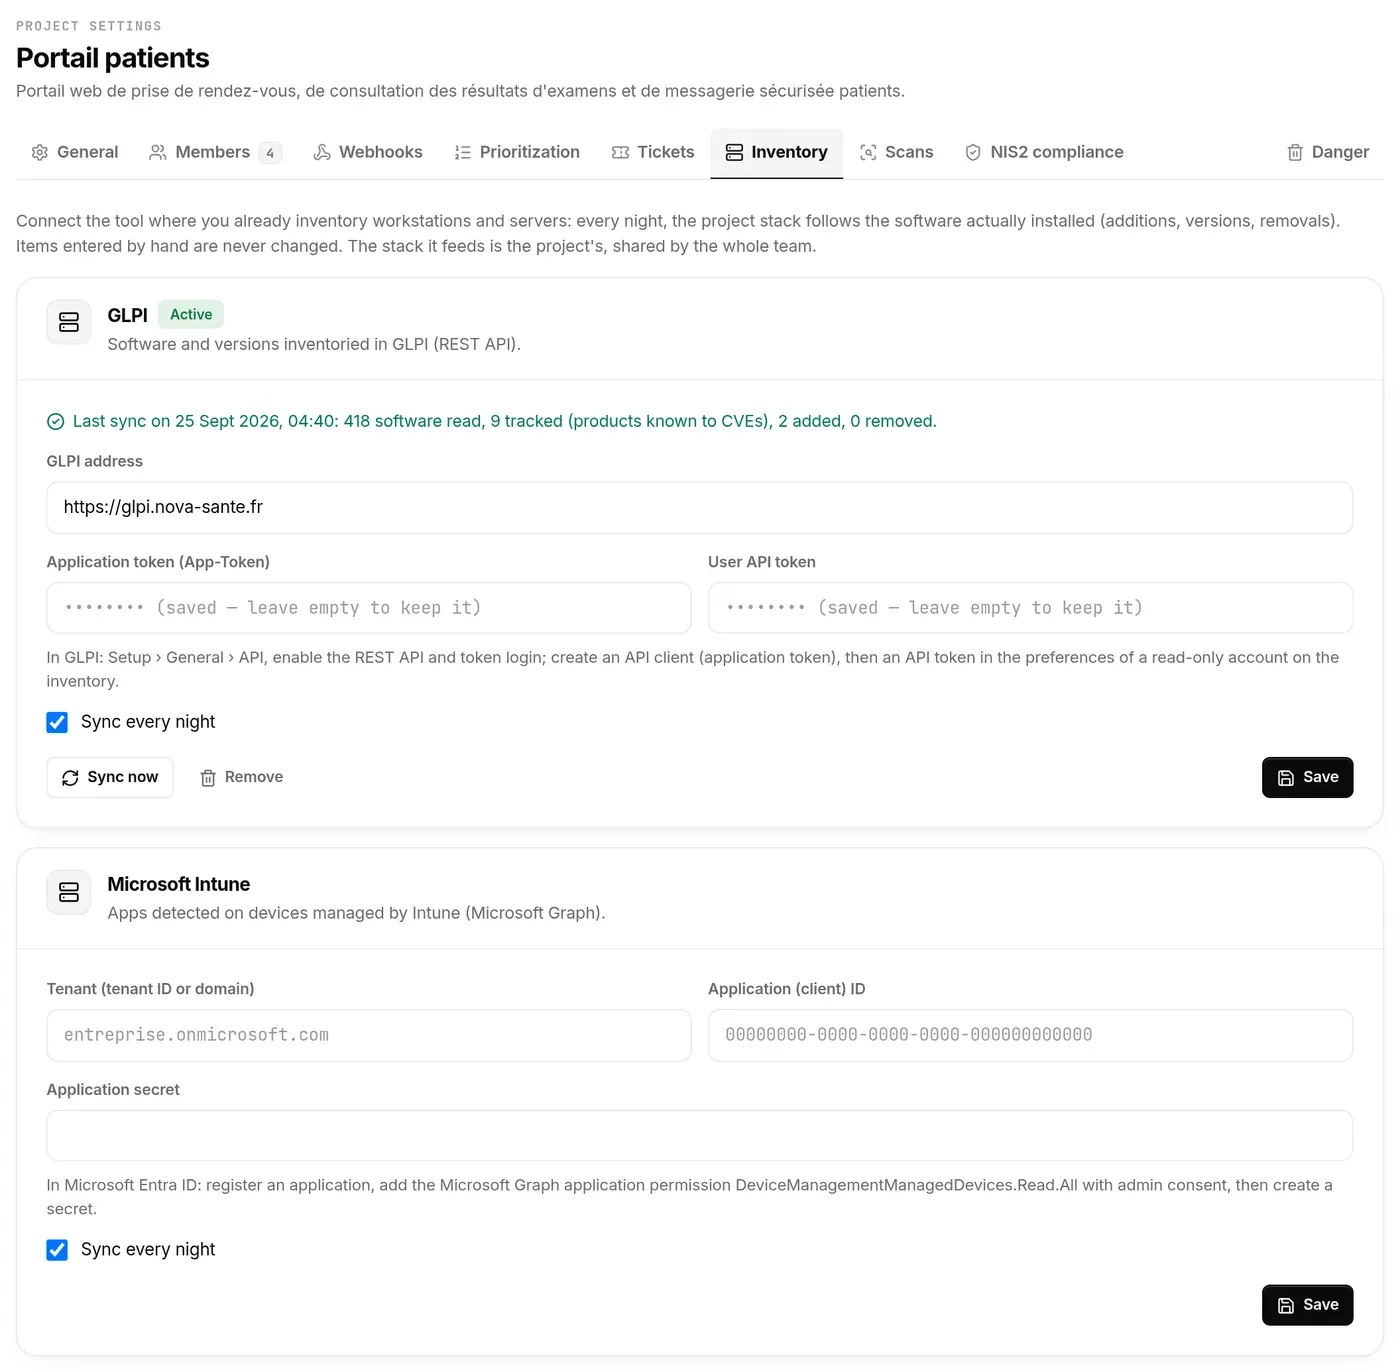
- Configuration is limited to the project’s Admins and Owner; secrets never come back from the server, and an empty field keeps the stored value.
- The connector feeds the project’s stack, shared by the team; it does not depend on who configured it.
- Connectors are included in the Pro and Business plans. On another plan, the card carries a padlock and the section shows “Inventory connectors unlock with the Pro plan”.
Compliance
Section titled “Compliance”Coverage is decided project by project. The project’s Compliance page (formerly the Frameworks and NIS2 compliance tabs) is the only place where NIS2 is turned on for THIS project; the Coverage page (/referentiels) lists every project of the organisation with its Activate button. The project page shows its state (Not enabled or Enabled), the Enable (or Disable) button, the project’s compliance workflows and, once the project is enabled, its remediation deadlines. Everything is explained in NIS2 › Turning NIS2 on for a project and Settings and board report.
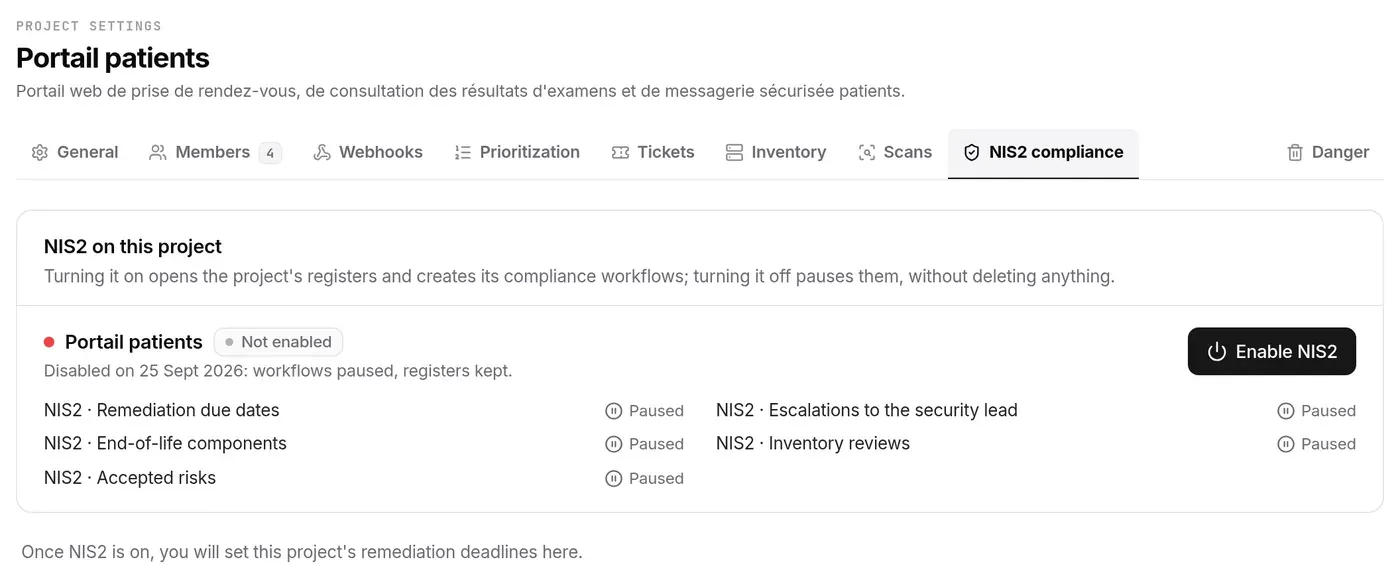
Disabling pauses the project’s workflows and keeps its registers. The page itself says when the organisation’s plan does not include framework tracking.
Deleting the project
Section titled “Deleting the project”The bottom section of the General page (the former “Danger” tab), reserved for those who can delete the project: its Owner, any member holding the Delete project right (members of the Administrateurs system group have it), and the Owner and Admins of the project’s organisation.
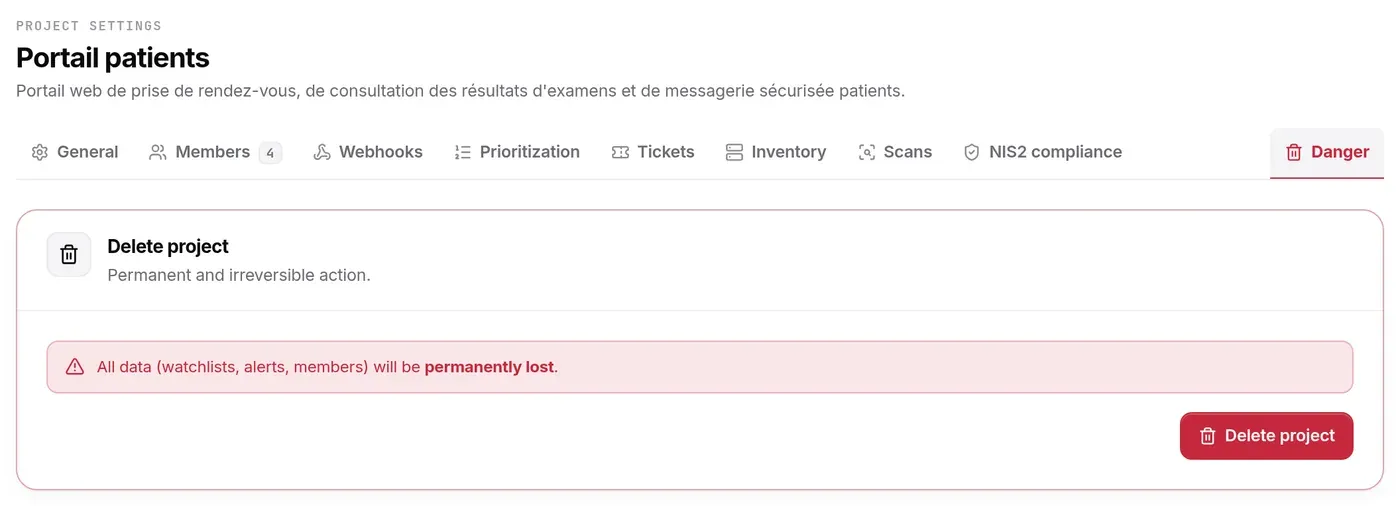
- At the bottom of the General page, read the warning: all the project’s data (watchlists, alerts, members) will be permanently lost.
- Click Delete project.
- Confirm in the window that repeats the project’s name.
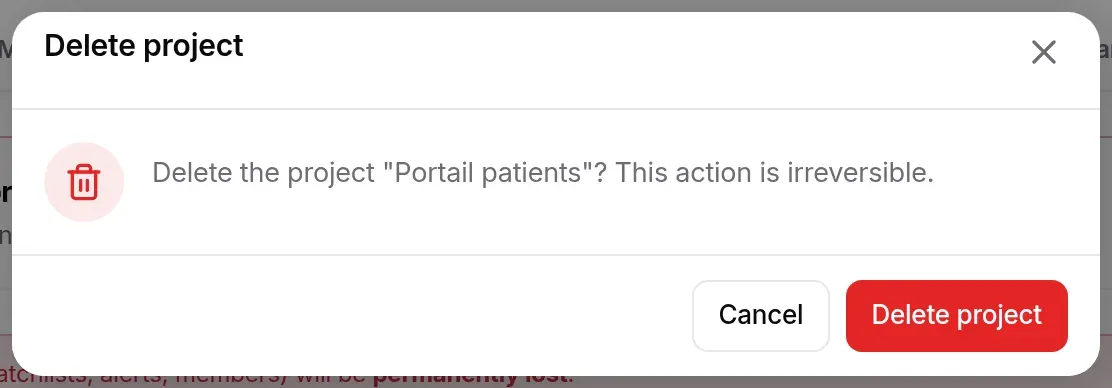
The default project cannot be deleted: the section says so instead of showing the button. After deletion you are sent back to the organisation’s Projects page; if it was the active project, no project is selected any more.
Who can do what
Section titled “Who can do what”| Action | Minimum project role |
|---|---|
| Open the settings, read the pages, see the members | User (VIEWER) |
| Edit name and description, members’ fine-grained rights, remove a member (except another Admin) | Admin |
| End-of-life warning lead times (Team notifications card) | Analyst |
| Webhooks, “Send webhooks” switch, project-specific prioritisation, exclusion rules, tickets, inventory | Admin |
| Turn NIS2 on or off for the project | Admin of the project or of the organisation |
| Delete the project | Owner, “Delete project” right, or organisation Admin and Owner |
The full table of rights per role is in Team, roles and groups. These are defaults: a custom right (the Rights choice of a member’s ⋯ menu, or a group’s rights) widens or narrows them, and the server applies the result.
Frequently asked questions
Section titled “Frequently asked questions”I cannot see the Members page. It is an old personal project, created before projects had to belong to an organisation: it does not accept other members. Create a project in an organisation to work with others.
I cannot see Delete the project. You are not allowed to delete this project: you need to be its Owner, hold the “Delete project” right, or be Admin or Owner of its organisation.
I cannot see the webhooks. Your role does not include the right to see webhooks (only Admins and the Owner have it by default).
Why is project creation greyed out? You need to be Admin or Owner of at least one organisation: a project is always created in an organisation.
How do I transfer a project or change a member’s role? Neither has a screen: a member’s role comes from their groups, and their rights are adjusted with the Rights choice of the ⋯ menu on the project’s Members page.
The NIS2 box does not appear when creating a project. It only appears if the chosen organisation’s plan includes NIS2 (Pro and Business), and only for an organisation Owner or Admin. You can turn NIS2 on later on the project’s Compliance page.