Alerts
An alert tells you that a CVE affects a component of the project’s stack and needs handling. The Alerts page lists them for the active project: it is the team’s work queue, the same for all its members.
- Who it is for: any project member with the right to view alerts (every role by default); changing their status needs the “Change status” right (or “Reopen case” from History), assigning them the right to edit cases, granted by default from the Analyst role upwards (see Permissions and plan).
- Where: menu Overview › Alerts. The red badge on the menu counts the active project’s alerts that you have not read yet.
- Scope: the alerts of the project chosen under Active project, at the top of the sidebar. Switching project changes the list.
The page reads from top to bottom:
- Title and active project.
- Excel: download the project’s alerts (Team plans and above).
- Current Alerts / History: the two tabs, with their alert counts.
- Search, Quick views and sort order (see Sorting the list).
- Quick filters: severity, Exploited, KEV, Public PoC, Unread, detection period, then the Advanced filters button.
- Results and active filters: the number of alerts found, one chip per filter applied, and Clear all.
- The table: one row per alert; clicking the row opens its record.
How an alert is raised
Section titled “How an alert is raised”TechWatchAlert continuously matches the CVEs it imports against the project’s stack, that is the products and vendors you declare there (see Stack). An alert is created when a CVE passes every one of these steps:
- Match. The product or vendor of a stack item is among those the CVE affects (its main vendor and product, and every product in its affected versions). The comparison ignores case and leading or trailing spaces.
- Precision. A product with the same name from another vendor is ruled out when the CVE’s CPE references prove it.
- Version. If the stack item has a version, the CVE is kept only when an affected version range contains it. With no declared version, or when the source publishes no range, every version is considered.
- Prioritisation policy. The project’s policy decides whether the CVE raises an alert: a CVSS score at or above the policy threshold or, when the exception is on, an exploitation signal (known exploitation, public PoC, EPSS above the threshold). A stack item can carry its own threshold, stricter or looser. With the default model, Combined risk, the threshold is a CVSS of 7.0 and the exception is on.
- Newness. Only CVEs that are new to the project raise alerts: those published on or after the day it was created (the CVE’s publication date, to the day, in UTC). An older CVE, even if it is modified, rescored, added to the KEV catalogue or given a PoC today, creates no alert and sends nothing: no notification, no email, no workflow. It stays visible in the CVE database.
- Workflow. Every notification goes through the project’s workflows. The alert is only created if an active workflow for the “new CVE” event contains the Create case action. Each project receives a monitoring workflow that does this when it is created; if you disable or delete it, no more alerts are created (see Workflows).
A few useful rules:
- One alert per project and per CVE, shared by the team. Every member sees the same alert and the same handling case: a status changed by a colleague changes everyone’s list. A member who joins the project sees the existing alerts. Only the read state is personal.
- No history at sign-up. A newly created project receives no alert for CVEs published before it, however many components it declares, even in an older organisation. Historical CVEs affecting the stack can be browsed in the CVE database.
- Catch-up. When you add a component to the stack, TechWatchAlert replays the same matching on CVEs already published since the project was created: those from the last 12 months, plus those in the KEV catalogue, 150 at most, exploited ones first. It therefore only concerns an older organisation completing its stack. These alerts trigger no notification and show Already published in the Detection column.
- An open alert keeps being tracked. An existing alert keeps receiving its CVE’s updates (CVE modified, added to KEV, PoC published).
- Manual declaration. From the record of a CVE in the database, Declare as alert creates the alert in the active project, with no threshold condition (see CVE database).
To find out why a specific CVE raised an alert, open its record: the Why this alert? panel replays each of these steps (see Handling an alert).
The three tabs
Section titled “The three tabs”- Current Alerts: alerts whose case is To do, Analyzing or Remediating. An alert nobody has opened yet (no case) counts as “To do”.
- Mitigated: Mitigated cases, whose vulnerability is not fixed but contained by a temporary measure, until their expiry date; each row gives its expiry date (“Mitigated → 19 Oct”, the full date on hover) (see Mitigating a CVE). Neither to do nor closed: the day after the expiry date, without a fix, the case comes back to Current Alerts by itself.
- History: cases closed as Risk accepted, Resolved or Not applicable. This is where a dismissed CVE goes (see Dismissing a CVE).
Each tab shows its alert count, search and filters included (the status filter only counts for the tab on display). Switching tab removes the status filter, since statuses belong to the tab, keeps the other filters and clears the selection.
Reading a row
Section titled “Reading a row”
| Column | Content |
|---|---|
| CVE ID | The identifier, a button to copy it, and a dot if the alert is unread. |
| Severity | The CVE’s severity: Critical, High, Medium, Low. |
| Description | The first line of the description published by the source, followed by the CVE’s tags in this project. It takes all the remaining width. |
| Vendor, Product | The CVE’s main vendor and product, with their logo when known. On a screen narrower than 1,536 pixels, the Vendor column disappears and the vendor is shown in small type under the product. |
| Exploitability | Risk view only: the displayed probability of exploitation and the exploitation icons (below). |
| Status | The case status, shared by the team. |
| Assignee (person icon) | The initials of the people assigned to the case (two at most, then “+N”); their full names on hover. A dash when nobody is assigned. You assign from the alert record (see Assigning the case) or from the list’s action bar (see Acting on several alerts). |
| Detection | How long ago the alert was created (exact date on hover), or “Already published” for a catch-up alert. |
The columns on this page cannot be configured (unlike the CVE database).
Icons and probability of exploitation
Section titled “Icons and probability of exploitation”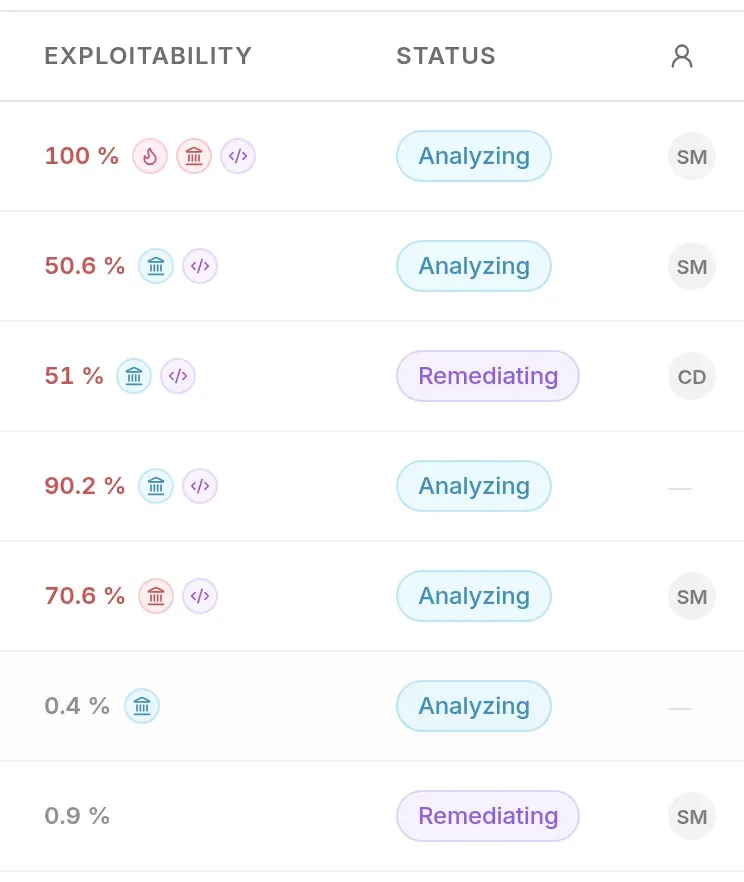
To keep every alert on a single line, exploitation signals are small round icons; their label and details show on hover.
- Pink flame, Exploited: known exploitation, according to at least one source: the CISA KEV catalog, the VulnCheck KEV catalog, ENISA’s EUVD or CERT-FR. The sources are listed on hover.
- Building, CERT-FR: the CVE is cited by CERT-FR, the French national CSIRT. The icon is always red, advisory or alert; the tooltip says when it is a CERT-FR alert (reference containing “-ALE-”). References are listed on hover (three at most, then “+n”).
- Purple chevrons, PoC: public proofs of concept exist; their number shows on hover (“PoC ×3”).
- The percentage: 100% when exploitation is known; otherwise, with a public PoC, the EPSS probability is raised halfway towards 100% (50% minimum); otherwise EPSS alone; “—” with no EPSS score. It shows in red from 50%, orange from 10%, grey below that.
Each status has its own colour: To do Analyzing Remediating Mitigated Risk accepted Resolved Not applicable. These labels are the same everywhere: list, alert record, dashboard, reports. On the alert record, the status is shown by an icon next to the label.
Read and unread alerts
Section titled “Read and unread alerts”
An unread alert has a dot after its identifier; a read alert is shown slightly faded. Reading is personal: an alert you have read stays unread for your colleagues until they open it. The badge on the Alerts menu counts the unread alerts of the active project. Opening an alert marks it as read, whether you come from the list, the dashboard or a link in an email; the menu badge updates straight away. The tick button in the Alert Summary widget on the dashboard marks it as read without opening it.
Sorting the list
Section titled “Sorting the list”Two orders, chosen in the list to the right of Quick views:
- Recently published (default): most recently published CVEs first; on equal dates, the most recent alert. The Exploitability column does not appear.
- Risk: the order of the project’s prioritisation policy. Alerts are ranked by successive keys, each from highest to lowest:
- the exploitation tier: 2 for known exploitation (if the policy puts it first), 1 for an EPSS above the threshold or a public PoC (if the policy counts them), 0 otherwise;
- the policy’s main criterion: the CVSS score for the Combined risk model (or EPSS, or severity, depending on the policy), CVEs without a score last;
- the secondary criterion: EPSS (or CVSS when EPSS is the main one);
- the alert date, most recent first.
Filtering
Section titled “Filtering”The page has the same filter bar as the CVE database. Search, severity, signals, product and scores apply to each alert’s CVE; the period and dates, to the alert’s detection; status, owner, tags and ticket, to its case; priority and due date, to its project’s policy.
Searching
Section titled “Searching”The Search a CVE, a product, a vendor, a word… field looks for the text typed in the CVE’s identifier, description, vendor and products (every product it affects, not just the first one), ignoring case. The list follows your typing after a short pause; Enter applies the search at once, Esc clears the field (a second press moves the cursor out of it), the cross clears it too, and the / key puts the cursor in the field from anywhere on the page.
Filters in the bar
Section titled “Filters in the bar”They apply at once and add up.
- Severity: Critical, High, Medium, Low, which can be combined; with none chosen, every severity is shown.
- Exploited (known exploitation: CISA or VulnCheck KEV, ENISA EUVD, CERT-FR), KEV (in the CISA KEV catalog), Public PoC (a public proof of concept or exploit exists).
- Unread: only the alerts you have not read yet.
- Detection period: Any time (default), Last 24 h, Last 7 days, Last 30 days, Last 90 days or Last 12 months, on the alert’s detection date (Detection column).
- Advanced filters opens the panel with the other filters.
Advanced filters
Section titled “Advanced filters”Advanced filters unfolds a panel under the bar; the same button, or Collapse at the bottom of the panel, folds it again. The panel is folded every time you arrive on the page, even when the address carries advanced filters: those filters show as chips, and the button shows how many there are.
- Handling:
- Status: one or more statuses of the tab on display (To do, Analyzing, Remediating in Current Alerts; Mitigated in Mitigated; Risk accepted, Resolved, Not applicable in History).
- Case owner: Anyone (no filter), Me (alerts whose case is assigned to you, alone or with others) or Nobody (nobody owns them). When a project is active, the Assigned to… list offers the project members who can see cases, to keep one person’s alerts.
- Tags: one or more of the organisation’s tags (the line appears as soon as there are any); an alert is kept if its CVE carries at least one of the chosen tags in this project. Switching the active project removes this filter.
- Linked ticket: All, With ticket or Without ticket, depending on whether a Jira, GitLab or GitHub ticket was opened for the CVE in this project, from the record or by a workflow (see Opening a ticket).
- Exploitation:
- Weaponized exploit (a Metasploit module or a Nuclei template exists) and Ransomware (used by ransomware, according to CISA or VulnCheck);
- Exploit source: GitHub, Exploit-DB, Metasploit, Nuclei, combinable; an alert is kept if at least one of its PoCs or exploits comes from one of the chosen sources. Each button carries the icon of the site its links lead to, as in the record’s PoC list (Metasploit modules and Nuclei templates are published on GitHub);
- CERT advisories: one or more national CERTs, picked from a list grouped by region (France, Europe, Americas, Asia-Pacific, Middle East), with a field to search a CERT by name or country. An alert is kept if at least one of the chosen CERTs published about its CVE: these are the CERTs of the record’s “CERT advisories” block, CERT-FR and EUVD included. CERT-FR, which had its own button until now, is one of them.
- Remediation:
- Priority: P1, P2, P3, combinable. These are the exploitation tiers of each alert’s project’s prioritisation policy, the ones that open the Risk order: P1, confirmed exploitation (KEV, EUVD, CERT-FR) when the policy puts it first; P2, an exploitation signal the policy counts (EPSS above its threshold, public PoC); P3, none. With the CVSS only model, which counts no signal, everything is P3.
- Fix: All, Available (at least one fixed version is known: those of the record’s “Fixed versions” block, taken from the CVE, GitHub or OSV advisories and CERT-FR notices) or None known.
- Workaround available: only the alerts whose CVE has a workaround or a mitigation published by the vendor or a CERT (the record’s “Interim measures” block: CSAF advisories from CISA, NCSC-NL and Siemens, CERT-FR alerts and notices). “No fix available” and “No fix planned” are not enough.
- Remediation due date, where due dates are tracked (a plan that includes the NIS2 space, NIS2 enabled for the project): Overdue (due date passed, escalated or not), Due soon (within the remediation policy’s reminder window, 3 days by default), On track, None (case closed or risk accepted). Combinable; these are the statuses of the Due dates page, under the project’s remediation policy.
- Product: the CVE’s Vendor and Product, as partial text.
- Scores: CVSS score (0 to 10) and EPSS probability (%), each with a Min and a Max, bounds included. An out-of-range value is outlined in red and does not filter.
- Dates: Detected between two days. This range replaces the period in the bar, which then shows “Chosen dates”; choosing a period in the bar clears the range.
Quick views
Section titled “Quick views”Quick views, to the right of the search, applies a common combination in one click:
- To triage: Current Alerts tab, To do status;
- My assignments: Current Alerts tab, owner Me;
- Unread: the alerts you have not read;
- Exploited criticals: Critical severity and Exploited;
- Used by ransomware: Ransomware;
- Overdue due dates: Current Alerts tab, due date Overdue (where due dates are tracked).
A view replaces the search and the filters applied; the sort order and rows per page stay. When the filters match a view exactly, the button shows its name.
Active filters
Section titled “Active filters”Under the bar, a line gives the number of alerts found (“9 results”), then one chip per filter applied: “Critical”, “Exploited”, “Status: Analyzing”, “My assignments”, “No owner”, “Assigned to Claire Dubois”, “Tag: Production”, “Detected since 01/09/2026”, “Priority: P1”, “Overdue”, “With ticket”… The cross on a chip removes its filter. Clear all removes the search and every filter, keeping the tab, sort order and rows per page.
Filters are applied on the server: the list, its total, the tab counts and pagination stay accurate. Every filter change goes back to the first page.
Sharing a filtered list
Section titled “Sharing a filtered list”The search, filters, tab, sort order, page and rows per page are written into the page address: reloading the page, or sharing its address, reopens the same view. Only departures from the defaults appear; whether the advanced panel is open never does.
| Parameter | Meaning |
|---|---|
q |
search |
severity=CRITICAL,HIGH |
severities (CRITICAL, HIGH, MEDIUM, LOW) |
exploitee=1, kev=1, poc=1, outille=1, rancongiciel=1 |
exploitation signals (certfr=1, an older link, becomes cert=certfr) |
exploit=metasploit,nuclei |
exploit source: github, exploitdb, metasploit, nuclei |
cert=certfr,bsi |
CERT advisories, by identifier (certfr, cert-eu, euvd, bsi, ncsc-nl, cisa, jvn…) |
unread=1 |
unread |
periode |
detection period: 24h, 7j, 30j, 90j or 1a (12 months) |
du, au |
detection range, as YYYY-MM-DD |
vendor, product |
vendor, product |
cvss_min, cvss_max, epss_min, epss_max |
scores, EPSS in % |
priorite=p1,p2 |
priority: p1, p2, p3 |
correctif=oui |
fix: oui (available) or non (none known) |
tab=history |
tab: contained (Mitigated) or history (History); absent: Current Alerts |
status=PENDING,ANALYZING |
statuses (PENDING, ANALYZING, FIXING; MITIGATED; ACCEPTED, RESOLVED, NOT_APPLICABLE) |
assignee |
owner: me, none or a member’s identifier |
tag |
tag identifiers |
echeance=depassee,proche |
due date: depassee, proche, dans_les_temps, aucune |
ticket=avec |
linked ticket: avec or sans |
sort=risk |
Risk order (absent: Recently published) |
page, page_size |
page, rows per page |
The page opens already filtered when you arrive from another screen:
- a severity counter on the dashboard opens
/alerts?severity=CRITICAL; - a Project cases tile opens
/alerts?status=…; a closed status opens the History tab; - a tag in the Tags widget opens
/alerts?tag=…; - the “View my alerts” link in an email (
/alerts?project=…) activates the project concerned, then the parameter leaves the address; - the View my assignments link of a bulk assignment email (or notification) (
/alerts?project=…&assignee=me) opens that project filtered on Case owner › Me.
A link to the Alerts page followed while it is already open is read again: the list takes its filters.
Pagination
Section titled “Pagination”
The table footer shows how many alerts the page displays. Rows per page offers 25, 50 or 100. When there are several pages, Previous and Next frame the range on display (“1–25 of 60”).
Acting on several alerts
Section titled “Acting on several alerts”Tick some alerts: the action bar appears at the bottom of the screen. It is the same bar as the tracking bar of an alert record (see The tracking bar): same statuses, in the same order, with the same labels, and Assign; it simply applies to every selected alert. Only Comment stays specific to the record, since a comment belongs to one case’s thread.
- Tick the alerts you want in the first column, or the header box to Select all on the page.
- The action bar appears with the number of selected alerts (“3 alerts selected”). When all the chosen alerts share the same status, it stands out.
- Click the status to apply: In progress (To do, Analyzing, Remediating), Contain (Mitigated) or Close the case (Not applicable, Resolved, Risk accepted). In the History tab, the bar only offers Reopen, which puts the cases back to Analyzing.
- Or click Assign (see below).
- The cross, on the left of the bar, clears the selection.
Rules applied:
- the status is set on each alert’s case (the team’s), one by one; if some fail, the bar stays open on the same selection and says “Unable to update the status. Check your permissions.”;
- Not applicable closes the chosen cases directly; the optional reason can only be entered from an alert record;
- Mitigated opens the mitigation form (type of measure, measure, justification, expiry date): the same mitigation is set on every selected case, each within the maximum duration of its project;
- a History (closed) case can only go back to in progress: Reopen is only offered to people with the “Reopen case” right; in the Current Alerts tab, the statuses need the “Change status” right;
- Risk accepted: when the project keeps a register of accepted risks (NIS2 compliance), the button opens a reasoned acceptance request submitted to management, for 50 alerts at most (see NIS2 › Registers). Without a register, the button opens the same form as Mitigated: a risk acceptance, too, carries a justification and an expiry date.
Assigning several alerts
Section titled “Assigning several alerts”Assign opens the same panel as on the record: the project members who can see its cases, you first (“you”), with a Search members field. An alert can have several assignees.
- Tick one or more people, then Apply: each is added to the people already assigned to every selected alert. Nothing is sent before Apply.
- A partial box (a dash) marks someone who owns only some of the chosen alerts: ticking adds them to the others, unticking removes them from all. Unticking someone who owns them all removes them from all.
- Assign to me adds you to every selected alert at once; Remove all assignments leaves them with nobody.
- A selection spanning several projects (“All projects” view) only offers Assign to me and Remove all assignments: members differ from one project to another.
- One assignment covers 200 alerts at most per request; beyond that, the interface chains requests.
Each newly assigned person is notified once, whatever the number of alerts: a bell notification and a summary email listing the CVEs (see Assigning the case). Nobody is notified of their own assignment, of an assignment that already existed, or of a removal.
By fix action
Section titled “By fix action”A list of CVEs says what is vulnerable; a team fixes by upgrading versions. The By CVE / By fix action / Exceptions switch, at the top of the page, groups cases into fix actions: “Upgrade openssl 3.0.11 → 3.0.15 · 14 CVEs · 2 exploited · due 12 Oct”.
How a fix action is computed:
- it starts from open cases (To do, Analyzing, Fixing) and mitigated cases, counted separately: a mitigation contains the flaw without fixing it, and the upgrade will close it too;
- cases are grouped by the stack component that raised the alert: product and declared installed version (see Stack);
- for each CVE, TechWatchAlert reads all the fixed versions published by the sources (the record’s “Fixed versions” block) — a CVE often publishes one per branch: Log4Shell is fixed in 2.3.1, 2.12.2 and 2.15.0 — and keeps the one that applies to the installed version: the smallest one above it on its branch (3.0.x for a 3.0.11; 15.x for PostgreSQL 15.6, where each major version is a branch); failing that, the smallest one above it on another branch (branch change: Log4j 2.14.1 → 2.15.0);
- the target version of the fix action is the highest of these versions: the only one that closes all its CVEs. CVEs that require a branch change are gathered into a single fix action towards the highest of their targets, which also closes those whose fixed versions it is above (Log4j 2.14.1 → 2.17.1 closes CVE-2021-44228, 45046 and 44832);
- an undeclared installed version gives the highest known fixed version (“version not declared”).
Two groups stay apart, collapsed below the list:
- No known fix: no fixed version is published, or none above the installed branch. The summary says how many have a known workaround (interim measures from vendors and CERTs), highlighted on each card. Nothing is guessed: a range “up to and including 3.2” does not say which version fixes;
- Already fixed per the declared version: the installed branch has its fixed version at or below the declared version (OpenSSL 3.0.13 and a CVE fixed in 3.0.8). Check the version actually deployed, then close as Not applicable, or correct the version in the stack.
Summary and “Where to start”
Section titled “Summary and “Where to start””At the top of the view, a band of figures: actions to take (and the CVEs and cases they close), those that close an exploited CVE, the nearest deadline, the cases with no known fix (and how many have a workaround) and, if any, those already fixed?. Each figure is a filter: a click shows only the fix actions that close an exploited CVE, those with a deadline (nearest first), or opens the relevant group on its own; a second click, or Show all, returns to the full view.
Where to start lists the fix actions, numbered in the order to do them: those that close an exploited CVE first, then nearest due date, then number of CVEs. Each row reads at a glance: component, installed version → highlighted target version, number of CVEs closed, then the exploited ones (KEV, VulnCheck, EUVD, CERT-FR, ransomware), the highest severity, the highest EPSS, the nearest due date — the remediation policy’s, or the due date set by the team when nearer —, the branch change, any ticket; on the right, the assignees and one button: the next step (“Start fixing”, then “Mark resolved”; “Move to analysis” for a no-fix group; “Close: not applicable” for an already-fixed group). A row expands to its CVEs (status, fixed version, assignees, link to the record) and names the CVEs of the same component that this version does not fix.
Actions on the whole fix action
Section titled “Actions on the whole fix action”An expanded row carries a bar of four actions; each opens a small panel (a sheet at the bottom of the screen on a phone):
- Change status: Analyzing, Fixing, Resolved or Not applicable, with an optional shared comment. Each case gets its own history line and its own audit log entry, exactly like a change made from its record, with the same rights (“Change status”); a refused case (closed case, risk register) does not block the others and is reported. Mitigated cases move neither to “Analyzing” nor to “Fixing” (they would lose their mitigation); Resolved and Not applicable close them with the others. The next-step button opens this same panel, with the step preselected;
- Assign (active project only): adds the chosen person to every CVE of the fix action, like assigning several alerts;
- Deadline: a team due date picked in the calendar (from today on), the team’s commitment for this fix action; Remove clears it. It does not replace the remediation policy due date (see NIS2); each case keeps a history line for it;
- Create a ticket: one ticket in the project’s tool (Jira, GitLab, GitHub), listing every CVE of the fix action, exploited first, and linked to each of them. A CVE that already had a ticket keeps it. Right: Analyst and above.
Without an active project (“All projects”), the view groups the fix actions of every project whose alerts you can see; a fix action spanning several projects shows how many, and its actions apply project by project (one ticket per project).
Exceptions: mitigated and accepted risks
Section titled “Exceptions: mitigated and accepted risks”The switch’s third position, Exceptions (address /alerts?vue=exceptions), lists what is not fixed but decided: Mitigated cases (a measure contains the flaw) and Risk accepted cases. It replaces the former “Accepted risks” page of the compliance space: same data, in the same place as alerts.
For each case: the CVE (link to its page), the status, the nature of the measure (vendor workaround, virtual patch, feature disabled, network isolation, other), the measure itself, the justification, the deadline (“Until 20 Oct · 9 d”, orange within the 14 days before, red once expired), the author and the date. The counters (All, Mitigated, Accepted risks, Expire within 14 d) filter the list. Without an active project, the view covers every project whose alerts you can see.
An approved acceptance from the accepted risk register (where it applies) carries the Register badge: its measure is the compensating measure, its deadline the review date. Expiring exceptions also appear in the Planning.
Accepted risk register
Section titled “Accepted risk register”Below the list, where the organisation follows NIS2, the accepted risk register. A fix can be deferred when the risk is analysed, mitigated and approved by management: the register keeps each request, its justification, its compensating measures, the decision and who made it. Nothing is deleted from it; a decision is never rewritten.
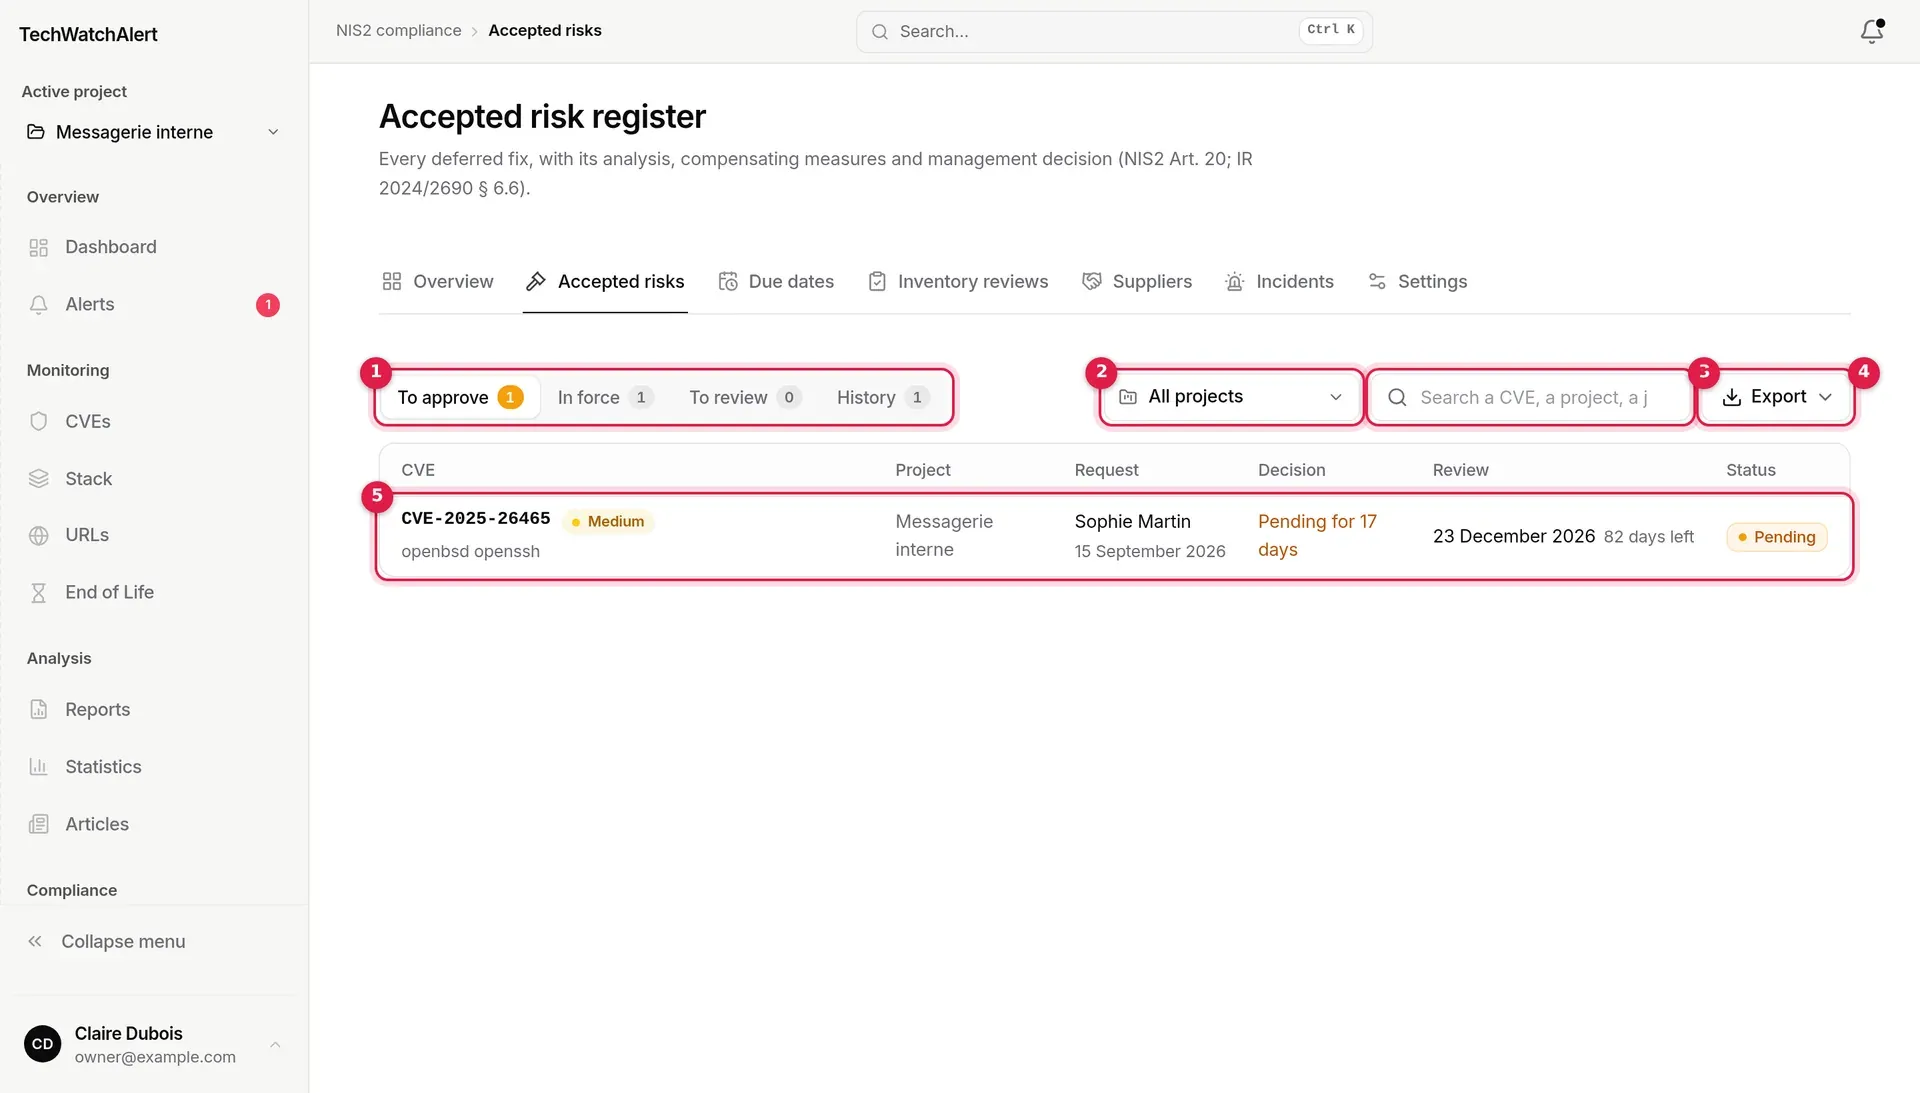
- Register tabs, with their counts: To approve, In force, To review, History.
- All projects: project filter.
- Search: a CVE, a project, a justification…
- Export: spreadsheet (CSV) or PDF register.
- A request: click it to open its details.
The four tabs
Section titled “The four tabs”
| Tab | Contents |
|---|---|
| To approve | requests awaiting management. Opens by default for management, whose count is then highlighted. |
| In force | acceptances approved by management, until their review date. Only these suspend the remediation due date. Opens by default for other members. |
| To review | acceptances in force whose review date falls within 30 days: renew them with a justified request, or fix. |
| History | refused or withdrawn requests, revoked, expired or superseded acceptances. |
Columns: CVE (with its severity and, where relevant, the “Exploited” pill), Project, Request (who, when), Decision (who decided and when; for a pending request, “Pending for N days”, in orange beyond 7 days), Review (date and days left), Status.

Statuses: Pending, Approved, Refused, Withdrawn, Expired, Revoked, Superseded. An acceptance approved by its own requester, as the only member of management, carries the Self-approved pill: the four-eyes principle could not apply, and the register says so.
Requesting an acceptance
Section titled “Requesting an acceptance”Requests are not created from the register but from the alert:
- on an alert’s page, by moving the case to the Risk accepted status;
- in the alert list, with the Accept the risk… bulk action (at most 50 CVEs per request).
See Handling an alert. The window is the same as the renewal one shown here:
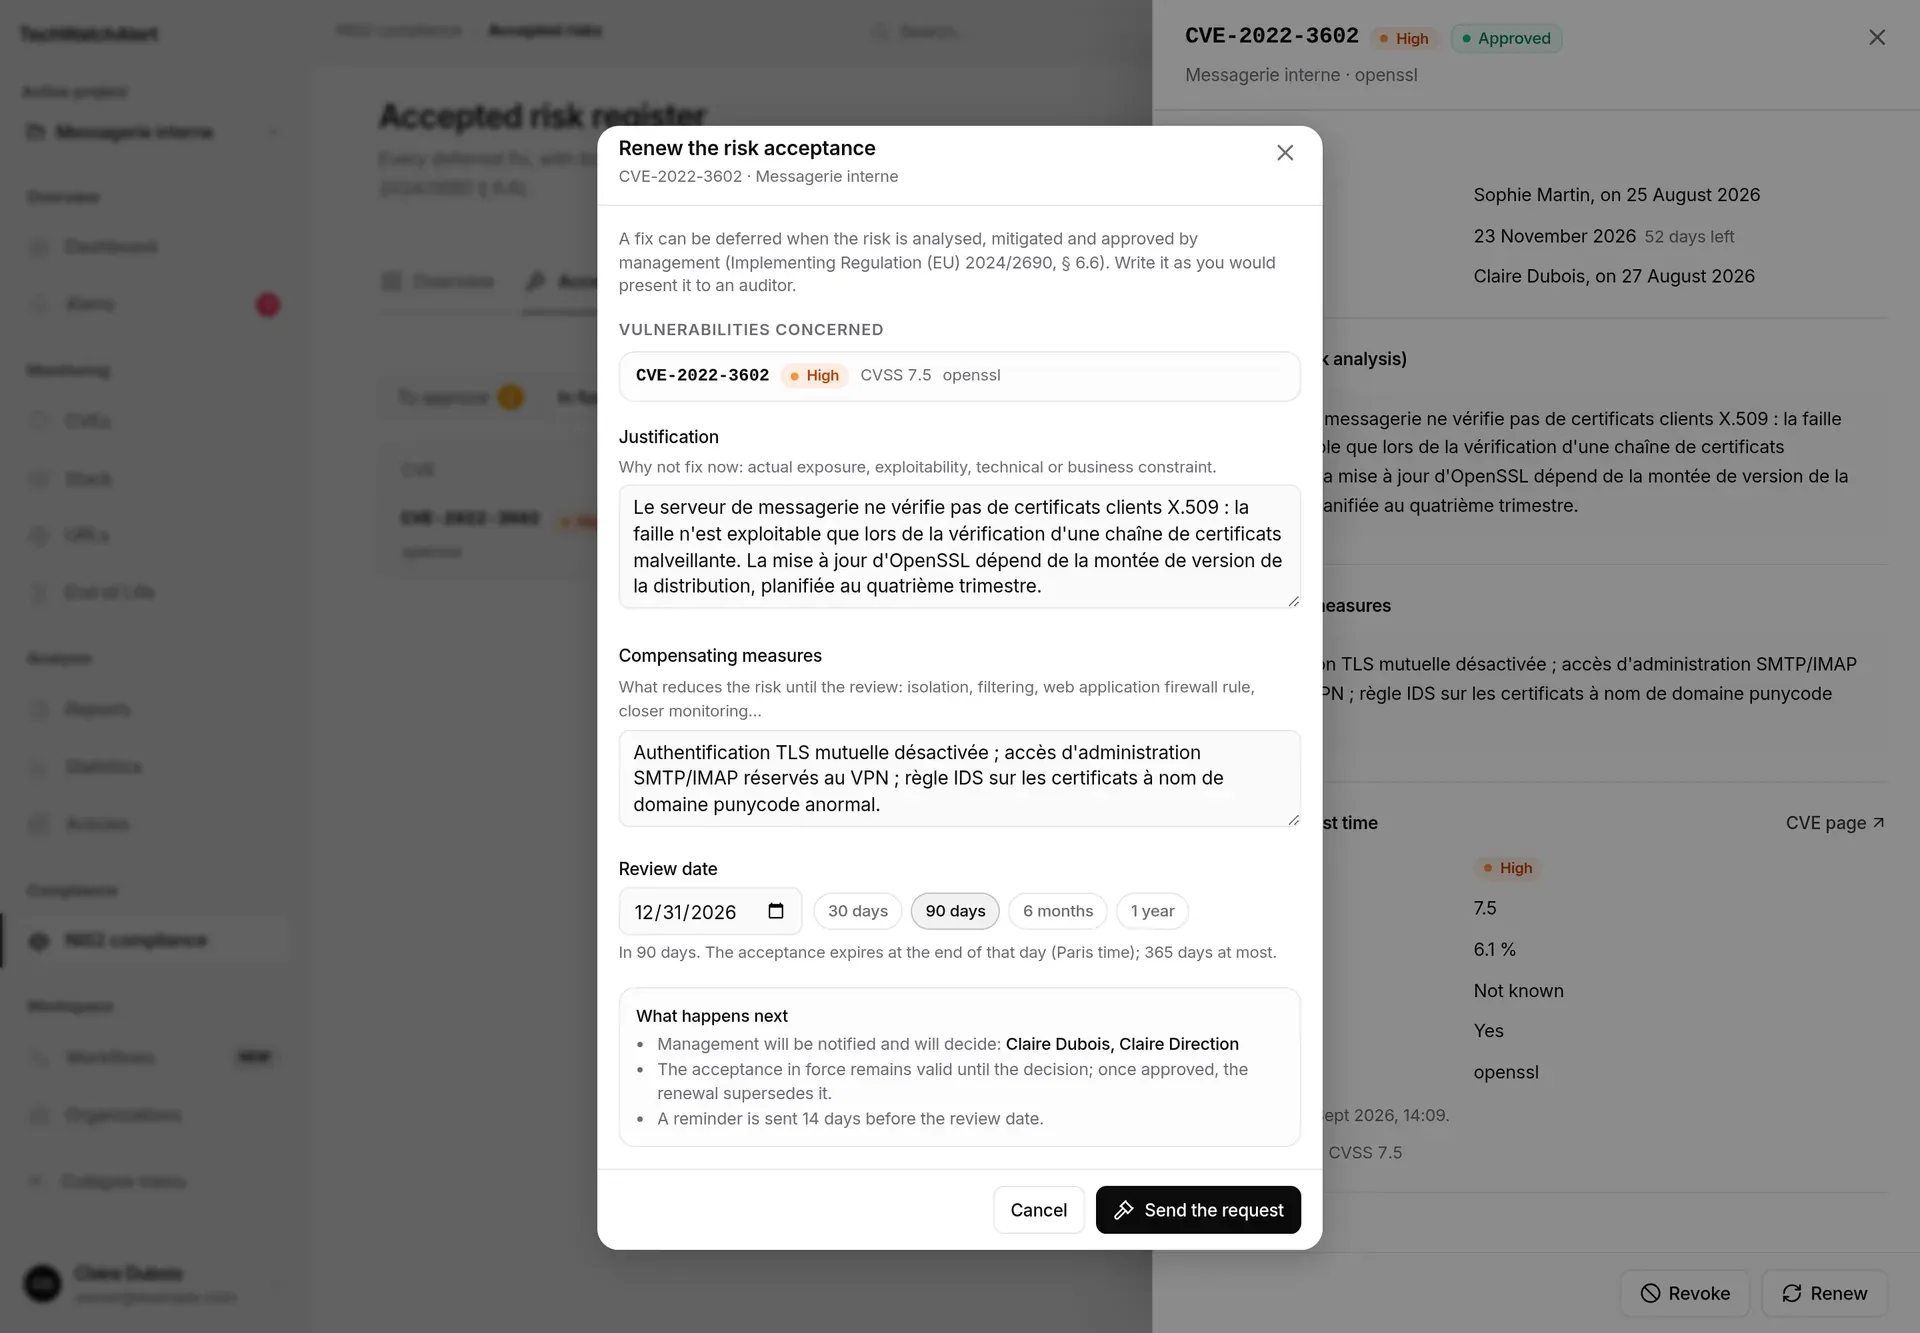
- Vulnerabilities concerned: you can remove some from the list.
- Justification: why not fix now (actual exposure, exploitability, technical or business constraint), at least 20 characters.
- Compensating measures: what reduces the risk until the review; at least one.
- Review date: 90 days by default, shortcuts 30 days, 90 days, 6 months, 1 year; 365 days at most, after today. The acceptance expires at the end of that day, Paris time.
- What happens next: who will decide (the management role holders, or else the owners), the CVE’s case, shared by the team, moving to “Risk accepted”, the reminder 14 days before the review date.
If you are the only member of management, the request is self-approved when sent (the button becomes Record the acceptance). A CVE that already has a pending request or an acceptance in force is removed from the request, with a message.
Requesting an acceptance requires the “Request a risk acceptance” project permission (analyst and above by default).
Deciding: approve, refuse, revoke
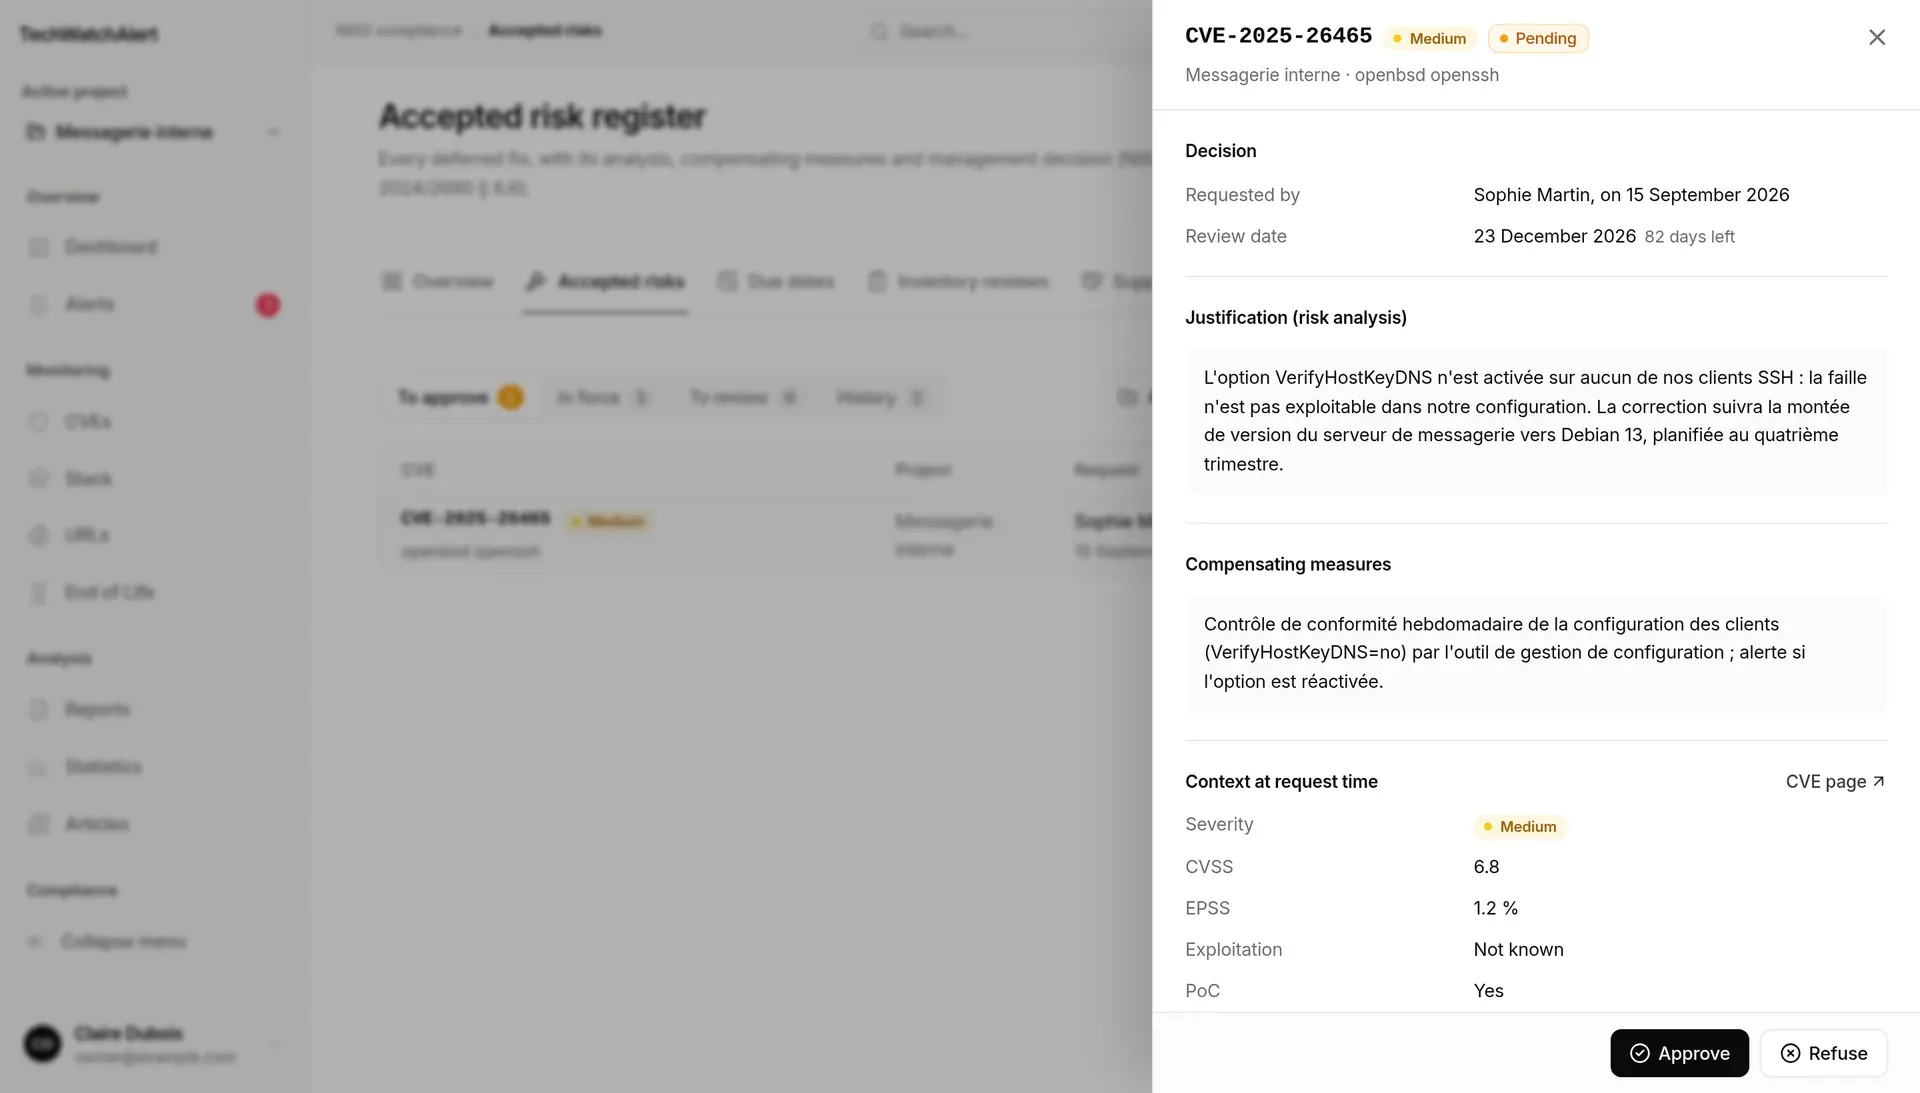
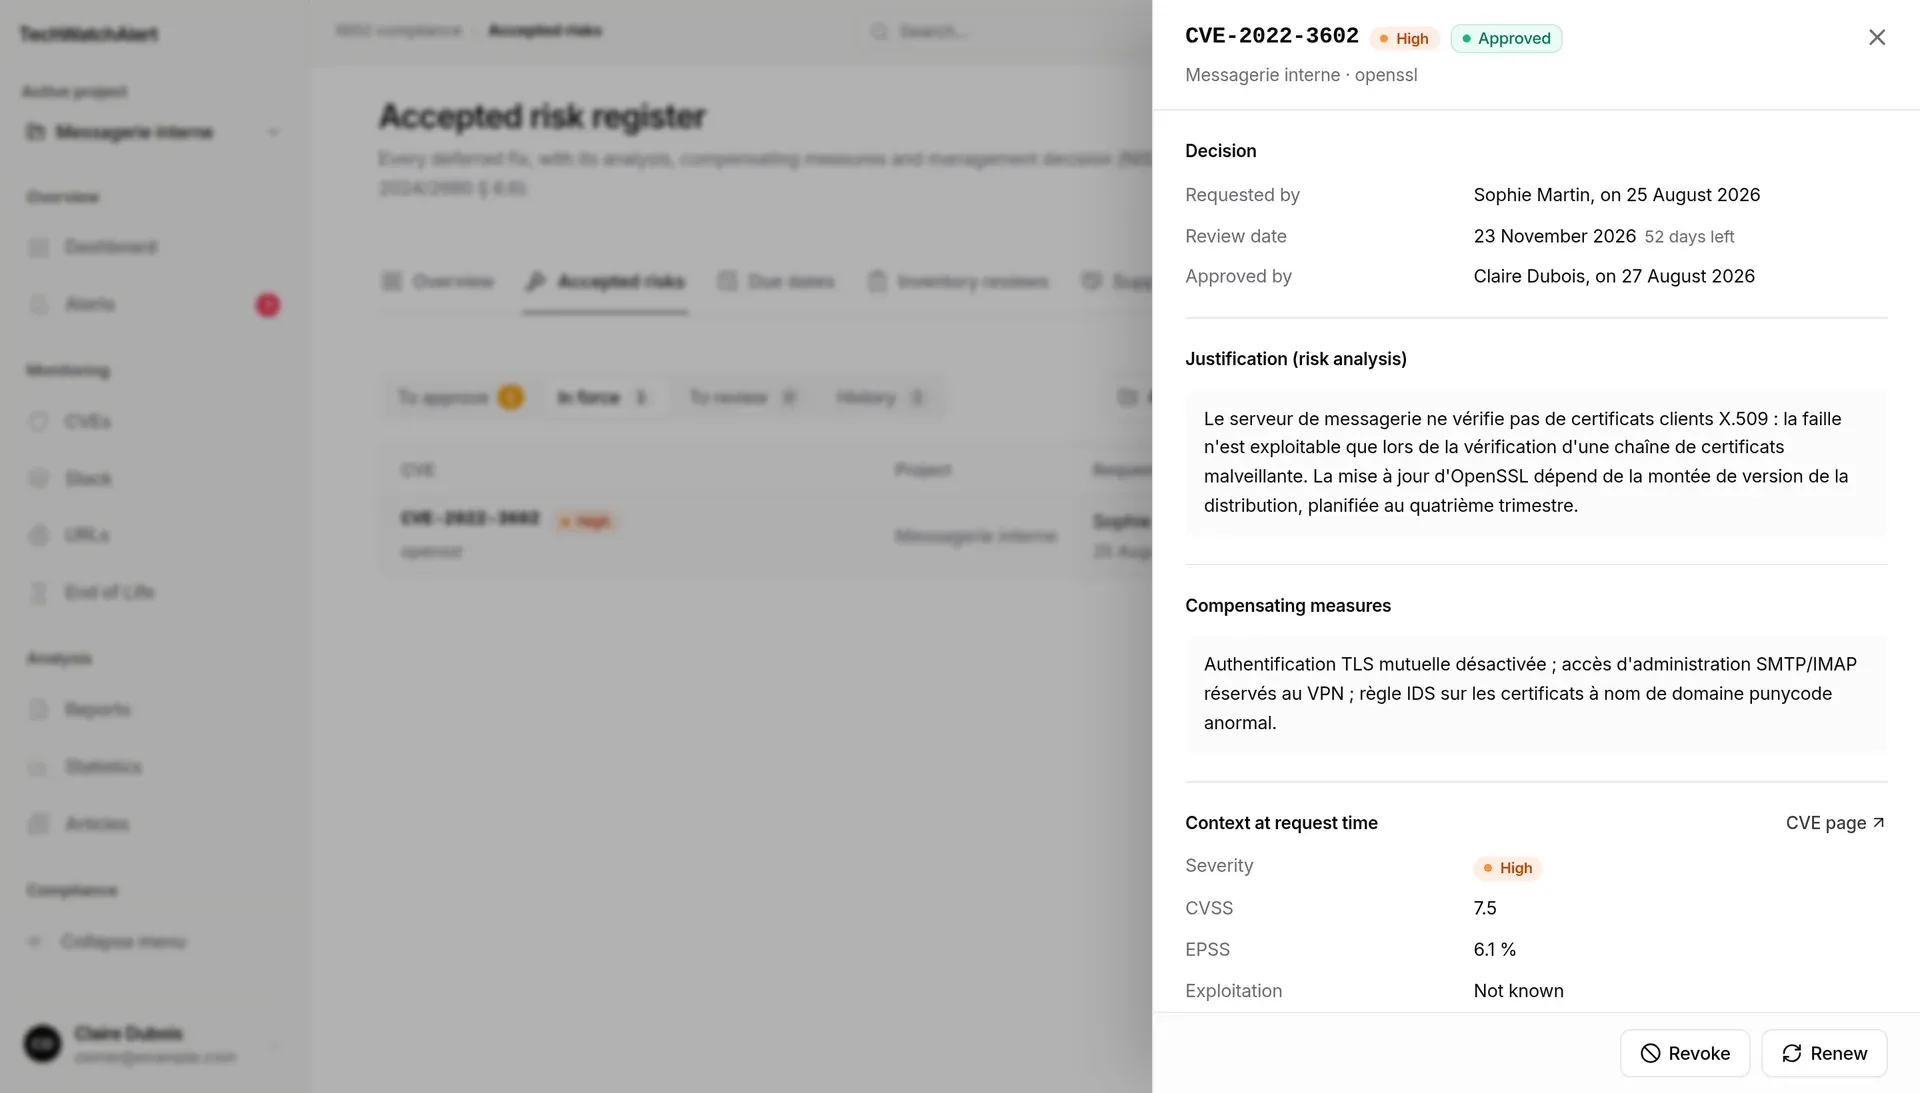
Section titled “Deciding: approve, refuse, revoke”Clicking a row opens the details: the decision (requester, review date, decision maker), the justification, the compensating measures, the context at request time (severity, CVSS, EPSS, exploitation, proof of concept, product), the renewal chain and the log. The footer buttons are the ones you are allowed to use.
| Status | Buttons | Who |
|---|---|---|
| Pending | Approve, Refuse | management, never the requester (unless they are the only member of management) |
| Pending | Withdraw my request | the requester |
| Approved | Revoke | management |
| Approved | Renew | anyone who can request an acceptance on the project, if no renewal is already pending |
| Expired | Renew | same, if no other acceptance is active for this CVE |
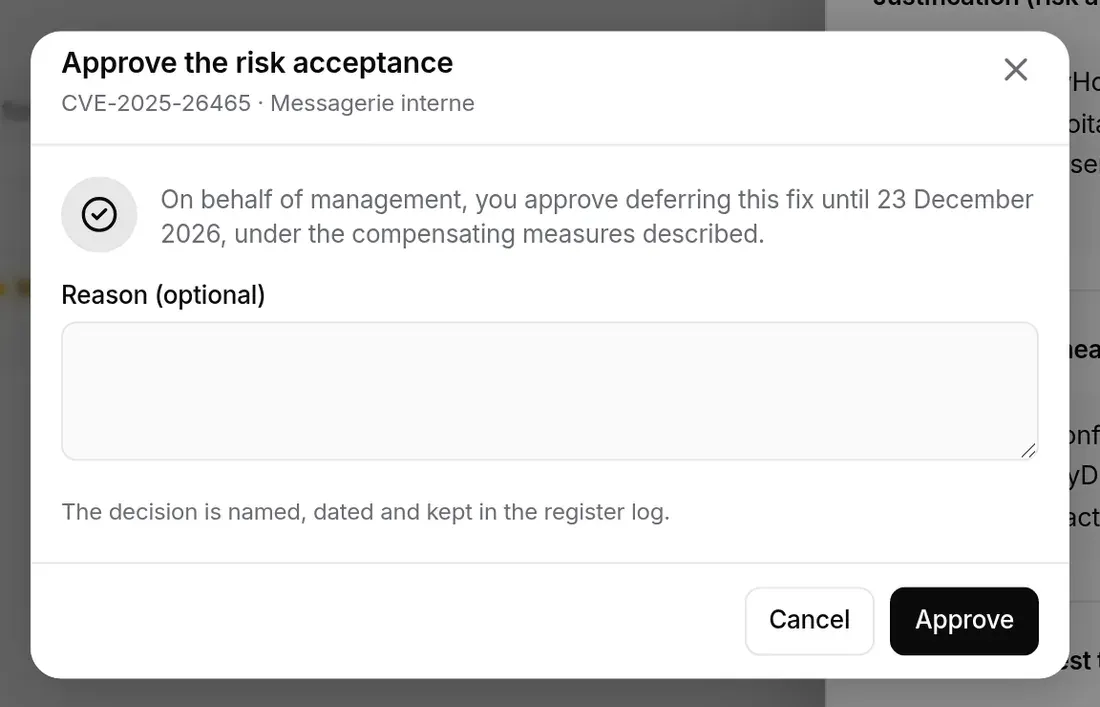
Each decision opens a confirmation window. The reason is optional to approve, required to refuse or revoke: it is sent to the requester and kept in the register. The decision is named, dated and kept in the log.
- Refuse: the requester’s case goes back to analysis; the CVE must still be fixed on time.
- Revoke: the acceptance ends immediately and the CVE is back under remediation deadlines.
- Withdraw: the request is withdrawn before any decision and the case goes back to analysis.
- Renew: creates a new, linked request; the acceptance in force remains valid until the decision and, once the renewal is approved, becomes “Superseded”.
Reminders and expiry
Section titled “Reminders and expiry”- At the end of the review day (Paris time), the acceptance expires: the CVE is back under due dates, the requester’s case is reopened and an “acceptance to review” notice is sent.
- 14 days before the review date, a reminder is sent.
- A request pending for 7 days triggers a reminder to management.
These notices go through the project’s NIS2 · Accepted risks workflow.
Exports
Section titled “Exports”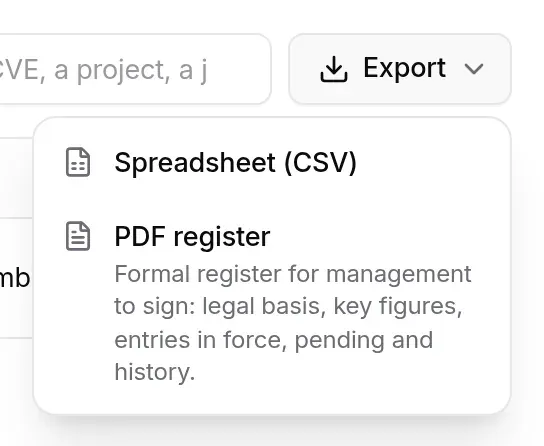
Export offers the Spreadsheet (CSV) and the PDF register, a “formal register for management to sign: legal basis, key figures, entries in force, pending and history”. Both follow the current project filter and search. If the server cannot produce the PDF, a message says so and suggests the CSV.
Exporting
Section titled “Exporting”Excel (the alerts’ Export (Excel) right, Analyst and above by default) downloads an .xlsx workbook: all the alerts of the active project, newest first, whatever the tab, search and filters on display, in batches of 2,500 rows. Up to 2,500 alerts, one click is enough; beyond that, the button offers the batches (“Rows 2,501 to 5,000”), one file each (alerts-2501-5000.xlsx). One row per alert. Columns: CVE, Project, Severity, Description, Vendor, Product, Status, Read (by you), Detected. The button is greyed out when there is nothing to export.
The export is included in the Team, Pro and Business plans. On Free, the button shows a padlock and opens the plan picker.
On a phone
Section titled “On a phone”The list becomes a stack of cards; the assignee’s initials follow the status. Under the title come the Current Alerts and History tabs, then the search, full width, and a toolbar that stays stuck to the top of the screen as you scroll: Filters (a badge gives the number of filters applied), the sort button, which shows the chosen order, and the range on display (“1–25 of 60”). Applied filters follow as chips, on a row that scrolls sideways and ends with Clear all.
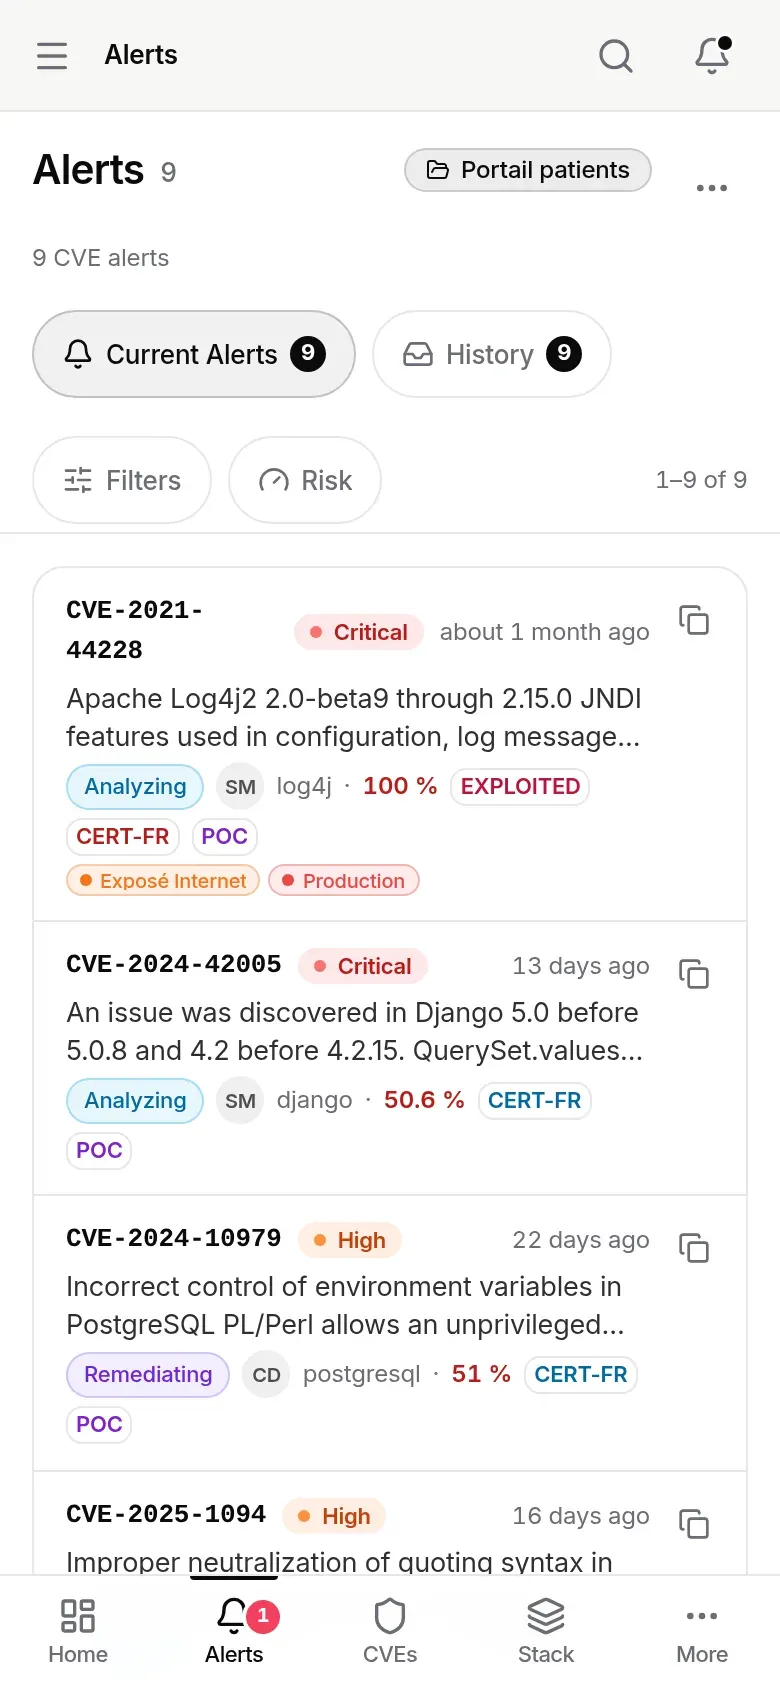
Filters opens a bottom sheet, closed by default: quick views, severity, the five exploitation signals, detection period, then Handling (status, case owner and Assigned to…, Unread, tags, linked ticket), Exploitation (exploit source, CERT advisories), Remediation (priority, fix, due date), Product, Scores and Dates. Each choice applies at once; the footer button (“Show 9 results”) closes the sheet, and Clear all removes every filter. The sort button opens the Sort by sheet (Recently published or Risk).
The header’s … opens the Actions sheet:
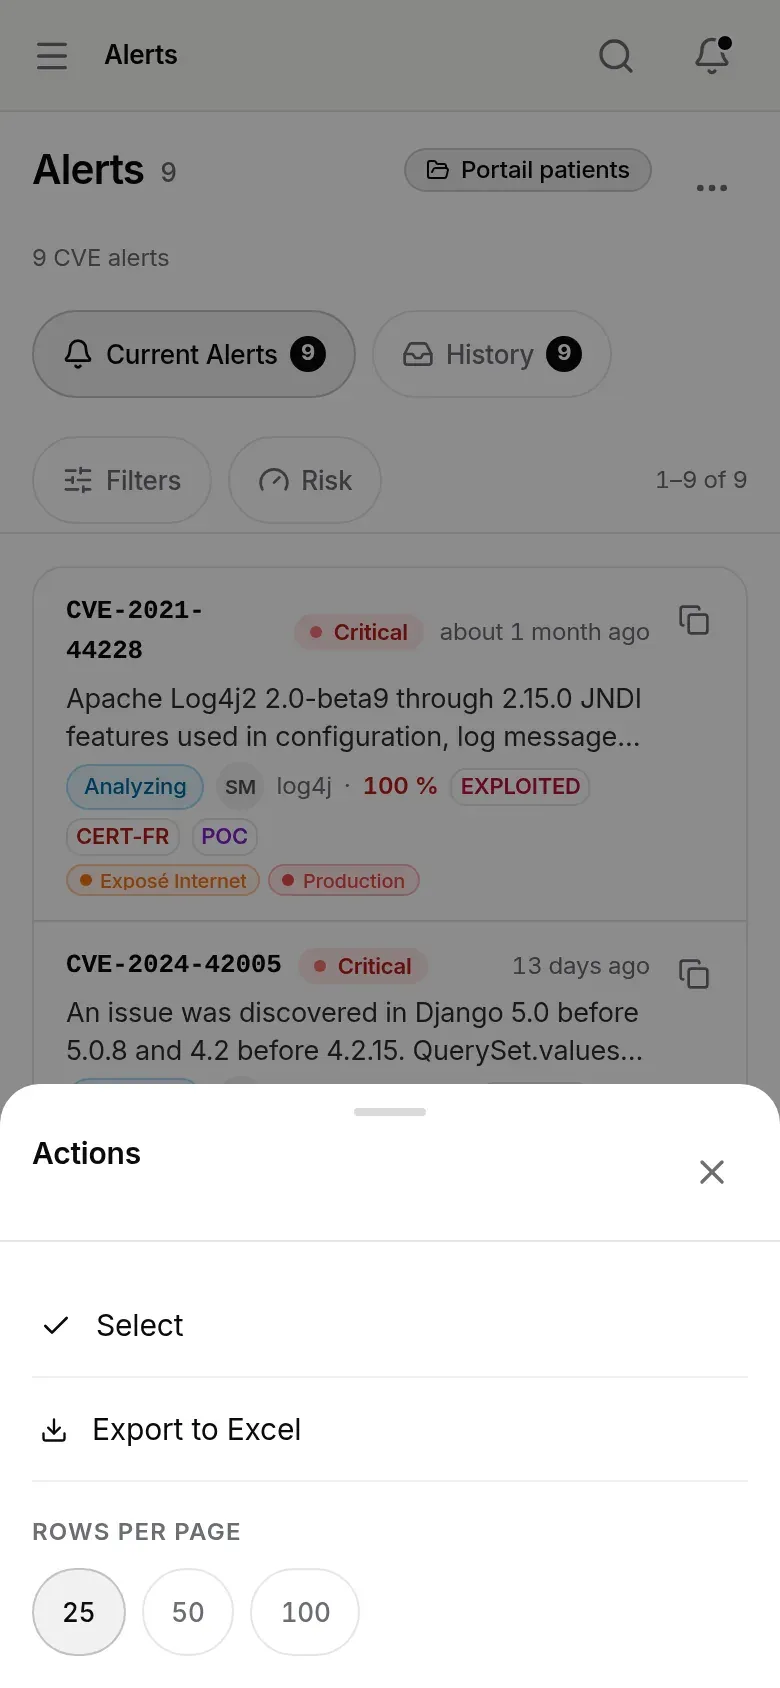
Multiple selection starts from … › Select, then a tap on each card; Select all ticks the whole page. The action bar, full width above the tabs, gives the number of chosen alerts and offers Change status and Assign, which open as bottom sheets. After a bulk status change, Undo restores the previous statuses for 9 seconds.
Permissions and plan
Section titled “Permissions and plan”| Action | Project role |
|---|---|
| View the list, filter, sort | User (the most restricted role) and above |
| Export to Excel (Team plans and above) | Analyst and above |
| Tick alerts, change their status (“Change status” right) or reopen them from History (“Reopen case” right) | Analyst and above |
| Assign alerts (right to edit cases, as on the record) | Analyst and above |
These are the default rights: a custom right of the member or their group also applies, Excel export included (see Team, roles and groups).
The tick boxes only appear when the action bar offers you at least one action (a status of the tab shown, or Assign): a User sees none. Handling cases (statuses, alert record) is part of the Team, Pro and Business plans.
Available depending on your plan
Section titled “Available depending on your plan”The Exceptions and By remediation action views each have their own plan feature, included in every plan by default. Outside the plan, the toggle carries a padlock: choosing it opens the subscription window, which says what the view brings and the plan that opens it; reached by address (?vue=exceptions, ?vue=gestes), the page presents the plan. Bulk actions in the by-remediation-action view also need case management (Team and above). See also: Subscription › pages, views and items.
Frequently asked questions
Section titled “Frequently asked questions”A CVE affects a product in the stack, but the project has no alert. Open the CVE in the CVE database: it may be below the project policy threshold, outside the version range declared in the stack, or set aside by a project exclusion rule (the Why this alert? panel on the CVE page says so), or the project’s monitoring workflow no longer creates a case. If the project has an alert for it, the Why this alert? panel on its record details each step.
A colleague has closed an alert: will I see it change? Yes. The case belongs to the project: its status, notes and comments are the same for everyone, and the record’s history says who made the change. Only the read or unread state is yours.
How do I find the alerts assigned to me?
The My assignments quick view, or Advanced filters › Case owner › Me. The /alerts?assignee=me address can be bookmarked; it is also the one behind the View my assignments link of bulk assignment emails.
Why does the export contain more rows than the screen? The export ignores the tab, the search and the filters: it contains all the alerts of the active project.